This article, "Rifleman Know-How: Scope Mounting Made Easy," appeared originally in the August 2006 issue of American Rifleman. To subscribe to the magazine, visit the NRA membership page and select American Rifleman as your member magazine.
Scopes are common fixtures on today’s hunting rifles, and one factor in how well they will perform is how they are installed. Mounting a scope on a rifle is not all that hard, and anyone who is reasonably handy can, with a minimum of tools, do it right. This is one of those projects that works as well on a kitchen table as it does in a fully equipped shop.
As with any job, it is important that you have the correct tools, starting with a good, multi-bit gunsmith screwdriver set. A gun vise is also handy to hold the rifle while you are working on it. Before mounting the scope, you should clean all the screw holes, contact surfaces, screws, rings and bases with a good spray degreaser.
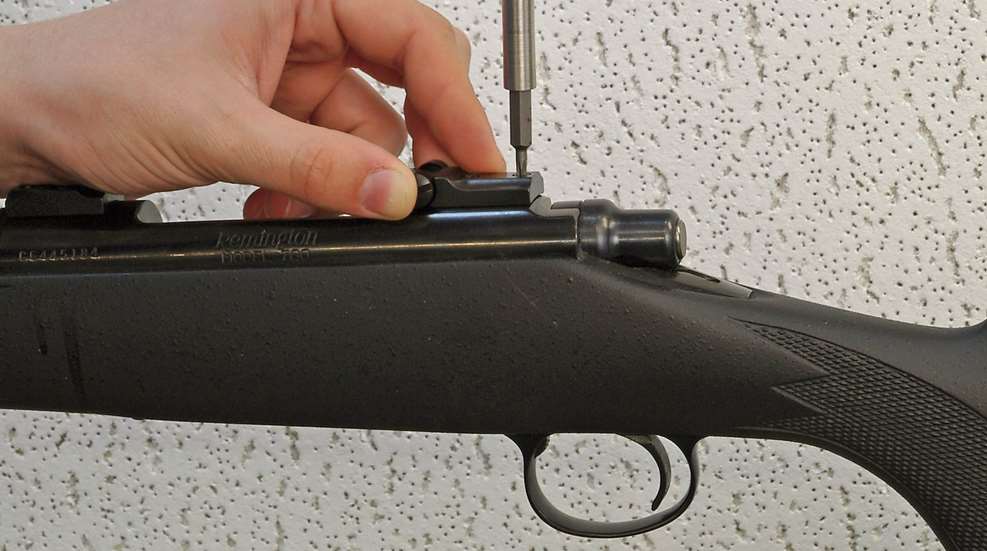
Mount the base or bases on the receiver of the rifle, making sure to use the correct screws in the proper holes, as some bases use different length screws for each of the holes. Leave all the screws loose and then tighten them one at a time, checking to see that the screw will tighten the base until you cannot move it. Then back out that screw and try the next one. This ensures that none of the screws are bottoming out instead of clamping the base. At the same time, make sure that none of the screws are projecting past the end of any open hole.
Put a drop of blue No. 242 Loctite on each screw before final installation. Once you are sure all the screws will tighten the base properly, snug them up. Move from front to back so that the screws will draw the base down smoothly and firmly. They need to be tight, but remember, these are small screws. Leupold recommends that 6-48 screws in a ring or base be tightened to 18 inch-pounds and 8-40 screws be tightened to 28 inch-pounds.
Now mount the rings on the bases. On dovetail turn-in type rings, add a bit more lubricating grease to the dovetail before installing the ring. Never use the scope to turn the ring into place. Instead use an appropriate-diameter bar or dowel or a ring wrench. If you use a bar, always have the top of the ring screwed on before you apply torque to avoid springing the bottom section of the ring, causing misalignment with the top.
Alignment and installation is much easier with the Wheeler Engineering Scope Ring Alignment and Lapping Kit. The first things you will need from this two-part kit are the scope alignment rods. These are pointed on one end and, after mounting one in each ring, are adjusted until the points are in perfect alignment. After the rings are aligned, switch to the lapping tool. Due to variances in manufacturing, there can be subtle differences between the front and rear rings. Lapping eliminates those differences and brings all the surfaces to the same plane. This improves the mounting job and adds to the gripping surface, which can be important for hard-recoiling guns. Lapping works best with steel, horizontally split rings.
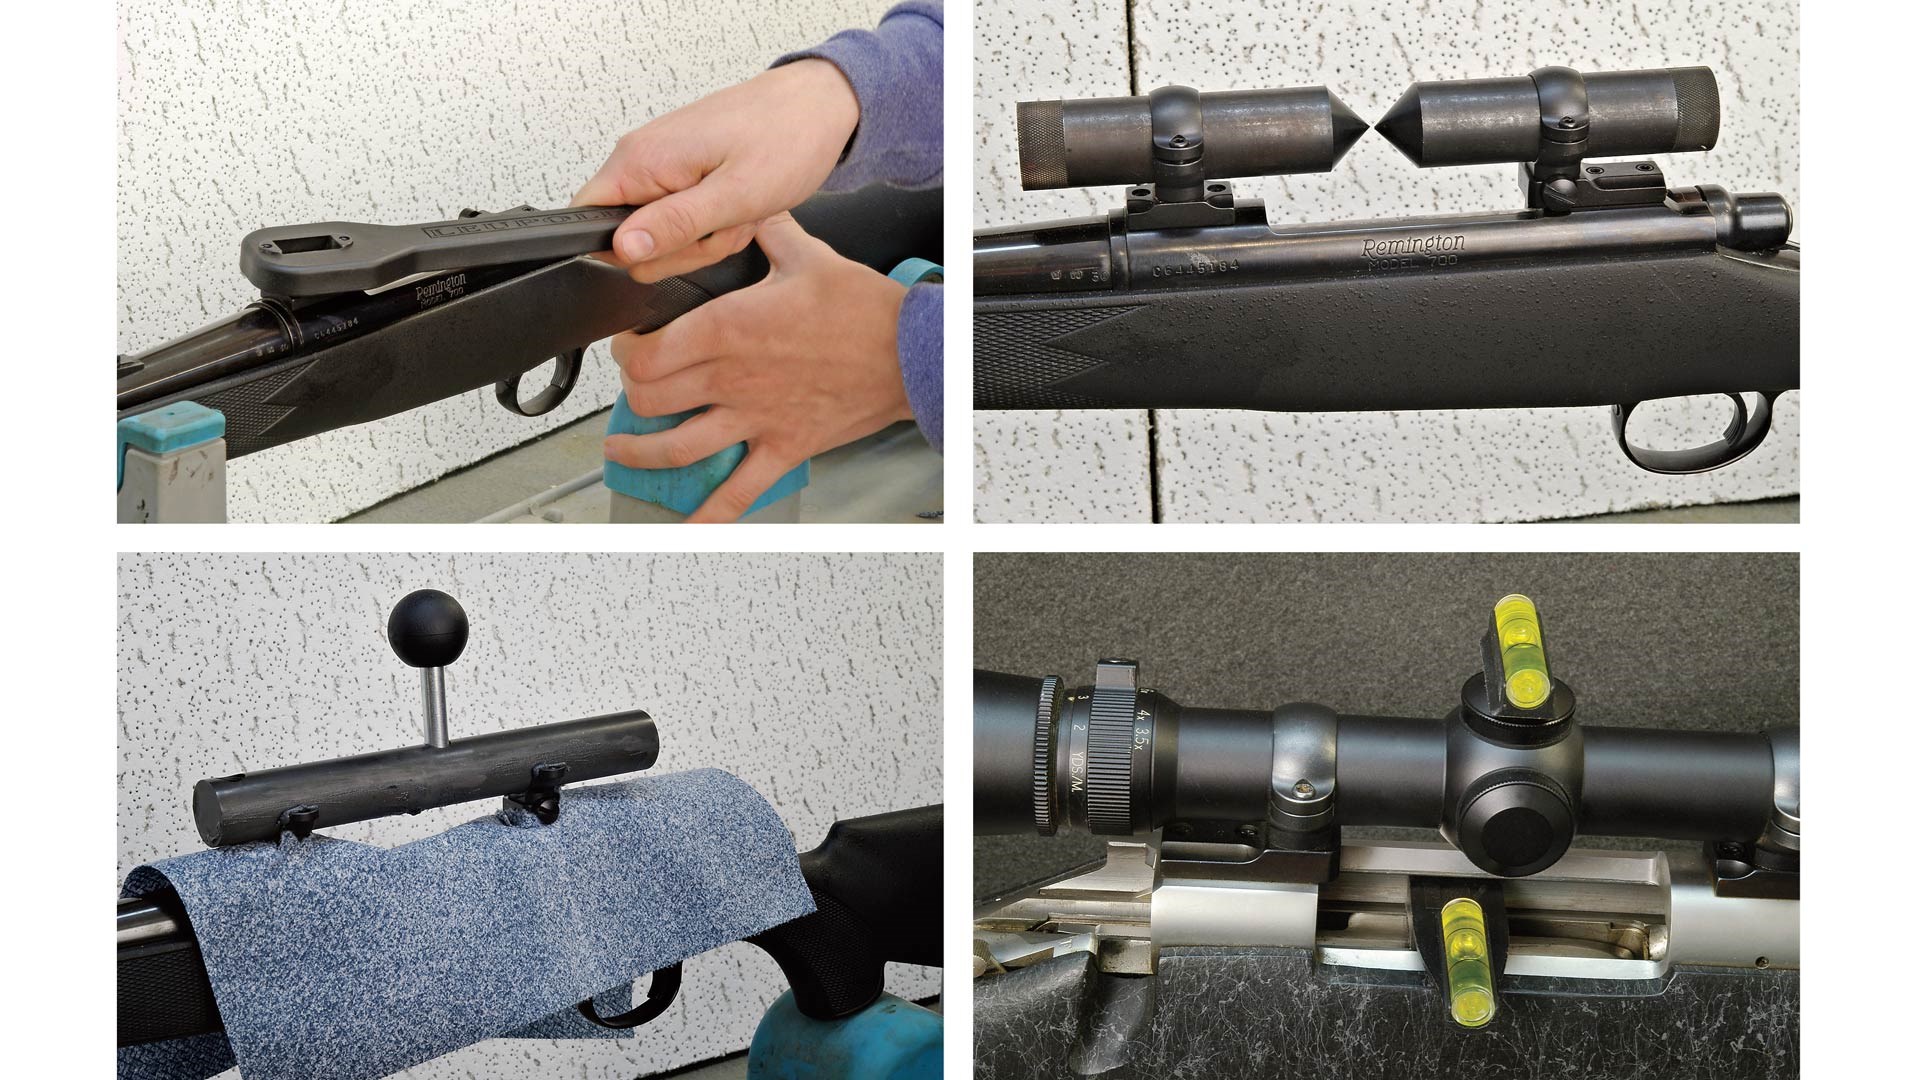
Given a few appropriate tools and a modicum of care, mounting a scope is not all that difficult. Steps include: tightening screws (top, single) individually to ensure that they draw down the bases firmly; (clockwise, above) turning in ring bottoms with a non-marring tool; assembling and aligning the rings; lapping the rings; and leveling the scope’s reticle.
Before lapping, I take a paper shop towel and make slots for the rings, then drape it over the gun to keep the abrasive out of the gun’s action. Coat the steel lapping rod with compound, and place it in both rings. Move the lapping tool back and forth while rotating slightly, and applying downward pressure. Check often to see how much of the ring is being lapped, and stop when you have at least 75 percent contact on both ring bases. More contact is better, but 100 percent is all but impossible, and you do not want to remove too much metal. Most sources say that it is not necessary to lap the tops of the rings as they are springy enough to compensate for slight misalignment.
On stainless steel rings, it is harder to see your progress, so before lapping them, coat the surface with Dykem layout fluid or a felt-tip marker. This will abrade away on the high spots, revealing the contact surface.
After completing lapping, clean the rings to remove any lapping compound. Place the scope in the rings, and tighten the screws until there is a little drag on the scope but it can still be moved. Keep the rings evenly tightened so that the gap between the top and bottom ring is equal on each side. Adjust the scope forward and back until the eye relief is correct for you. With a variable scope, make certain that you check it at both ends of the power spectrum. Remember to check eye-relief when dressed in hunting clothes, as setting the eye-relief in a T-shirt and then trying to shoot a buck next hunting season while bundled up in several layers of thick clothing may allow the buck to die of old age.
Sometimes there simply isn’t enough room to move the scope for the correct eye relief. The answer is an extension ring. This is a ring that is offset with an extension so that the ring will be in front of or behind the base. This allows more latitude for adjusting eye relief. Extension rings are also handy when the gun has a short receiver that puts the scope bases too close together or a long receiver where they are too far apart for the scope you want to mount.
Perhaps the most difficult part of mounting a riflescope is aligning the crosshairs. The vertical crosshair should be in line with the axis of the bore. The Reticle Leveler from Segway Industries indexes to a flat surface, usually on the scope-mount base, and allows alignment of the crosshairs with the bore. It is remarkably easy to use and surprisingly accurate. However, this tool will not work with guns or mounts that lack a flat surface that is square to the bore.
Another tool that works very well with most rifles is the Wheeler Engineering Level-Level-Level. This tool uses a magnetically attached level that indexes off the bolt rails in the action. Another level is placed on the top adjustment cap on the scope. When both are reading perfectly level, the scope is in alignment with the bore. It works very well on those rifles with accessible action rails.
When the crosshairs are aligned correctly, tighten the ring screws in an alternating pattern, left to right and front to back. Put some rust protection on the metal, bore sight the rifle and scope, and you are ready for the range.