Not long ago my eldest son was ready to graduate to a semi-automatic .22 LR rifle. He's the kind of kid who enjoys building, exploring and learning how things work. Instead of simply buying a rifle for him to use, I thought he would enjoy helping to build one himself—which he did!
For enthusiasts of any age who want some hands-on experience working on firearms, Ruger's 10/22 semi-automatic .22 LR carbines have a relatively simple design with fewer parts. They feature modular assemblies which are a snap to swap out or upgrade. This makes 10/22 pattern rimfires one of the easiest firearms to modify or build from scratch at home. These platforms are a true table-top build that can be completed using just a few simple, inexpensive tools with no gunsmithing required.
When I've pulled together other builds, such as an AR-15 or Glock pistol, I've found handy instructional books and online videos to help guide the process. However, I didn't find much for first-time 10/22 builders. The following information is comprised of two sections. The first is a walkthrough of the primary components of a 10/22 pattern rifle and the components that went into this particular build. It's followed by a step-by-step description of the rifle's assembly. This isn't a comprehensive guide to every possible configuration under the sun (there are quite a few of them), but you should come away with enough information to decide if this is a project you want to tackle.
Primary Components Walkthrough
Depending on the model and features, a 10/22 has between 14 and 16 major components held together with just a few pins and screws. The bolt assembly, trigger group and stock assembly are usually self-contained, modular units. Of course, these units can be broken down (the bolt contains seven parts and the trigger group around 27, depending on the make) and may need to be dismantled at some point in the future for repairs. But in most cases, it's not necessary to break down these modules in the course of a build. Numrich Gun Parts provides a useful exploded diagram of and components key to a typical, wood-stocked 10/22.
Because this is a rifle my son will inherit one day, I turned to manufacturers and component providers I trust. My goal was to build a 10/22 that could straddle range practice, small-game hunting and some competition roles in order to provide a lifetime of enjoyment.
Receiver Options
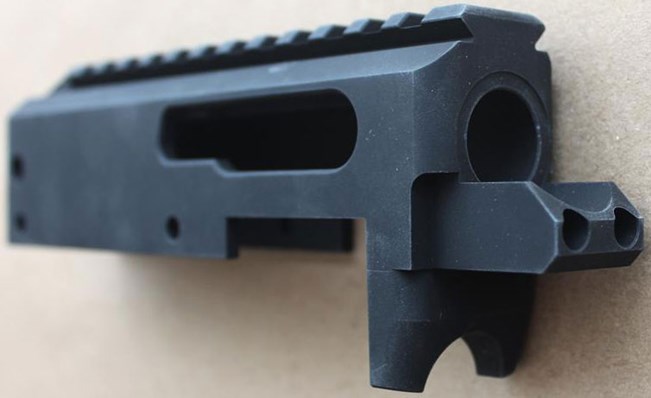
The receiver is the core component of this semi-automatic rifle that literally joins all the other parts together. It's the part that has a serial number, and the federal government legally considers it a “firearm” whether it's stripped down (like the receiver shown here), fitted with some parts or incorporated into a complete, ready-to-shoot rifle. This means receivers must be obtained through a federally licensed dealer with all of the same paperwork and related fees as a factory assembled firearm. All other 10/22 components can be purchased without a background check and shipped directly to your home or business.
As of this writing, Ruger does not sell stripped receivers. If you want a factory receiver, you have to buy a whole gun. Until recently, most of the stripped receivers available for at-home builders were high-end models from companies that specialize in custom competition rifles, including Tactical Solutions, Volquartsen Firearms and Tactical Innovations. They're terrific products that can cost anywhere from $150 to $550.
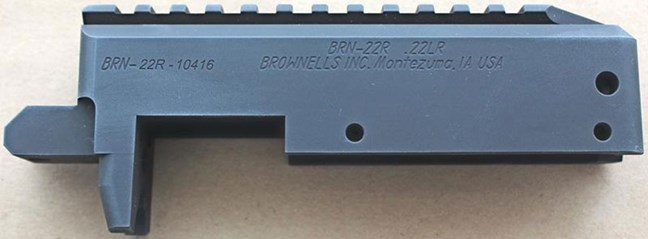
Last year, Brownells launched its in-house BRN-22 receivers for fixed-barrel 10/22 carbines. Machined from billets of 6061 T6 aluminum with a hard coat anodized finish, customers can choose from receivers with integral Picatinny optics rails (shown) or Standard models drilled and tapped to accept removable rails. For 2019, the company has added a third option for use with Ruger Takedown pattern barrels and stocks. BRN-22 prices start at $79.99 and the fixed-barrel receivers ship with a V-block and a pair of V-block mounting screws. The receiver I worked with demonstrated Brownells' typical top-notch craftsmanship inside and out, making it a rock solid value for hobbyists on a budget. These receivers are also available with factory -nstalled barrels. Brownells provides every other component needed to complete a 10/22 rifle, with options from a variety of manufacturers.
Selecting a Barrel
Ruger's typical factory barrels feature a reduced-weight tapered profile, integrated iron sights and the company's Standard chamber dimensions. Standard 10/22 chambers have been opened up in order to run reliably with the exceptionally broad variety of .22 LR loads on the U.S. market ranging, from bargain-priced bulk-box loads to premium competition-grade rounds. This chamber's configuration contributes to 10/22's reputation for eat-anything reliability. Tapered factory barrels are an affordable option well-suited to general-purpose plinking, target shooting and small-game hunting. They are usually outfitted with a set of iron sights at the factory. Generally speaking, the trade off for the reduced weight of the thinner barrel and relaxed chamber dimensions is a reduced degree of accuracy when compared to some more expensive competition-grade barrels on the market.
It's common for competition-grade 10/22 barrels to have Bentz chambers and bull-barrel profiles. Usually, but not always, the iron sights are omitted. Bentz chambers are considered “match grade” for semi-automatic rimfires. They are tighter than sporting-purpose Standard chambers but not quite as tight as the Match chambers reserved for bolt-action competition guns. Some barrels are threaded for muzzle accessories while others are not.
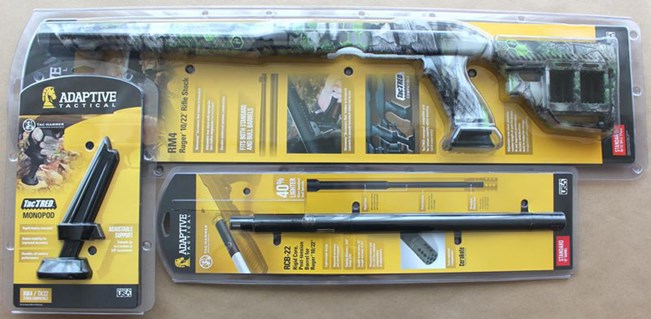
A 10/22 bull barrel usually has a consistent 0.920" diameter from the receiver to the muzzle. The purpose of this thicker profile is to reduce barrel flex under recoil for increased accuracy. Solid-steel bull barrels are sturdy and less expensive but relatively heavy. Milling flutes or custom contours into all-steel barrels reduces the weight while maintaining rigidity, but the barrels cost more due to the added machine work. The lightest bull barrels, which tend to cost more, feature a rigid core, post-tension mixed-materials construction with a carbon-fiber or aluminum sleeve, like the Adaptive Tactical Tac-Hammer barrel used for this build.

The Tac Hammer features a stepped P4140 Chromoly steel core with a Bentz chamber and rust-resistant coating. The 6061 aluminum shroud is available with a black or silver (shown) Cerakote finish. This combination of features provides the stiffness of a solid-steel bull barrel without the added the weight. The 1/2x28 TPI threaded muzzle is fitted with a jam nut (to secure the shroud) and a removable compensator (to learn more about muzzle devices, click here). Tac-Hammer barrels are available with or without a cantilevered optics rail. For this build I opted for the no-rail version because the BRN-22 already had one.
V-Block and Retention Screws
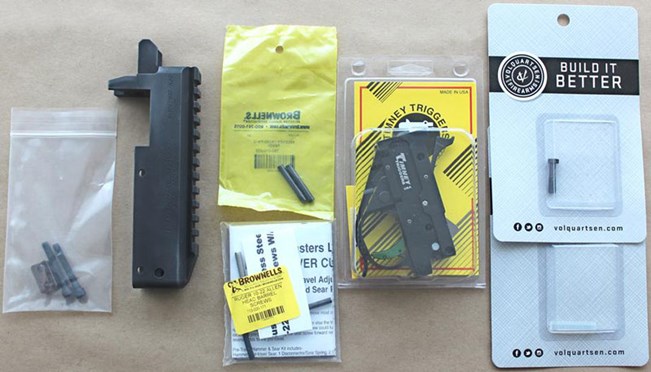
The barrel block, or V-block, secures a 10/22's barrel to the receiver via to retention screws. Factory-grade and competition-grade blocks are both readily available online. The retention screws are usually sold in pairs separately from the V-blocks. While the factory type blocks and screws will get the job done, I opted to upgrade to Tactical Solutions Performance V-Block and a pair of Brownells' Power Custom stainless-steel screws.
Bolts and Bolt Handle Assemblies
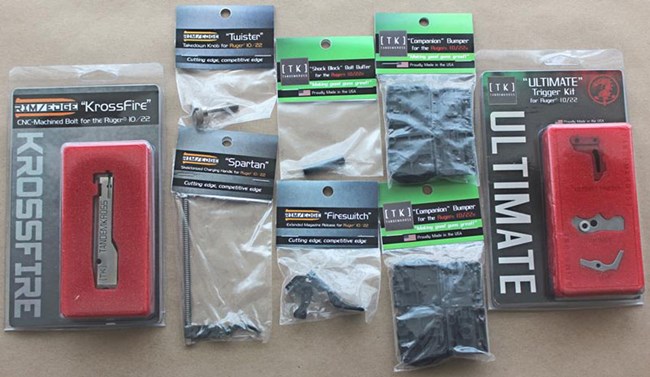
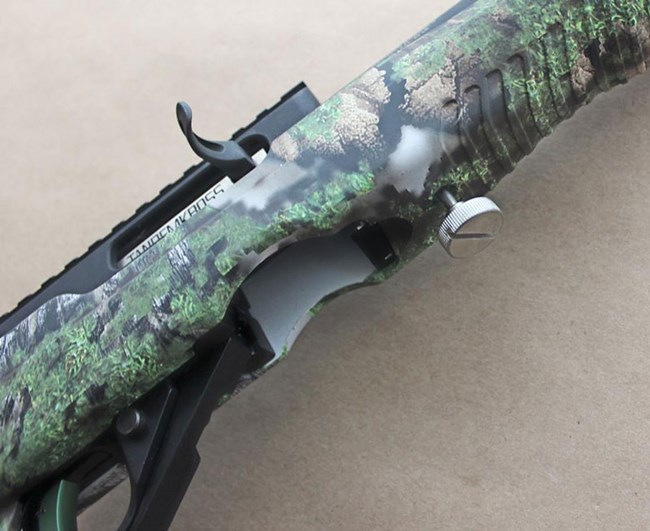
Bolt assemblies usually arrive with the spring-loaded firing pin and extractor installed. The bolt handle is normally sold as an assembly that includes the guide rod and a captured recoil spring. Factory-standard parts are available but this rifle was upgraded with a KrossFire CNC-Machined bolt and a Spartan Skeletonized bolt handle, both of which are made by Tandemkross.
Trigger Group
Much like 10/22 pattern receivers, it used to be that the only trigger groups on the market for at-home builds were premium competition models. Some of them are quite expensive. A few years ago, Ruger released the polymer-housed BX Trigger as an aftermarket upgrade. Often available for less than their suggested $89.95 retail price, the BX triggers I've worked with have a smooth 3-lbs. 7-oz. trigger pull and run as reliably as any other factory 10/22 trigger I've used.
Last year Tandemkross released a new product that reduces custom trigger costs called the Ultimate Trigger Kit (TK18N0304, $134.99). It ships with a competition-type flat face aluminum trigger, a stainless-steel hammer and other parts that can be used to rebuild a factory-standard trigger group for a much lighter, cleaner trigger pull of around 2 lbs.
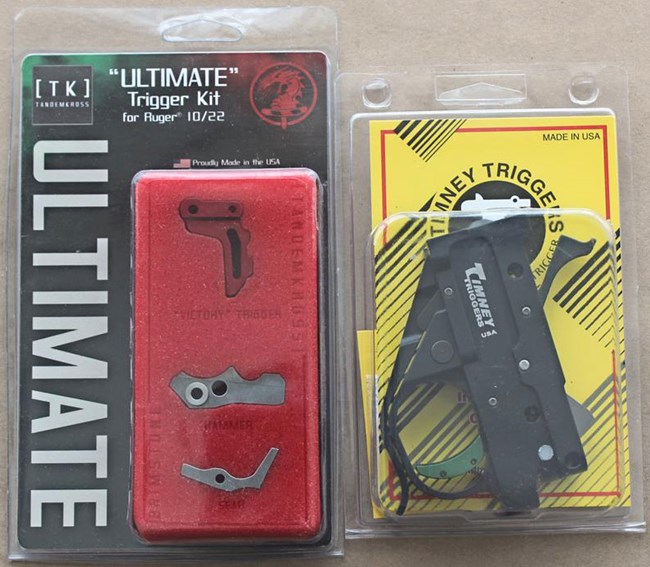
For this rifle I turned to Timney Triggers drop-in 10/22 assembly (1022-5C) with a black aluminum housing and a green-anodized aluminum trigger shoe. Out of the box, the trigger group exhibited a smooth, clean trigger pull of 2 lbs. 13 ozs. I have yet to meet a single Timney product I didn't like. I mean that literally. Every single product I've worked with over the last decade has operated flawlessly and either met or exceeded my expectations. It's a top-end trigger with a suggested retail price of $269.95 that will definitely pay for itself over time (and thanks for the Tootsie Pop; my son enjoyed it).
Receiver Pins, Bolt Stops and Takedown Screws
The 10/22 requires two steel receiver pins, a bolt-stop pin, and a takedown screw. The receiver pins secure and support the trigger group housing. The bolt stop rests in between the rear interior portion of the receiver and the bolt assembly. The bolt stop literally stops the bolt from slamming into the aluminum receiver as it cycles. Ruger factory assembled rifles ship with a steel bolt stop pin which should last the lifetime of the rifle but the steel-on-steel impact is a bit jerky.
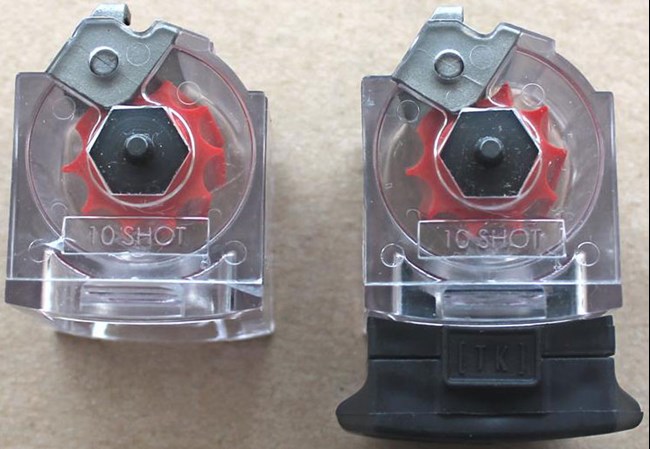
Competition and custom rifles are often outfitted with a hard rubber-like polymer rod instead of a steel bolt-stop pin. Referred to as a recoil buffer, like the black Tandemkross Shock Block Bolt Buffer (left) or the transparent Volquartsen Recoil Buffer Pin (right), the polymer softens the blow of the rearward moving bolt assembly. They can wear out over time, but they smooth out the feel of the recoiling rifle, and they're inexpensive and easy to replace.
When mixing components from various manufacturers you’ll occasionally run into parts that don’t quite fit together. In this case, it was the recoil buffer. I originally planned to install the Volquartsen buffer (it’s shown in various photos), but it turned out to be slightly too large for the ports in this particular receiver. No worries though, I’ve found it a home in another gun. It was replaced with the black Tandemkross Shock Block shown in other photos.
The takedown screw is located in the shoulder stock just in front of the magazine well. Its sole job is to secure the receiver to the shoulder stock. This screw is loosened, and the stock removed, for most maintenance and cleaning tasks with this rifle. Factory takedown screws are counter sunk with smaller heads for a flush fit to the stock. They can be removed with either a standard screwdriver or Allen key (hex wrench) depending on how they are configured. Tandemkross offers the oversized Twister Titanium Takedown Knob for easier, tool-less removal.
Shoulder Stocks
Just about every stock configuration and material type has been applied to the 10/22 at some point or another. Fixed, top-folding, side-folding, telescoping, bullpup, hardwoods, laminates, polymers and aluminum - the 10/22 has worn them all.
Rather than try to provide an exhaustive list of 10/22 stock possibilities here, I'll offer two pieces of advice. First, make sure the stock option you pick is compatible with the tapered or 0.920" bull-barrel profile you've selected. Second, look for a stock that fits your particular needs both aesthetically and mechanically. There's no reason to just settle for something you don’t want these days because there are so many options to choose from.
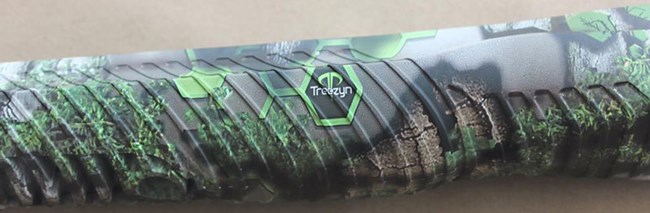
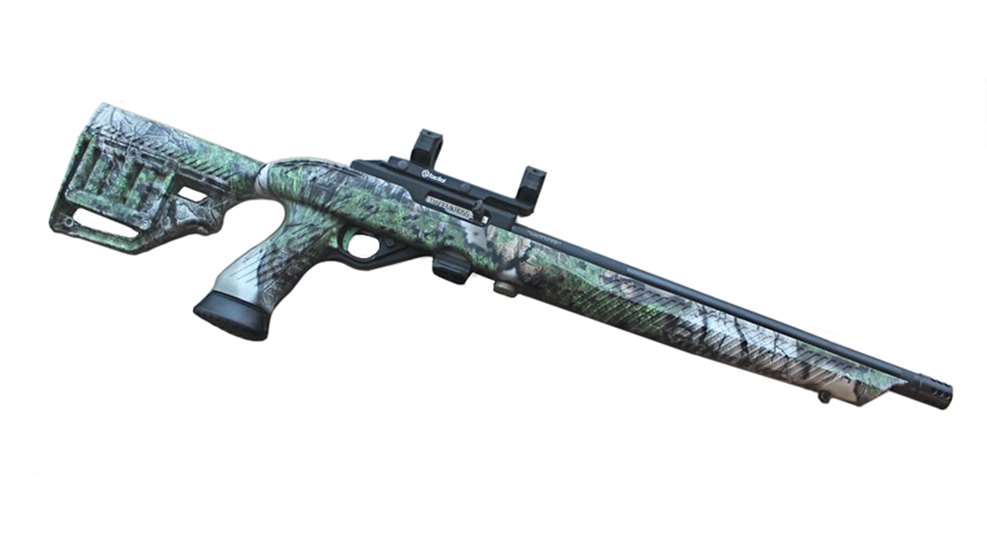
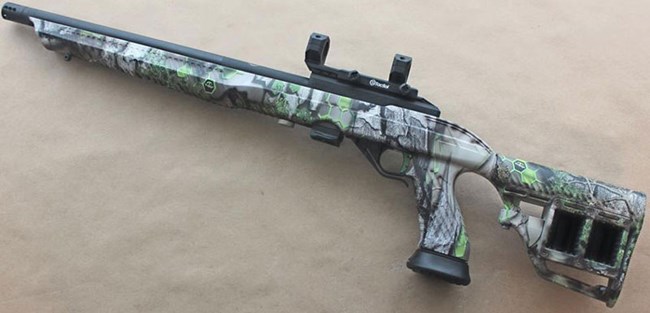
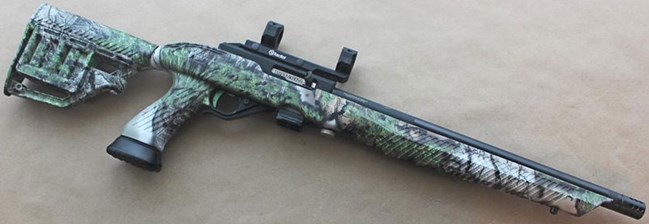
For this build I used an Adaptive Tactical RM4 stock with a new camouflage pattern which sports several desirable features suitable for a growing enthusiast. It has an eye catching appearance thanks to its sleek lines and modern styling. The new Treezyn Early Seezyn Camouflage boosts the cool factor with my son who really likes the blend of traditional forest elements and bright green hexagons.
The RM4's strong, but light, polymer construction is impact- and weather-resistant. It free floats either tapered or bull barrels. The adjustable shoulder stock allows for a length-of-pull ranging from 10.50" to 14.50", which fits most youth and adult shooters. The ergonomic pistol grip will accept the company’s ADTAC TacTRED monopod, which is designed to fit seamlessly with the base of the grip. Other features include a pair of sling-swivel studs, a reversible for-end accessory rail and two 10-round rotary magazine storage slots in the shoulder stock.
Magazine Releases and Magazines
Ruger's factory installed magazine release is usually a push-button type which is flush to the stock. For competition rifles, several companies offer extended, lever-type releases which are faster and easier to use, like the Tandemkross Fireswitch magazine release. In this case, the Timney trigger group included an extended release as one of its features, so no additional upgrade was required.
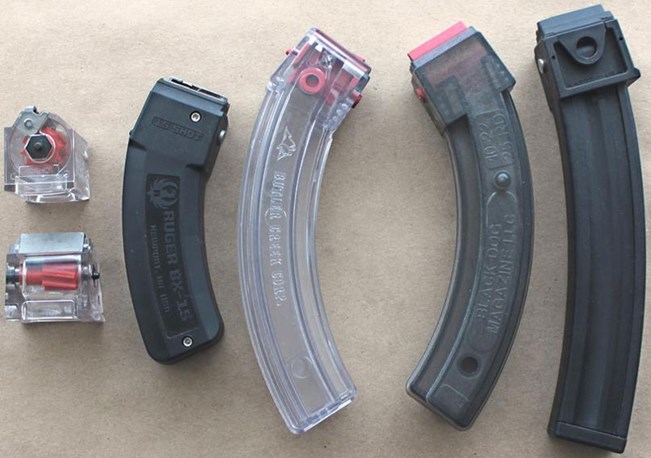
An entire cottage industry has been built around the marketing and sales of 10/22 aftermarket banana magazines and drums that hold 25 rounds or more. Ruger finally began offering in-house BX-15 and BX-25 extended magazines a few years ago that hold 15 or 25 rounds.
Ruger's original BX-10 rotary 10-round magazine fits flush to the stock and is available with either a black or transparent housing. Since this rifle is going to be used for training, I got two transparent BX-10s from Ruger to keep in the two storage compartments in the stock. These rubber-lined sockets are a snug fit so each magazine was fitted with a Tandemkross Companion bumper plate to make it easier for smaller hands to manage.
Scope Mounts and Optics
The two accessory categories where I see enthusiasts cheat themselves out of a positive shooting experience on a regular basis are handgun holsters and rifle optics. If you buy a $1500 pistol and then cram it into a dog-eared, $6.95 holster pulled out of the bottom of the dusty old used bits bin at your local shop, it won't be the pistol's fault if it doesn't ride comfortably on your hip.
It's the same with rifle optics and scope mounts—you get what you pay for. I'm not saying you have to break the bank in order to purchase a solid set up. But in my experience, the least expensive options are rarely a good investment.
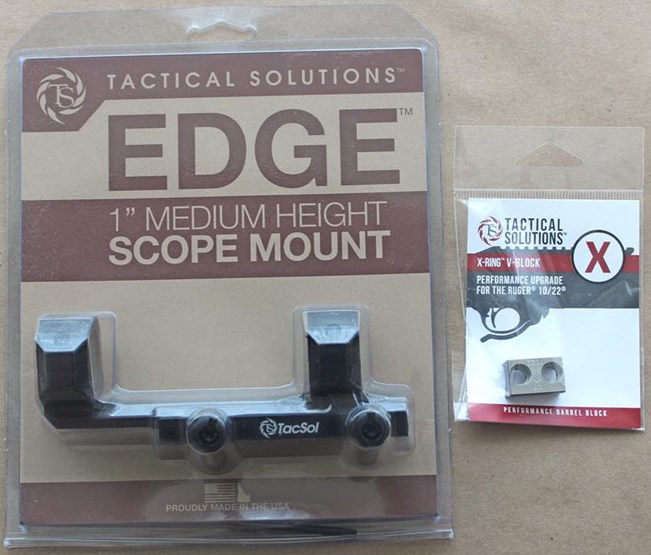
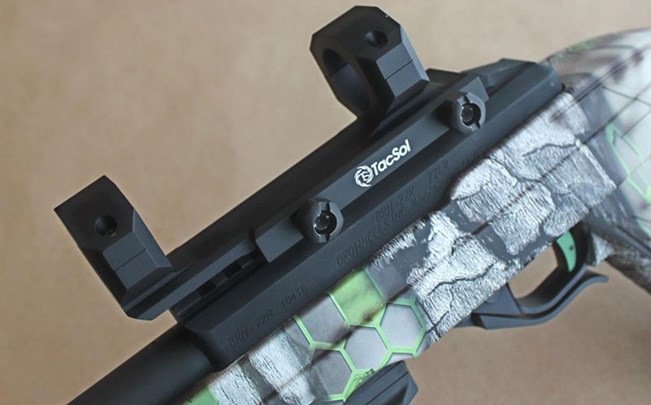
Although I was still working on a scope when this build was completed, my son's rifle is going to be outfitted with a top-notch Tactical Solutions 1" ring, medium-height one-piece mount. Milled from 6061-T6 aluminum and given a hard-coat anodized finish, this mount clamps securely to full-length Picatinny rails. Paired with a quality, multi-purpose 3-9x40 mm sporting optic, this mount can comfortably ride on a 10/22 or move over to a center-fire rifle when he's ready to graduate.
Assembling the Rifle
Putting together a 10/22 is a table-top build, meaning no special shop equipment or tools (vices, armorer's wrenches, grinders) are required to complete the project. A set of standard Allen keys (hex wrenches) and a couple of screwdrivers should do the trick. Clear off and clean your work surface. You may want to cover it with butcher paper or a blanket to protect the surface and a small container or a small hand towel can be helpful in preventing small parts from rolling away.
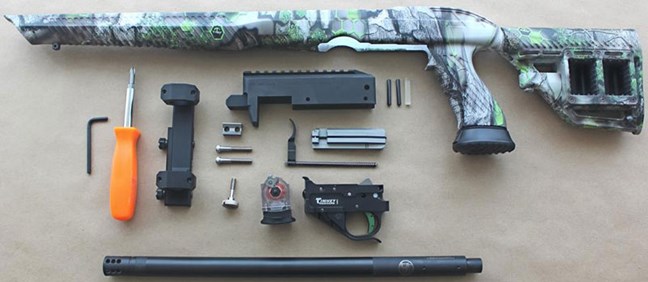
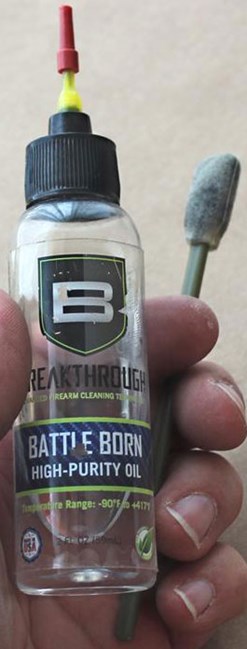
Inspect all of the components for any flaws or damage. Verify that you have all the parts and tools in order and read through any instructions provided with the components before you begin. I like to keep a bottle of light gun oil on hand to help ease tight-fitting components together and to lubricate the moving parts as they are assembled. This allows the rifle to be range ready once it’s completed. Don't forget to wear safety glasses while working.
Step 1: Attach the Barrel
For this step you will need the stripped receiver, barrel, V-block and the pair of V-block screws.
Insert the chamber end of the barrel into the receiver. Ensure the barrel’s notch is aligned with the V-block mount.
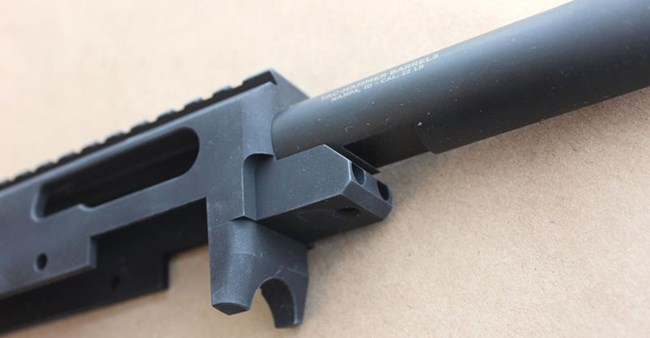
With the V-block in proper alignment (an arrow tells you which end is up), drive in the two support screws using an Allen key.
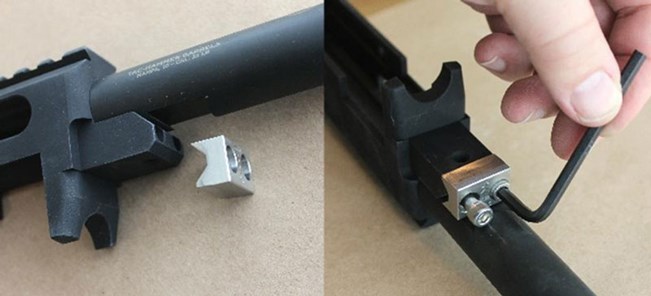
Once assembled, the barrel, V-block and the support screws remain attached to the receiver unless they need to be replaced.

Step 2: Install the Bolt Assembly
This step requires the complete bolt assembly, bolt-handle assembly and either a steel bolt-stop pin or a polymer recoil buffer rod.
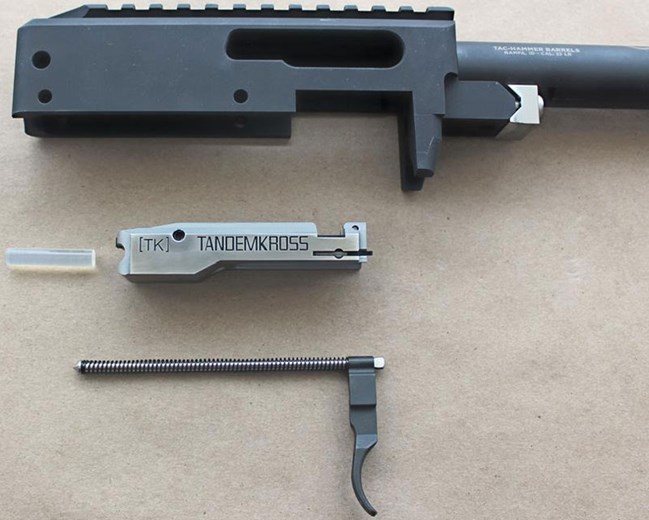
Rotate the receiver so that the open side is facing upwards. Insert the bolt-handle assembly into the receiver though the ejection port with the rounded tip of the guide rod pressed into the support notch located on the closed side of the receiver.
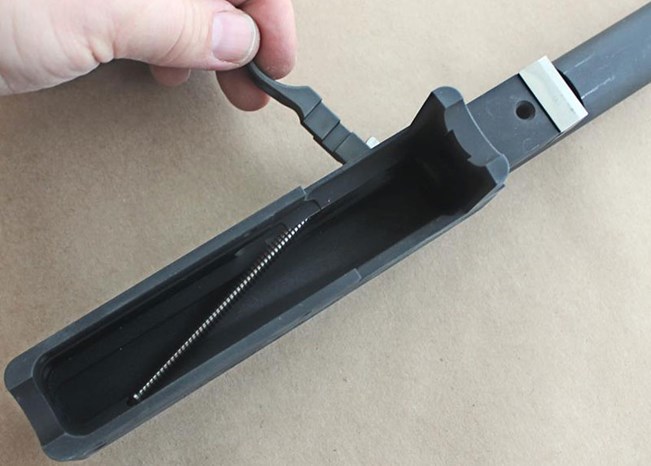
Pull the charging handle back as shown. Drop in the bolt at the rear of the receiver with the extractor pointed towards the barrel. Make sure it's properly aligned with the receiver rails and the bolt handle assembly. Slowly release the bolt handle allowing the bolt to move forward into the closed position.
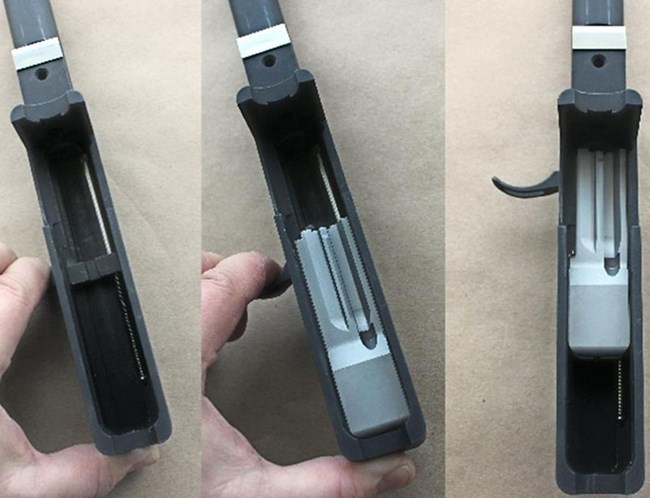
Rotate the receiver onto its left side (bolt handle up) and insert either a bolt pin or a recoil buffer rod into the upper opening located at the rear of the receiver.
Some buffers are slightly larger than the port and may require a bit of gun oil and elbow grease to insert.

Step 3: Install the Trigger Assembly
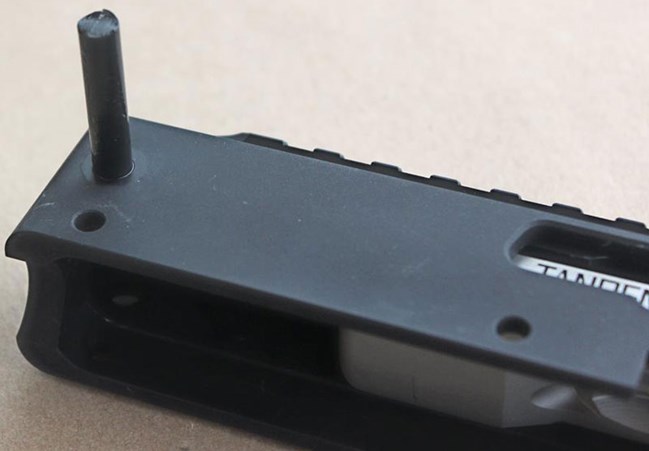
This step calls for the complete trigger group and the two steel receiver pins. The trigger group's hammer should be cocked and the safety engaged.
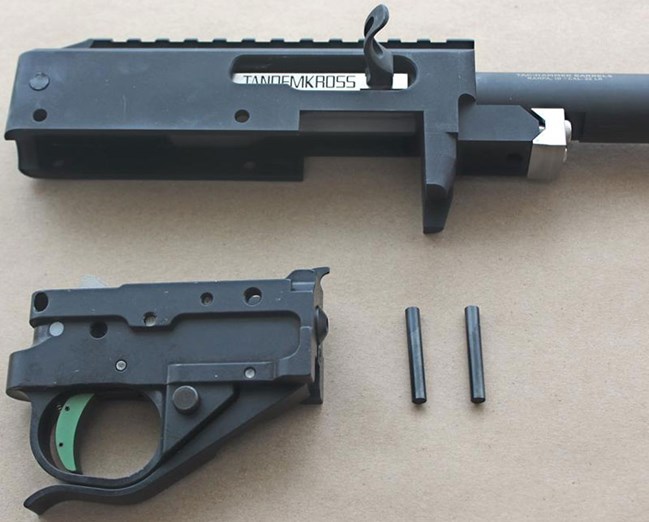
Insert the trigger group into the receiver and then press in the two receiver pins. The pins should slide into place without the need for tapping or hammering.
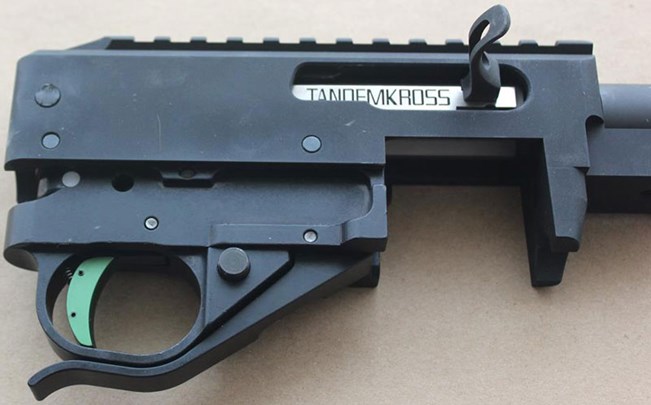
If the pins are tight or won't slide in easily, double check the alignment of the trigger group. It should be noted that these pins have a tendency to fall out when the receiver is moved around outside of the shoulder stock.

Step 4: Attach the Stock
A barreled 10/22 receiver with a trigger group in place does not drop directly into the shoulder stock. Note the gap inbetween the rear of the receiver and the back end of the trigger group. That gap locks into a stabilizing ledge located inside the stock.
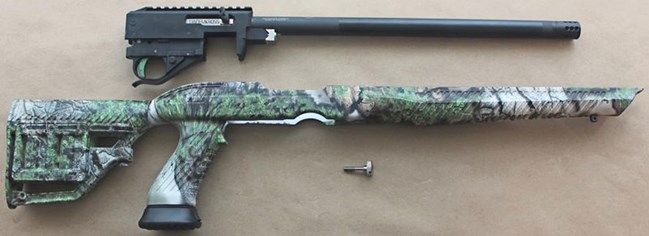
Lower the receiver down into the stock at an angle (muzzle up). One the receiver is aligned with that ledge, press the receiver and barrel down into the stock. Drive in the stock screw until it is firmly tightened, but not gorilla tight (there's a risk of stripping out the screw).
Step 5: Bench Checks, Optics and Clean Up
With the rifle fully assembled, lubricated and no ammunition in or anywhere near the gun, conduct a series of bench checks to ensure all of the controls and features are operating properly. Cycle the bolt, engage the safety, insert and remove magazines, etc. If you are going to install an optic, now is the time to do it. As with any firearm build, make sure to carefully store any small leftover parts and instruction sheets provided with the components for future use.
If at any point the rifle does not seem to be coming together correctly or there are mechanical issues you don't know how to resolve, then stop the build. Gather up what you have and seek out the assistance of a qualified gunsmith. Safety is the number one priority, which means a gun should not be fired unless you know it's in proper working order.
Parting Thoughts
After building the rifle shown here and running a set of bench checks, I broke it back down and invited my son to join me at the table. He thought he was just pitching in for an article. Imagine his surprise when we finished the rifle and I told him this would be his rifle to practice with now and to inherit when he's old enough to own it. That was one happy kid. I entertained visions of shooting with my grandchildren some day, just as my father spends time at the range with his.
Building a 10/22 with a friend or family member is something both of you will remember for years to come. If a high-end, competition-grade build is not your cup of tea, there are other ways to conduct a build together. Break down a new off-the-rack rifle. Basic factory models have suggested retail prices from $309 to $399. Or, rescue a used 10/22 from a local dealer. The price of the project is not the point. The time spent together as friends and family, and the pride of ownership that comes with doing it yourself, are what a build like this is all about.
Specifications:
Manufacturer: At-Home Custom Build
Model: Ruger 10/22 Pattern Fixed-Barrel Carbine
Action: Blowback-Operated Semi-Automatic
Caliber: .22 Long Rifle
Receiver: Brownells Stripped BRN-22 (BRORUG1022PT001) $89.99
Optics Rail: Integral
Receiver Cross Pins (2): Brownells Ruger Factory (#B5) $4.99
Recoil Buffer: Tandemkross Shock Block Bolt Buffer $4.99
Bolt Assembly: Tandemkross KrossFire CNC-Machined $119.99
Charging Handle: Tandemkross Spartan Skeletonized $24.99
Barrel: Adaptive Tactical 16" Tac-Hammer $299.99
Muzzle: ½ x 28 TPI Threading With Muzzle Brake
Barrel Band with Screw: None
V-Block Barrel Retainer: Tactical Solutions Performance Accessory V-Block $20
V-Block Screws (2): Brownells -Power Custom Allen Head Stainless (713-000-171WB) $19.99
Trigger Group: Timney Triggers 10/22, Black Aluminum Housing, Green Shoe (1022-5C) $269.95
Trigger Pull: 2 lbs. 12 ozs. Listed, 2 lbs. 13 ozs. As Tested
Shoulder Stock: Adaptive Tactical RM4 Adjustable, Treezyn Early Seezyn Camouflage $134.99
Grip-Mounted Monopod: Adaptive Tactical TacTRED $39.99
Takedown Screw: Tandemkross Twister Titanium Takedown Knob $24.99
Magazines: Ruger 10-Round Rotary, Clear (#90223) $24.95
Magazine Extensions: Tandemkross Companion Bumpers (TK18N0036BLK1) $21.99 Per Pair
Sights: None
Overall Length: 32.50" Collapsed, 36.50" Extended
Length of Pull (LOP): 10.50" to 14.50"
Trigger Pull: 2 lbs. 13 ozs. (As Tested)
Weight: 5 lbs. 14 ozs. without Optic or Magazine
Capacity: Accepts 10/22-Type Magazines
Twist: 1:16” RH
Grooves: Six
Scope Mount: Tactical Solutions Edge 1" One-Piece Scope Mount $99
Finished Rifle Suggested Retail: $1222.78 (Excluding Shipping, Taxes and Labor)