The Glock semi-automatic pistol's simplicity and reliability has made it one of the most popular polymer framed, striker-fired handguns in the world. This semi-automatic also enjoys a high degree of modularity with a broad selection of drop-in components from dozens of manufactures. This has made it a favorite option for at-home builds, caliber conversions and do-it-yourself customizations.

If you are considering taking the make-a-Glock plunge, here are a few handy tips to keep in mind and a complete walkthrough of building a Glockmeister custom Gen 4 G40 10 mm pistol from scratch. Despite the variety of upgrades included in this build, the assembly process is the same as an off-the rack pistol.
Identify the Pistol's Primary Purpose
An at-home firearm build project should begin with careful consideration of how the gun will be used most of the time. Generally speaking, the features of modern guns are specialized for recreational target shooting, self-defense, hunting and competition. Although Glock's various models may appear to be clones of each other due to their nearly identical controls and cosmetics, the company has successfully stretched and compressed its signature Safe-action design to accommodate center-fire pistol calibers ranging from .380 ACP to 10 mm Auto in order to fill a variety of shooting rolls.
The single-stack Slimline and double-stack Subcompact models are built specifically for use as daily concealed-carry and back-up guns. The Compact line splits the difference in size and ammunition capacity between the Subcompact and Standard lines making them small enough to conceal yet comfortable to shoot. The Standard pistols were designed with 4.48" barrels and full-size grips for military and law enforcement applications. The Competition models, also known as the 'Practical Tacticals', are built with Standard frames and fitted with a 5.31" barrels and a weight reduced slides. The Longslide models, including the G40 shown here, sport 6.02" barrels and full-weight extended slides for handgun hunting.
Factory finished (complete) frames are serial numbered and considered by the U.S. government to be a "gun" no matter the condition they are in when shipped. Stripped bare, partially assembled or incorporated into a complete pistol, a serial numbered frame must be transferred via an FFL dealer with the accompanying paperwork and fees. The rest of the pistol's components, include the slide, barrel and magazines, can be shipped directly to your home or business. For the sake of this walk-through, a Glock factory frame is used as the foundation for the build.
Mind the Generation Gap
Before purchasing any components, assemblies or kits, make sure they are compatible with the model you’re building. Glock pistols have been in production since 1982 and have been subjected to a variety of changes, updates and caliber introductions over the years. The major shifts in pistol configurations are grouped by Generation. Although some Gen 1 and Gen 2 pistols are still in service, you won't find much in the way of aftermarket parts or customizations for them.
The Gen 3 line was launched in 1998 and remains in production today. Just about anything you could want for a Gen 3 pistol is currently available. The Gen 4 pistols began shipping in 2010 and the market has caught up to them with a selection of parts and upgrades almost on par with the Gen 3 offerings. The Gen 5 pistols, which are based on the M-series models designed for the FBI, have only been on the market since August of last year, so they are essentially still brand new.
In short, if you want to build a pistol at home in the near future, you'll most likely be working around a Gen 3 or Gen 4 compatible frame with parts to match. Pay attention close attention to the cartridge designations as well. Key components, including the magazines, recoil springs and extractor plunger assemblies are specialized for particular calibers. Installing the wrong parts for your generation or caliber can cause anything from an inconvenient malfunction to permanent damage to the pistol.
Selecting a Recoil Assembly
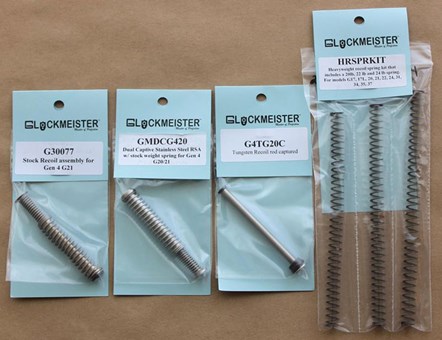
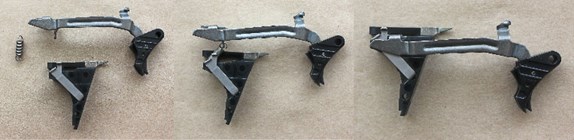
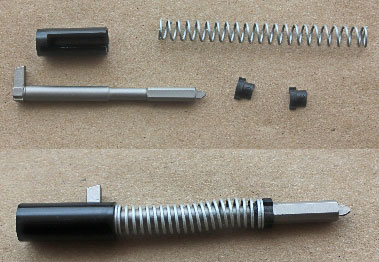
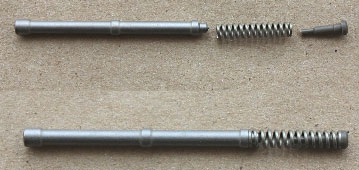
There’s certainly nothing wrong with using a stock Glock recoil assembly like the Gen 4 dual spring model (left) built around a polymer guide rod and sheet steel supports. In the case of the G40 10 mm, the factory assembly provides 17 lbs. of resistance. Because the 10 mm operates at higher pressures than other cartridges, some folk choose to upgrade to a sturdier model like the Glockmeister RSA assembly (center) which employs a stainless steel guide rod with machined stainless steel supports. For competitors, hunters and handloaders, a single-spring Tungsten guide rod with interchangeable springs (right) is a useful option. The added weight of the Tungsten works to reduce muzzle flip while the springs can be trade out to tune the level of resistance to suit a particular load of ammunition. The springs shown here provide 20 lbs., 22 lbs. or 24 lbs. of resistance to help reduced the wear and tear cause by shooting hot and extra hot 10 mm loads.
Setting Your Sights
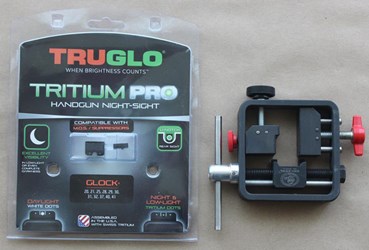
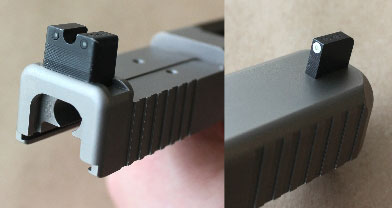
Installing Glock-type sights can be a bit of a challenge. Front sights are pinned in place or attached via a tiny 3/16 hex nut, depending on the make and model of the sight system. The rear sight must be pressed into a dovetail slot milled into the slide using a specialized sight pusher tool like the now discontinued Kaiser Shooting Uni 200l sight tool shown here.
Home builders have essentially three options for installing sights:
- Purchase rear sight tool (between $50 to $150) along with a front sight tool (around $10) and install the sights yourself.
- Pay a service fee to the company providing the components to have the sights installed before the slide is shipped.
- Take the sights and slide to a local Glock certified gunsmith for installation.
The advantage of spending the money on the sight installation tools is that you’ll have them on hand for future sight swaps or adjustments. In this case, the extra tall TRUGLO rear sight designed for use with red dot optics and sound suppressors was not compatible with the UNI pusher I had in my tool box. So a trusted local gunsmith took 20 minutes and $20 to install the front and rear sights with the advice that I wait a few hours before firing the gun so that the thread locking compound applied to the front sight could cure properly.
Tools and Instructional Resources
Assembling a Glock pistol from scratch is a true table top project. No vices, power tools, hydraulic presses, hammers or specialized support blocks are required. The gun literally slides and snaps together using a Glock Armorers Disassembly Tool (or a Glock Tool for short), which is essentially a pin punch with a polymer handle, accomplishing most of the tasks. A pair of house hold needle nose pliers and a small standard screwdriver come in handy (but are not necessary) for installing the magazine release. The wrenches and hardware required for installing and adjusting a red dot optic using the Glock MOS system can be found in the Adapter kit or with the optic itself. Remember to wear a pair of safety glasses just in case you unintentionally launch a spring during the build (like I did).
As with any other popular do-it-yourself firearms project, a wide variety of instructional resources are available ranging from $1,200 online gunsmithing courses to free-of-charge YouTube videos. Glock provides an excellent technical manual for those who sign up for the company's Certified Armorer's Course, which usually costs around $250 to attend. I took the course a few years ago and enjoyed it, but when the dust settled it seemed like all that was really needs was a good manual to get the job done.
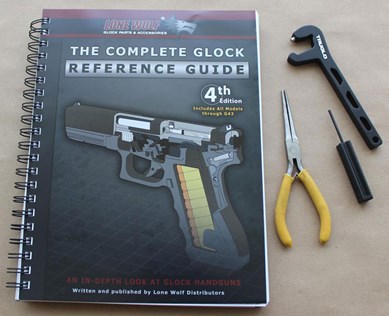
If I were building a Glock for the very first time today, I would contact Lone Wolf Distributors and order the Armorer's Tool Kit (LWD-TOOLKIT) which includes the company's top notch Complete Glock Reference Guide (BOO-CGRG), the LWD 4-in-1 Armorers Tool and a Glock Bench Mat printed with a component diagram for $56.69. If money is tight, buy the Complete Glock Reference Guide by itself for $19.95, pick up a standard Glock Tool online for around $7 and use a clean dish cloth or shop rag as a work mat.

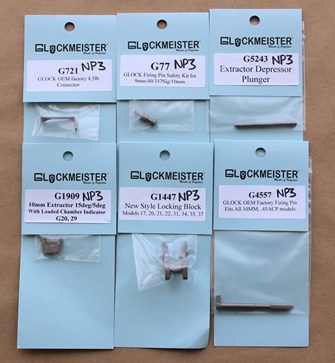
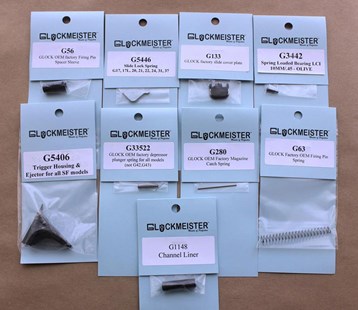
One of the best resources for custom builds that folks often overlook are the dedicated component and services providers like Glockmeister. The staff shared their extensive experience and knowledge of the platform to sort out which upgrades and services would be best suited to this particular 10 mm pistol project. Because of the company’s extensive catalog of in-house and 3rd party components, I ended up using Glockmeister as a one-stop-shopping source for all of the parts that went into this gun.
Building the Pistol
Once you have your work space cleaned up an organized, a good light source in place, your tools laid out and all of the pistol's parts checked and accounted for, you're ready to get started. Experienced Glockster's can knock together a pistol in about an hour or so but beginners should give themselves additional time in order to reference the manual along the way.
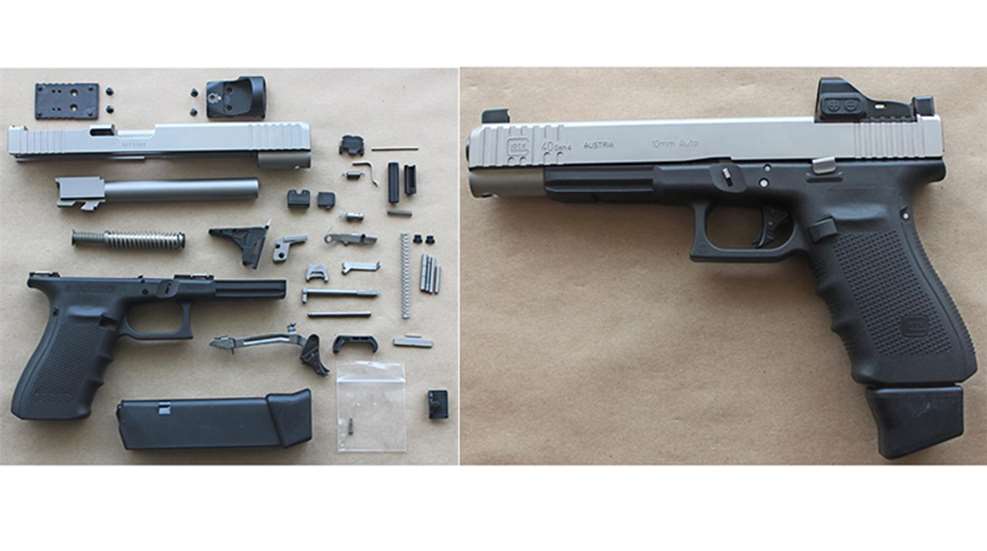
The average Glock breaks down into 38 components and assemblies. Pistols with MOS optics mounting systems require a few more. This walk through begins with the assembly of the frame. This is followed by the assembling of the slide, the optic installation and the completion of the pistol.
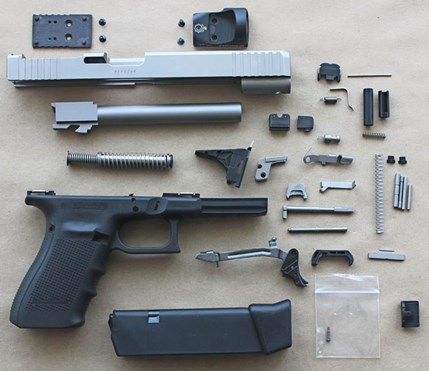
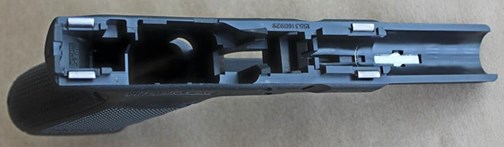
A bare factory or OEM polymer frame has the metallic slide rails and serial number plate (located in the dust cover) molded directly into the frame. Should the rails be damaged somehow the entire frame will need to be replaced.
 s
s
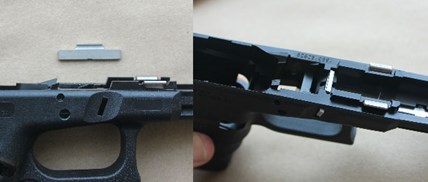
Start by inserting the slide lock spring into the frame in the orientation shown here.
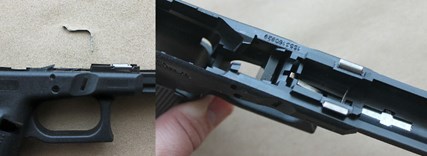
Using the Glock Tool to depress the spring, insert the slide lock through the side of the frame with the grooved side of the top extension facing towards the magazine well.
Use needle nose pliers to insert the magazine release spring into wedge shaped slot located inside the magazine well behind the trigger guard. If you do not have a set of pliers, the spring can be pressed into place using the Glock Tool.
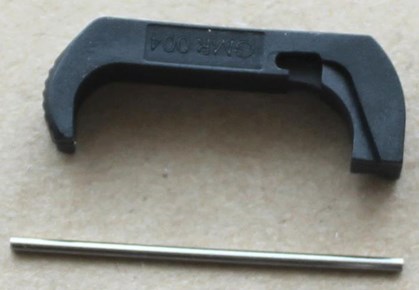
While tipping the spring out and away from the frame using a small standard screwdriver (or the Glock Tool in a pinch), insert the magazine release through the opening in the frame with the button facing to the side of the frame you prefer. In this case, the button is placed on the left side of the frame for right-handed shooting hand operation. Maneuver the top of the spring into the magazine release’s spring notch.
Insert the trigger connector into the polymer trigger mechanism housing which has a metallic ejector molded into it along its top edge.

Hook one end of the trigger spring into the pre-drilled hole at the rear of the polymer trigger mechanism housing. Hook the other end of the trigger spring into the trigger bar connected to the trigger shoe. Lower the trigger bar down over the connector as shown. The trigger group is ready to be placed in the frame.
Lower the trigger mechanism housing into the rear of the frame with the trigger shoe positioned in the slot located above the trigger guard. Press the trigger group down into the frame until the trigger bar is level with the top of the frame and the pin hole in the trigger mechanism housing aligns with opening in the frame.

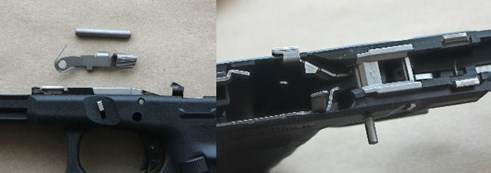
Press the locking block into the frame.
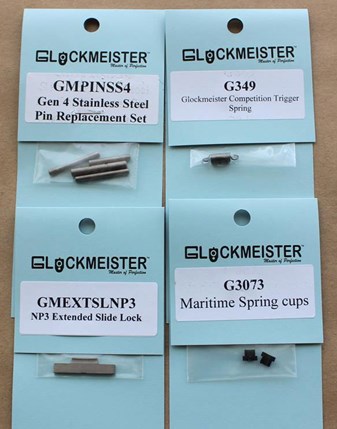
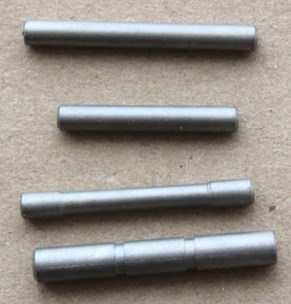
This pistol's Gen 4 frame, with its interchangeable backstrap system, has a total of four pins including (from the top) an extended trigger housing pin for use with the back straps, a flush fit trigger housing pin used when no backstrap is installed, a barbell shaped locking block pin and a trigger pin.
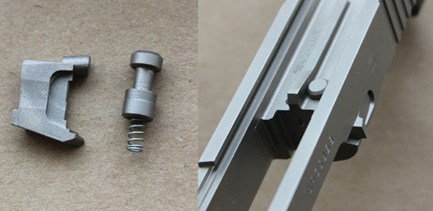
Press the trigger housing and locking block pins into the frame using the Glock Tool. Some aftermarket pins will be a tighter fit than factory pins. However, it should not be necessary to use excessive force or to hammer the pins into place when the pin holes of the trigger mechanism housing and locking block are properly aligned in the openings in the frame. Note that the locking block pin must be installed before the slide catch.
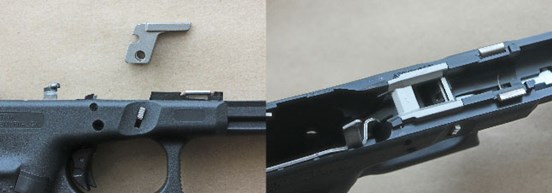
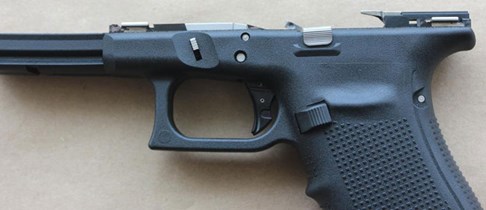
The slide catch is secured to the frame by the trigger pin. Insert the slide catch first, check the aliment of the trigger shoe’s pin hole with the frame, and then press the trigger pin into the frame.
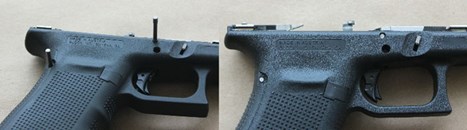
At this point, all of the pins and external controls are in place.
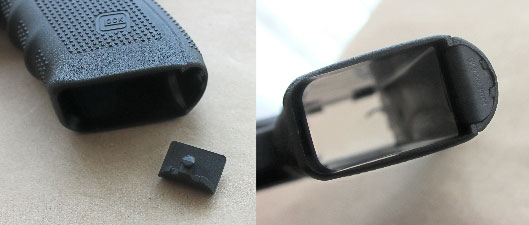
Glock pistols have back strap channels with openings at the base of the grip. This opening can be left as-is or fitted with an optional channel plug which simply snaps into place.
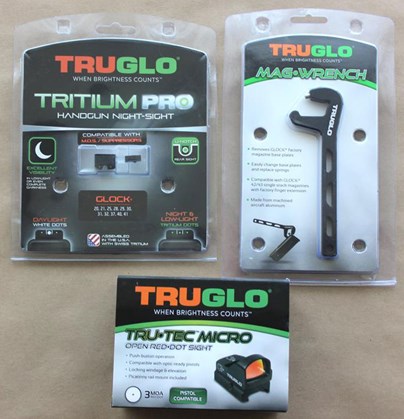
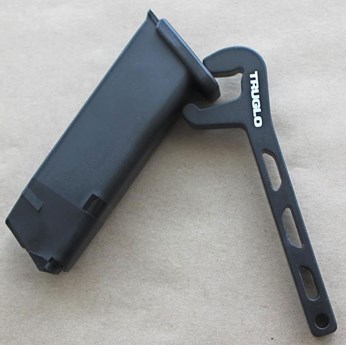
Most Glock factory magazines ship with flat base plates which can be removed for cleaning and maintenance. The base plate shown here is being removed using a TRUGLO Glock Mag Wrench. However they can be removed using the Glock Tool (with a bit more effort).
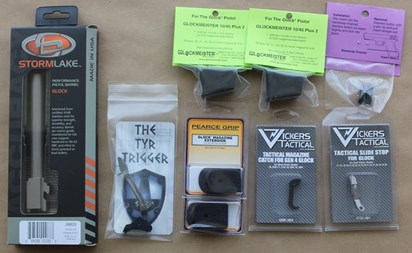
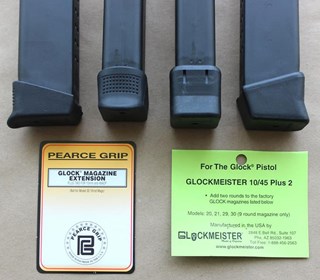
Several companies offer aftermarket magazine extensions which can be used to replace the flat base plate to provide a finger rest or increase the ammunition capacity of the magazine. The Pearce Grips Plus and Glockmeister Plus 2 extensions shown here increase the ammunition capacity of the G40's 15-round magazines to 17 rounds without the need to replace the magazine springs.
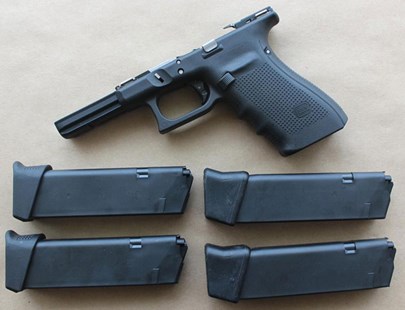
With the optional magazine modifications in place, the frame assembly is complete.
Now it's time to get to work on the slide assembly. The slide shown here is completely bare with no components installed.
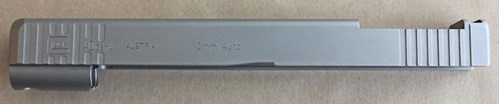
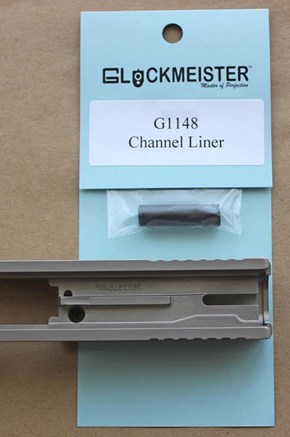
If you are starting with bare slide that has yet to be part of a complete pistol, or you’re working with a slide that has been stripped in order to apply a different finish (like this one), don't forget to purchase and insert a polymer firing pin channel liner before installing the firing pin assembly. The liner is a single use component that must be replaced with a new one if removed from the slide.
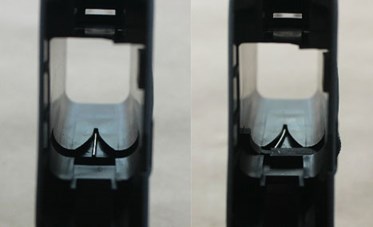
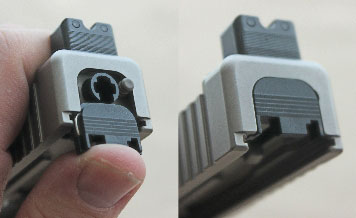
Install the rear and front sights following the manufacturer's instructions or with the assistance of a qualified gunsmith.
Insert the firing pin safety spring into the firing pin safety plunger as shown. Place the plunger in the slide. While depressing the plunger with the Glock Tool, slide the extractor into place.
Preparing the firing pin assembly begins with placing the firing pin spacer sleeve over the firing pin with the pin’s extension set into in the sleeve's notch. Place the firing pin spring over the firing pin. While retracting the firing pin spring, insert the two spring cups which will retain the spring when installed properly.
Prepare the extractor depressor plunger by attaching the spring followed by the polymer bearing. The color and shape of the bearing is determined by the caliber of ammunition the pistol is chambered for and the type of extractor used.
Insert extractor depressor plunger into the smaller of the two openings at the end of the slide with the polymer bearing facing out. Insert the firing pin assembly while aligning the pin’s extension with the slot in the slide.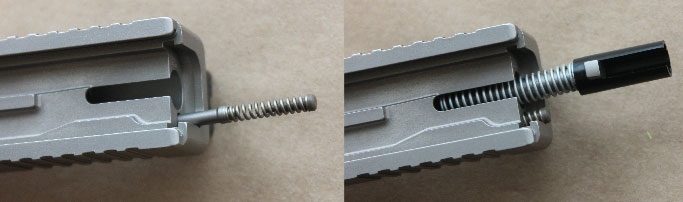
Insert the slide plate partially into the slide with the textured side facing out. Press the trigger pin spacer sleeve into the slide and move the slide plate up to the extractor depressor plunger. Press the plunger bearing into the slide using the Glock Tool and hold in place while moving the slide plate up into place. With the bearing secured by the slide plate, remove the tip of the Glock Tool and lock the slide plate all the way into place.
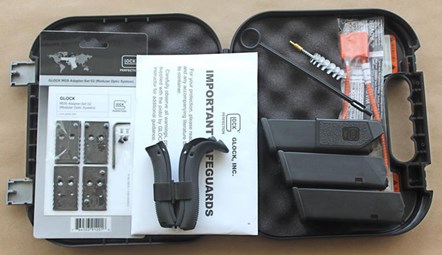
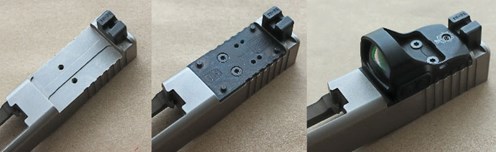
If your pistol has an MOS optics mounting system, use the provided wrench to remove the two screws securing slide filler plate and replace it with the appropriate optics adapter plate and screws from the kit. Secure the optic to the adapter plate using the appropriate length screws (which may need to be purchased separately).
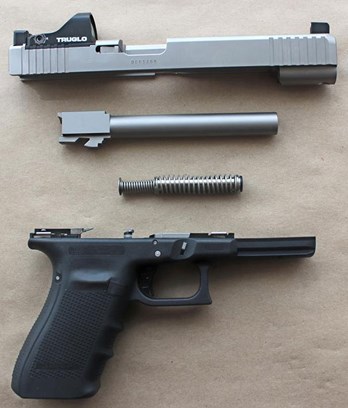
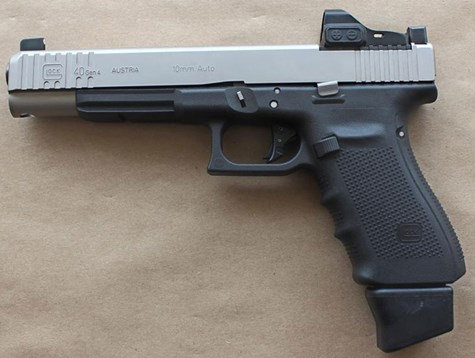
With the frame and slide complete, the pistol’s major components are ready for final assembly. Insert the barrel into the slide followed by the recoil assembly. Press the slide onto the frame and insert an empty magazine.
The pistol is complete and ready for a series of bench checks to verify that the pistol’s controls and safeties are operating properly. Once the pistol passes all of the bench checks, lubricate it according to the instructions in the owner's manual in preparation for the first trip to the shooting range. Place the pistol in secure storage until ready to use.
See the detailed set of component specifications and a range test of this custom G40 pistol.
Component and Services Provider: Glockmeister
Base Pistol: Glock 40 Gen4 MOS
Armorer's Tool Kit: Lone Wolf Distributors (LWD-TOOLKIT) $56.69
Glock Magazine Wrench: TRUGLO (TG970GM) $25