For fans of historical firearms, putting together a pistol or rifle kit can be one of the most-rewarding projects of their entire hobby, and it provides a great outlet to keep a gun guy satiated during cold winter months or rainy weekends when heading to the range isn’t a fun choice. Today’s manufacturers offer an incredible array of project options, ranging from relatively simple finishing kits like those offered by Traditions or Dixie Gun Works, to intermediate kits offered by Davide-Pedersoli, to expert-level options from Track of the Wolf or The Rifle Shoppe.
For this build, we tapped the folks at Italian Firearms Group, a U.S.-based importer that works with Davide-Pedersoli to import the Italian firm’s reproductions and kits into the United States. One of Pedersoli’s numerous reproductions is the Model 1805 Harpers Ferry pistol, a fairly faithful reproduction of the first martial pistol produced by a United States Armory. We’ve covered the early history of U.S. martial pistols and the eventual development of the Model 1805 Harpers Ferry in past articles on this site, so you can check out the story that led to this modern-day reproduction at those links.
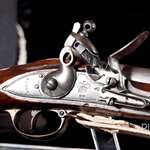
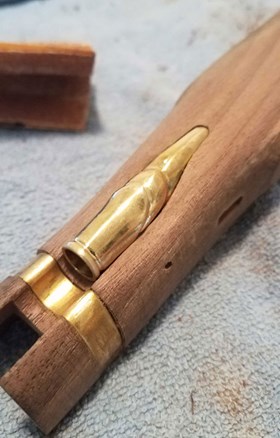
When it arrives from the factory, the Harpers Ferry Model 1805 actually comes fully assembled. When consumers first open the box, they might be surprised to see a complete pistol staring back at them and think that it looks fairly finished already. Both the barrel and lock inlets are already completed on this kit, so you won’t have to do much digging into the wood to make things look right. All the brass components are already slotted into their corresponding spots, with inlets already made for the brass buttcap, ramrod, rear thimble, side plate, trigger guard, barrel rib, barrel key, stock band and barrel wedge.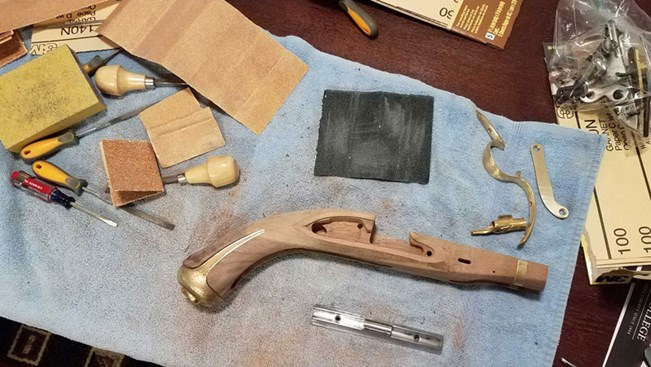
At this point, one might think, “What the heck did they leave for me to do then?” To illustrate exactly how the finished product ought to appear, we borrowed an original Model 1805 Harpers Ferry pistol from the NRA National Firearms Museum. This example produced in 1807 shows that quite a few details on the Pedersoli reproduction are right. The lockplate includes the stylized, spread-wing eagle-and-shield stamp, complete with “US” stamped below the insignia. At the rear of the lock, the armory of manufacture, “Harpers Ferry” is stamped in block letters, followed below with its year of manufacture.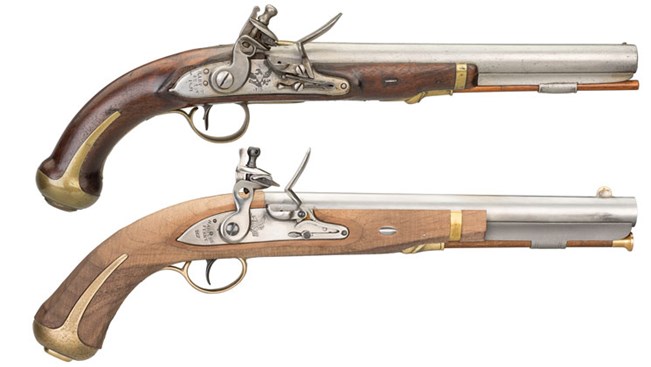
Original pictured top, reproduction pictured bottom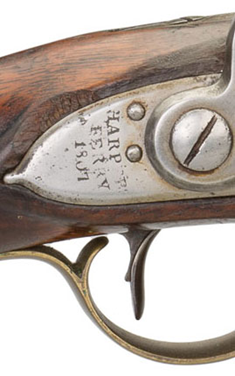 In this case, the reproduction lists the year 1807, which corresponds with the year in which most Model 1805 Harpers Ferry pistols were produced. On the opposite side of the gun, where the original feature proof marks and its serial number “281,” the Pedersoli reproduction provides its manufacture information, proof marks and caliber. Upon closer examination, some of the finer details, like the shape of the frizzen spring, the orientation of the barrel wedge, the size of the front-sight blade and the amount of wood forward of the barrel band aren’t quite exact, but as far as reproductions go, it’s pretty darn close.
However, there’s a deceiving amount of work that needs to be done in order to bring this kit up to snuff, but that’s why we ordered it! Let’s take a quick look at our to-do list. First, in the stock it’s evident that there’s a fair amount of wood on the grip of the pistol, which is showing proud compared to the brass buttcap and trigger guard. The excess wood is evident up in the forearm of the gun, which swallows the brass thimble located at the swell just before the front band.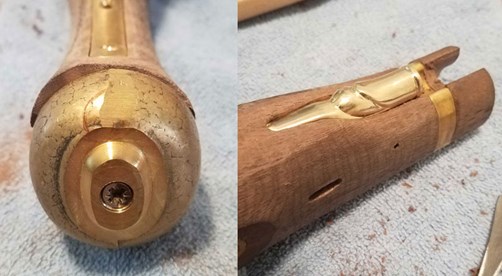
 Moving to metal parts, possibly the most-deceiving component is that under-barrel rib. This component comes with a raw, as-cast finish that must be ground away and polished to match the finish on the barrel. With the exception of some smaller components, like the barrel band, ramrod components and sideplate, all of the brass components come in their raw, as-cast form, complete with rough, jarring grind marks where the casting gates were cut off. These components, while softer and easier to work than the mild-steel barrel rib, must still be shaped, sanded and polished to a bright finish like those on the original.
Tool-wise, a good set of files are going to be handy in removing and shaping much of the wood on the stock grip. One thing to notice in the original is that the butt on this particular example swells before it meets the brass of the butt cap, producing an oblong, egg-shaped pommel on the butt-end of the gun. To reproduce these contours, it’ll take quite a bit of wood-shaping and removal, more so than can accurately be done with sandpaper.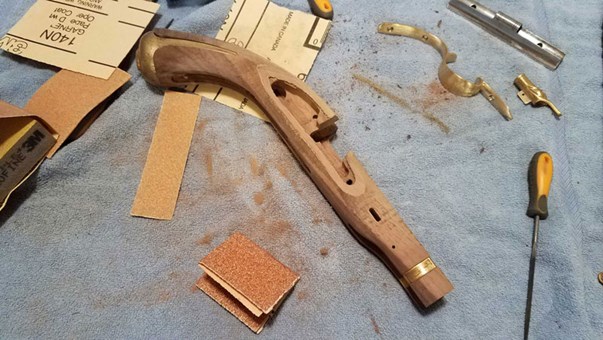
 For use on this kit, I ordered the MulWark 9-Piece Premium Grade Carpenter File Kit, which can be found on Amazon for $25. For detail work on both wood and brass components, I also used the Central Forge 12-Piece Precision Needle File Set, which can be had for less than $9 on Amazon. Once contours are shaped and finished, you’ll want a good gradient of sandpaper, going from 200-grit paper to as fine of a polish as you’d like. I ended up sanding certain components up to 2,500-grit before final polishing with an emery compound.
For final polishing on the brass components, I used a Dremel-style rotary tool complete with felt polishing pads to get into the tight folds of the trigger guard and the ramrod thumble, as well as to get a mirror-like shine on the rest of the brass components after final sanding. The use of power tools can be a boon or mean doom for hobbyists, so tread with care. Many might want to stick with hand-polishing until the end to avoid the consequences of overzealous effort. Remember: you can always take more material away, but you can’t put it back.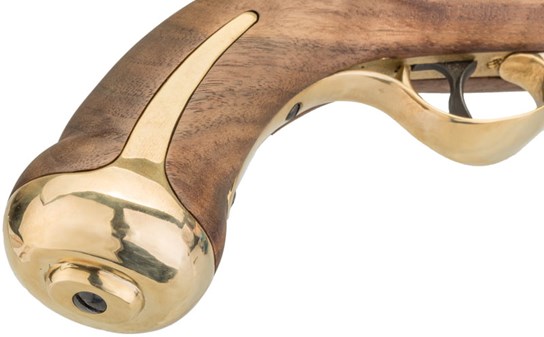
 To start this Harpers Ferry Model 1805 project, I disassembled the pistol, keeping component parts organized in separate plastic bags. You’ll want to do this, because there are a number of small screws that are easily lost, particularly the two screws that hold the barrel rib in place. The lock, which is already finished, can be set aside for the duration of the project, as can the barrel.
The hardest material to remove is the cast finish on the mild-steel barrel rib, particularly because of the tight corners and severe contours found on the design. For this, there’s nothing to do but go after it with sandpaper, starting with the heaviest grit and moving up to lighter grits one step at a time. Pay special attention to the ramrod slot. You can take a smaller-diameter dowel and wrap sandpaper around it in order to tackle this hard-to-reach area. Though it’s tedious, the barrel rib is your dues-paying portion of the project, and it’s a pleasant surprise once you get to the polishing stage to be able to see a mirror-finish on this once-rough component.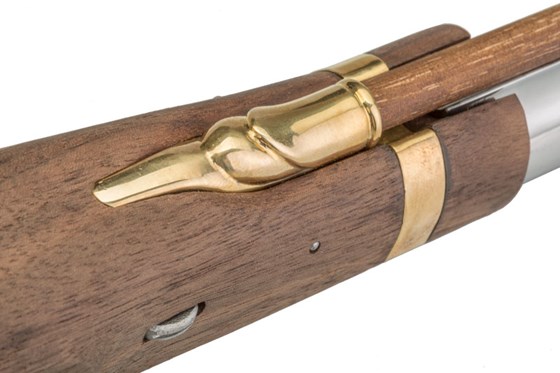
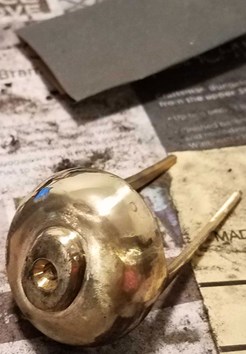
Once the barrel rib is finished and ready for polishing, set it aside and go after the brass components. I first started on the ramrod thimble, which proved to be a particularly challenging component due to the depth of the grind mark that removed the casting gate on this part. Because the furrow left by the grinder actually interrupted what would become the final contour of the thimble, I took the precision-finishing files and recessed that first ridge back to a point where the grind mark wouldn’t be noticed in the finished product.
At this point, test fits of the thimble showed that the component canted to one side while it sat solidly in its inlet. This part is pinned into place, so preserving the holes through which the pin traveled was critical while also trying to figure out how best to tackle the cant. Finally, I settled on a combination of both woodwork and metal work, slightly enlarging the inlet into which the thimble sat while also carefully removing material from the offending side of the thimble’s attachment point. This canted the whole unit just enough to correct the balance.
After these two components, things got easier, as far as metal-finishing went. The trigger guard and butt cap both required progressive applications of sandpaper until they got to the polishing point. The sideplate already came with a smoothly finished surface, so that came from the box requiring just a light polish with a polishing pad and emery compound.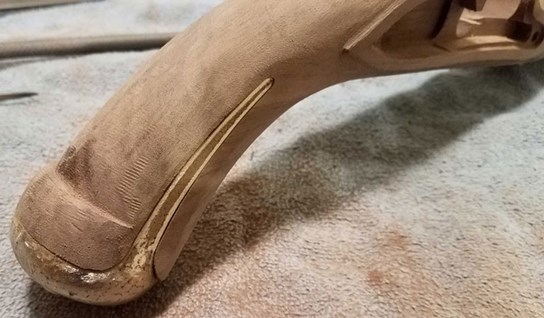
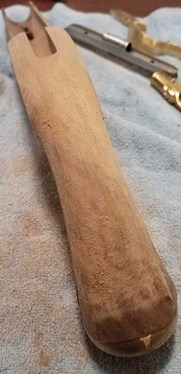 Prior to getting too deep into the metal components however, final shaping of the stock was needed. Using wood-carving chisels first, I slowly removed material from either side of the forearm, relieving the wood that crowded the ramrod thimble. After this, I took shaping files and liberally removed wood from the rear of the stock, cutting a prominent ledge that ended right where I wanted the wood to curve into the contour of the butt cap. After this ledge fully formed, I took a flat-sided file and slowly cut a semi-spherical contour into the stock that met the brass cap at all points along its circumference. To keep track of your work, a contour gauge can be a helpful tool at this point.
While carving the contour of the butt out and thinning the circumference of the grip, builders will also notice that fine contouring around the lockplate and sideplate molding is needed, and I tackled these areas with precision files, slowly shaping the contour with one stroke at a time. After filing is done, it’s sandpaper time. Just like on the metal components, work from heaviest grit to finest, never going backward if you can help it.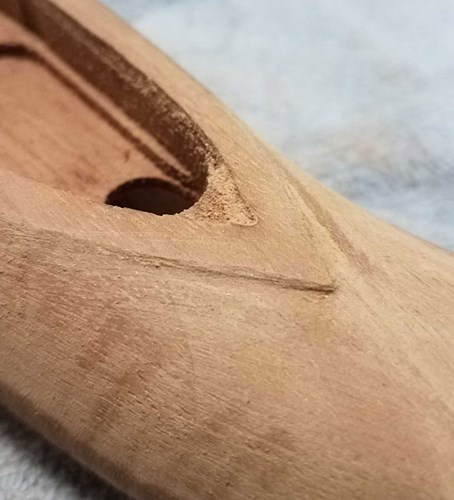
After a few progressive sandings (I ended things at 320-grit), you can apply the finish of your choice. The traditional coating on military stocks used on guns like the Model 1805 Harpers Ferry was a boiled linseed-oil finish, but it’s your kit and the finish of choice is a personal preference. I wanted mine to have a traditional finish, so I went down to Home Depot and got a jug of boiled linseed oil.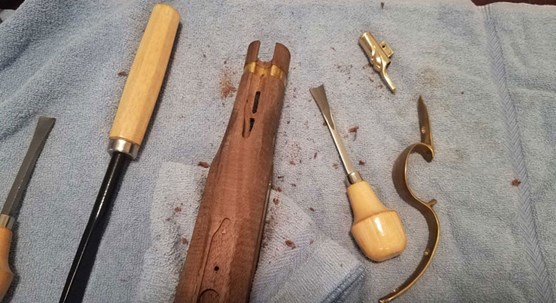
There are many schools of thought out there on the proper application of a linseed-oil finish. One reason why projects like these are great in the winter is because this particular finish doesn’t like being applied in humid environments. Ideally, you want either dry weather or a dry workshop to apply this stuff. What follows is how I finished my pistol. There will be people out there who like it, and there will be die-hard purists who will say I’m making a mockery of oil-based finish applications. Take it as it is.
First, I removed all metal components and rubbed down the entire stock with tack cloth to remove any sanding residue. Then I took a linseed oil-soaked rag and liberally applied it to the wood in every spot I could reach. I let the stock sit for about 10 minutes, and then I wiped off the excess. Old, leftover wire clothes hangers made for a decent, makeshift apparatus on which the drying stock could rest.
A full 24 hours later, I returned to the stock and noticed that the finish pulled out a few spots that I could have finished a bit better during the sanding process. I tackled these spots with 2,500-grit sandpaper, slowly working these imperfections out of the final finish. Afterward, I ran over the whole stock with 000 steel wool then liberally applied another coat of boiled linseed oil. After 10 minutes, the excess was cleared away and the stock left to dry for another 24 hours. This application, wiping and drying process was repeated another three times for a total of 5 coats.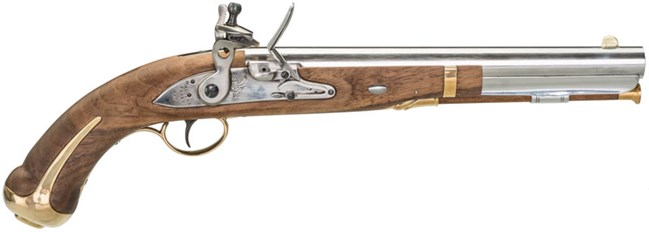
One rule of thumb by which woodworkers often live when finishing wood pieces with linseed oil is “one coat a day for a week, one coat a week for a month, then one coat a year every year afterward.” However, this isn’t a hard-and-fast rule, and I liked how mine turned out after just five coats. You might decide you like more or less.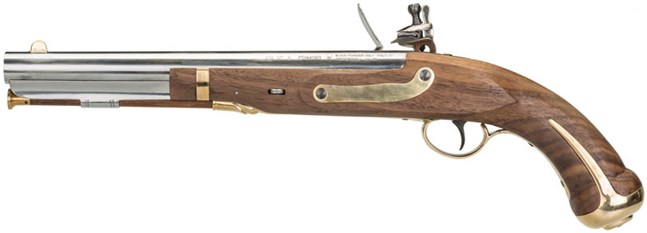
One thing to keep in mind when working with linseed oil is that it tends to produce heat as it dries. That’s not so much an issue for your stock as it is for your rags, as linseed oil-soaked rags are known to self-combust if left alone in a pile. Be sure you either seal your soaked rag in a Ziplock bag to keep it wet throughout the process or thoroughly wash your rags after use to avoid this potential danger.
All told, though I tackled this project piecemeal over the course of several months, a dedicated builder could plow through this project through a few weekends of solid work. I’ve put together reproduction kits before, and this was a nice step up from prior kits that were mostly just finishing wood and basic assembly. It offered a nice, extra challenge that required some wood-shaping without the added work of full inletting. All the parts came together nicely, and I ended up with a beautiful representation of one of the most-recognized flintlock pistols in U.S. military history. Now, all that’s left is to shoot it!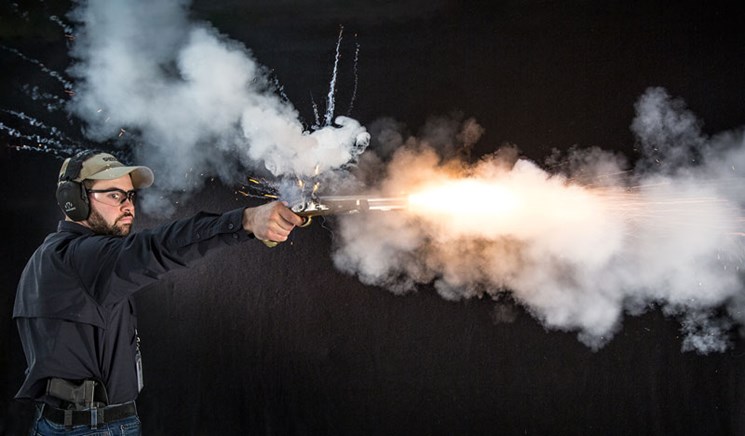
Additional Reading:
The Model 1805 Harpers Ferry Pistol: Launching the Reproduction Era
The Model 1805 Harpers Ferry Pistol: From Inception to Insignia
Arsenals and Armament: The Early Years of U.S. Martial Pistols