Ballistic Programs and ballistic reticles were designed to help shooters hit targets at long range. Ballistic programs help you predict the flight of your bullet and ballistic reticles can be used to do the same, or let you apply the prediction solution of the computer program. Both are helpful for long-range shooting. However, for the shooting most sportsmen do at targets, varmints or big game, a duplex reticle and some time on the range is all you need.
With most American-made riflescopes, the reticle is placed in the second focal plane. This means that if you adjust the magnification, the size of the reticle changes in relation to the size of the target. This is the reason ballistic reticles are calibrated to work only on the highest magnification setting.
The marks and dots on a reticle correlate to a measurement on the target. This is how ballistic reticles work. By placing these dots or marks at pre-calculated locations on the reticle, which match the drop of bullets fired from common, high-velocity cartridges at ever extending ranges, they can be used as additional aiming points at those predetermined ranges.
Duplex reticles go by different names depending on the manufacturer, but they are all made up of a thin center wire with heavier sections on the edges. The distance between the intersection of the wires at the center and the point on the wire where it thickens can be used just like a ballistic aiming point with many of these reticles. This distance or space is called subtension and it subtends, or equals, to a different measurement at every range, and this distance varies with magnification. If you know this subtension, you can use it to judge range to get hits at long distance.
If you know the space in your reticle subtends to 16 inches at 400 yards and you see a pronghorn antelope and his chest fits perfectly in that space, then he is about 400 yards away. If his chest is twice as large as the space, then he is half as far: 200 yards. If his chest is a little bit smaller than the space, then you could estimate that he is about 450 yards away. The key to ranging with a duplex style reticle is to know the subtension of the reticle at various ranges and to know the size of the object you are trying to range. This is not anything new. Leupold has been including this ranging feature on its variable scopes for a long time.
Essentially the same process is applied when using the duplex reticle to compensate for bullet drop. If you know how far your bullet drops at a certain range and you know the subtension of this space on your reticle at that range, then you can hold accordingly. The duplex reticle can serve as a guide to help you guess the proper hold over. It can also be much more precise.
Let's say you are hunting with a .270 Win. shooting a typical 130-grain bullet. If you zero your rifle at 250 yards—about 2.5 inches high at 100 yards—you're about 3.25 inches low at 300 yards. This means that, ideally, you could hold center on an 8-inch target anywhere out to 300 yards and get a hit. This is just fine for big-game hunting. Now, what if you need to take a shot at 400 yards? Your bullet will strike about 15 inches below the point of aim at that range.
This means you will have to hold 15 inches above the desired point of impact, but at 400 yards, 15 inches can be hard to judge. If your riflescope has a duplex reticle where the distance between the intersection of the cross wires and the bottom taper point of the vertical wire equals 4 inches at 100 yards, it will equal 16 inches at 400 yards. So, all you'll need to do is use the bottom taper point of the vertical cross wire as your aiming point to hold 16-inches high.
But what if this reticle subtension does not correspond to your bullet's trajectory at that range? If you have a variable scope you can use the magnification dial to adjust your subtension. Here's a trick you can use to figure this out.
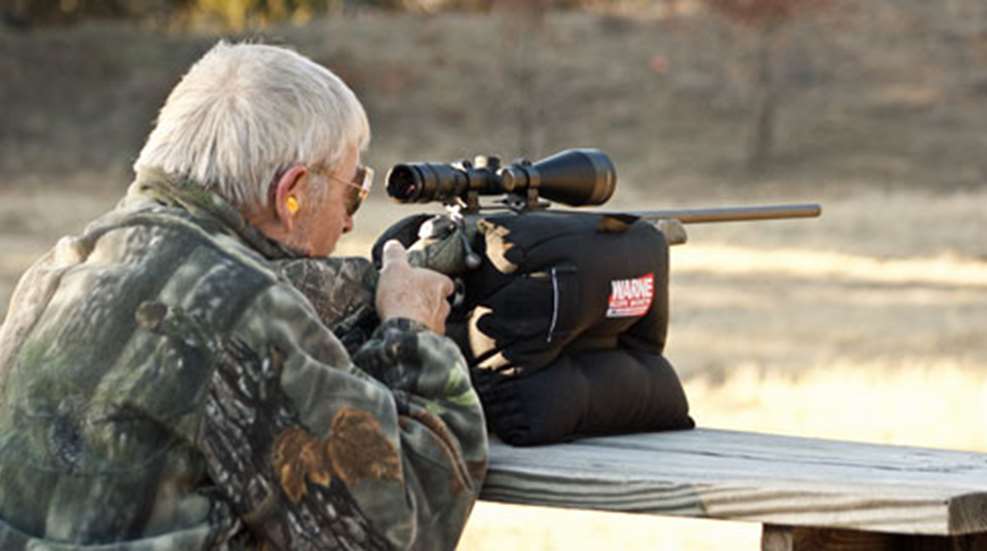
Put a 6- to 8-inch diameter target at the top edge of a piece of poster board and set it at 400 yards. Now, with your rifle zeroed about 2 inches or so high at 100 yards, fire a three-shot group while aiming at that circle target. You'll need to go downrange and place a stick-on target over the center of your group on the poster board. Now, go back to your rifle and hold on the top target and adjust the magnification until the taper point on the bottom vertical cross wire is centered on the bottom target.
To confirm your adjustment, leave the magnification setting there and fire another three-shot group at the top target, but use the taper point of the bottom cross wire and aim at the center of the top target. All three shots should hit the top target. Now, all you'll need to do to shoot and hit at 400 yards is set your magnification to the determined power and aim with the taper point of the bottom cross wire.
Does it work? My first mule deer was taken at almost 350 yards and that is exactly how I knew how to hold. I've also used this system quite a bit when shooting prairie dogs. If you know the subtension of your reticle and have a ballistics computer program to reference, you can fine tune this technique to your cartridge and rifle and set it for the range at which you will most likely need help shooting.
Most riflescope manufacturers have the reticle subtensions listed in their catalogs. If not, contact them direct. Nikon greatly simplifies this process with its SPOT ON program, which does all the calculations for you, if you have a Nikon Scope with a Nikoplex reticle. Still, you'll need to confirm the calculations on the range to be sure. But that is not a bad thing. The more you shoot, the better you'll get and it never hurts to practice all you can when you’re facing long-range shots.


![Ruger 250Th[16]](/media/ss1dj10i/ruger-250th-16.jpg?anchor=center&mode=crop&width=770&height=430&rnd=134202089811930000&quality=60)
![Ruger 250Th[16]](/media/ss1dj10i/ruger-250th-16.jpg?anchor=center&mode=crop&width=150&height=150&rnd=134202089811930000&quality=60)