“Why did I miss that bird?”
How many times have shotgunners asked their pals and themselves that question? Shooting moving targets is both an art and a science with many interlocking and interrelated parts. Gun fit, foot position, gun mount, swing and all the other factors enter the equation, and most take practice to master. Nonetheless, one item we can address is patterning. It’s a little time consuming, but it’s well worth every second. Finding the correct load and choke combination for your shotgun that best serves your hunting and shooting circumstances can remove doubts about your gun’s performance and allow you, the shooter, to concentrate solely on the wingshooting art.
Actually, there are two aspects of patterning: The first addresses gun fit, the second gun performance. Lest we leave a question, we’ll take a quick look at the first before moving on to the second.
Gun fitting is an art. Good gun fitting requires firing live ammunition at a pattern plate. There are no alternatives or short cuts. Flashlights and laser devices inserted in the muzzle cannot determine anything close to a definitive fit. If you have a particular gun-fit problem, it’s best to enlist the services of a real gun fitter, but it is possible to check your shotgun’s fit and adjust your stock by yourself.
Here’s how: Make sure that you have a safe background—a berm or area at least 200-yards deep without the slightest chance of human incursion. Then set up a pattern sheet—a large piece of wrapping paper, or even better, white butcher’s paper—with a series of 3"-diameter dots set about 3-ft. apart. If possible, position the dots so that they’re slightly above eye level.
Accurately measure exactly 16 yards from the pattern sheet, and mark the spot. Then, using your tightest choke and a light target load, mount your shotgun and fire at the dot. For the first shot or two, the gun ought to be mounted deliberately. Don’t dally, but mount and shoot in a slow manner so that the bead comes to rest on the target dot, and the stock is well cheeked. Fire two or three shots at the same dot, and see if there is a trend. If you mount consistently, the patterns ought to be somewhat superimposed. Then move to a new dot, quickly mount and shoot. If you’re consistent in mounting your shotgun, the rapid and slow-fire results should be about the same.
Once you’ve fired several shots, carefully measure from the center of the stacked patterns to the center of the dot that was your pointing reference. For every inch the patterns are removed from the dot, your stock needs to be adjusted 1/16". For example, if your patterns are below the mark by 2", and you prefer your patterns to print a bit high, then you will want to raise the comb of your stock about 3/16", which should then place the patterns about 1" high. It’s not a definitive fitting, but a good way to see if your shot is hitting where you are looking. Guided by your results, make the indicated corrections and check the fit again.
Gun-fitting tests how the shooter and gun interrelate, and is somewhat subjective in that it requires a good, consistent gun mount. The second and more common use of patterning is purely objective and will show how a specific shotgun barrel, choke and load interact. The caveat is that the results are for one load/barrel/choke combination, and changing any one of these interrelated components requires a whole new run of tests. Shooting steel shot patterns with a shotgun with its improved-cylinder choke tube in place will yield much different results than with a lead upland load, so keep notes and treat every variation as new data.
In the days of fixed chokes—that prehistoric era before screw-in choke tubes—the conscientious shotgunner would set up and test several different loads, different shot charges or different shot sizes to see which gave him the best patterns in terms of density and evenness. In those days, even changing to a different brand of ammunition might significantly affect results, and gun writers exhorted their readers to explore all the variations until satisfactory patterns were found. Today, we are in far better shape, because we can now choose a favorite brand of ammo and then try a variety of factory and aftermarket choke tubes to obtain the best results.
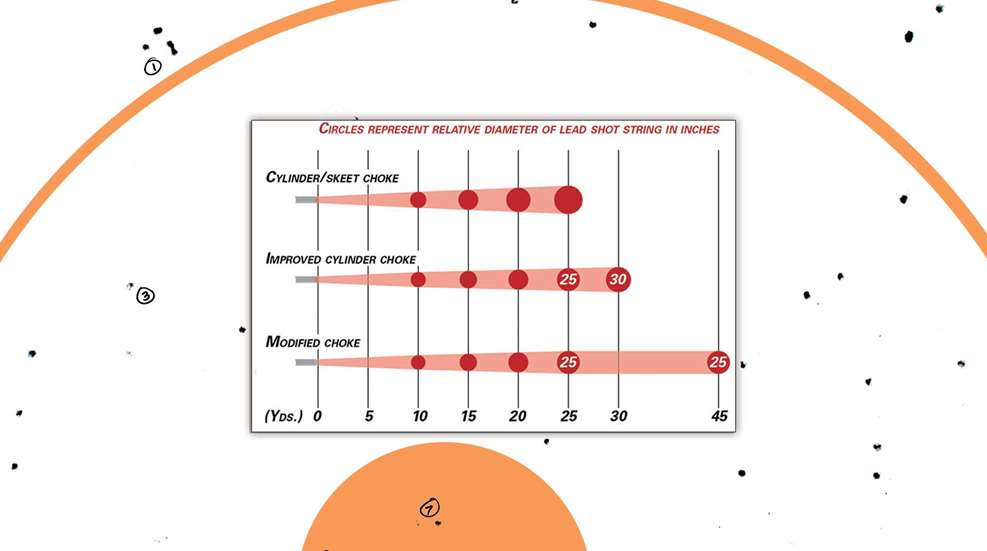
What are the best results? Looking at patterns on paper, we are seeing only one dimension of the shot charge that has exited the muzzle. Shot flies to the target like an elongated, sausage-shaped cloud, and what strikes the paper indicates only the diameter of the shot string. However, if the shot striking the paper is evenly distributed without gaping holes, then we have found much of what we’re seeking.
In general, modern ammunition needs less choke than the shells our fathers and grandfathers shot. In studying ammunition developments through the past 50 years, most of the modifications to lead shot—copper and nickel plating, buffering, plastic shot cups and wrappers, etc.—were incorporated solely to keep more of the relatively soft lead pellets in the pattern. We still have these amenities, but we must remember that they were developed because the card and felt wads in use at the time allowed hot propellent gasses to seep into the unprotected shot column. The fact was that one brand of shotshells fit the barrel of an individual shotgun better than another and, consequently, shot better in that shotgun.
Setting Up
For centuries, 40 yards has been the established distance for pattern testing shotguns. Frankly, it’s the optimum range for a full-choked shotgun, where plus or minus 75 percent of the shot charge should strike within a 30" circle. Certainly, kills are reported at distances beyond that range, and there’s no reason patterns cannot be shot at greater and lesser distances. In fact, if you’re working with an upland gun, shooting patterns at 25, 30 and 35 yards makes good sense, as those are the ranges at which an upland gun shines. But, for the sake of comparison and adherence to standards, 40 yards is the norm and the distance at which standard pattern percentages are based.
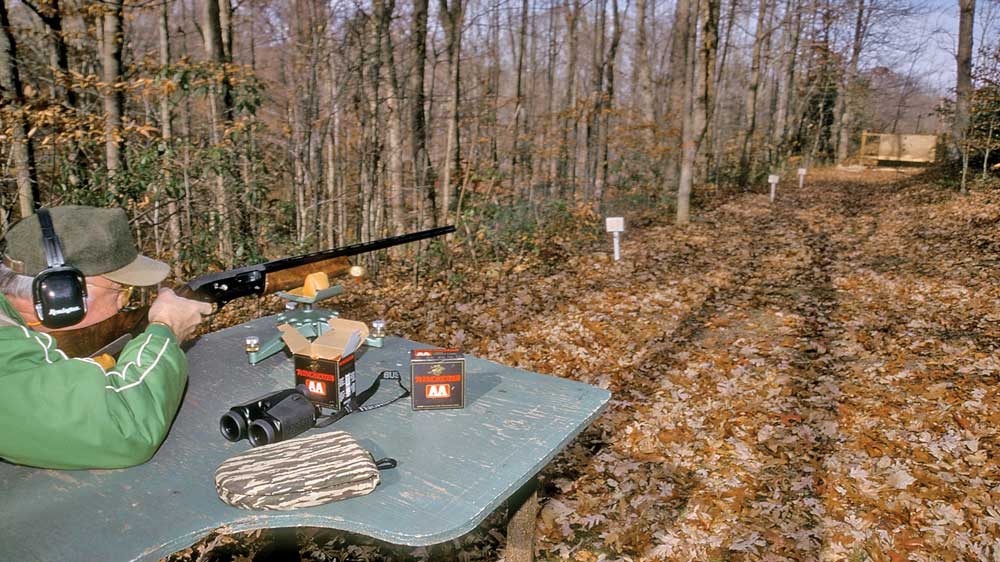
Again, it is imperative that a safe background be used. Large pellets fired at a high velocity can break human skin and blind well beyond 200 yards, so be sure that you have a safe area in which to shoot. Some kind of frame that will hold your pattern sheets is necessary. A sawhorse made of two-by-fours or other frames that will support a large sheet of cardboard or other backing to which the pattern sheet is stapled is necessary. Many gun clubs have patterning ranges, complete with sturdy backers, and if you have access to such a set-up, you’re home free. Otherwise some lumber or PVC pipe and ingenuity can fashion a satisfactory frame to hold pattern sheets. A 4x8-ft. sheet of insulation, plywood or the cardboard from a large appliance carton will satisfactorily hold the pattern sheets.
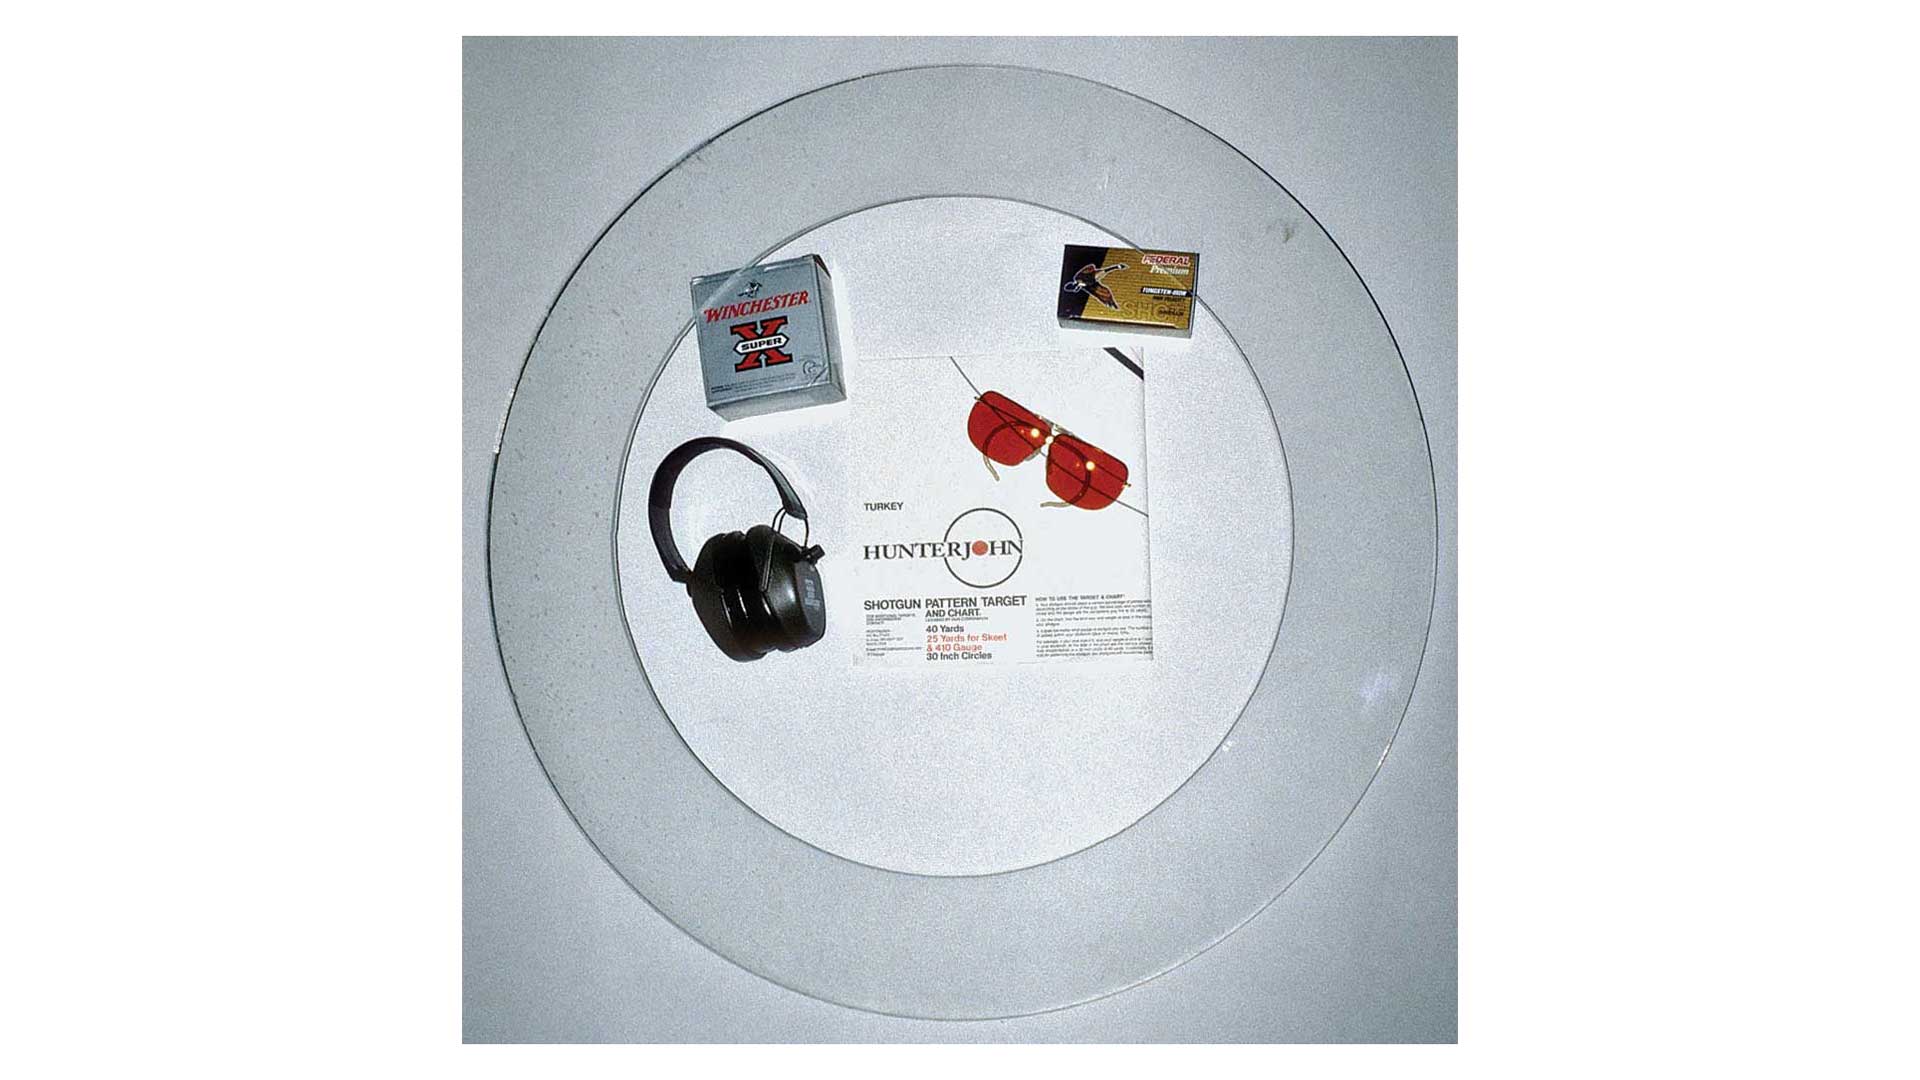
I use both pre-printed pattern targets by HunterJohn and plain sheets of 48"-wide, white butcher’s paper with a sighting dot, such as one of Birchwood Casey’s self-adhesive orange dots placed in the center. Pattern sheets should be ideally 40" or, even better, 48" square, which allows for aiming errors. While some substitutes—like newsprint—can be used, unless you have a clear surface, pellets are very hard to count. I’ve noted some using rifle targets at our gun club’s patterning range, but they don’t offer enough area for proper diagnosis.
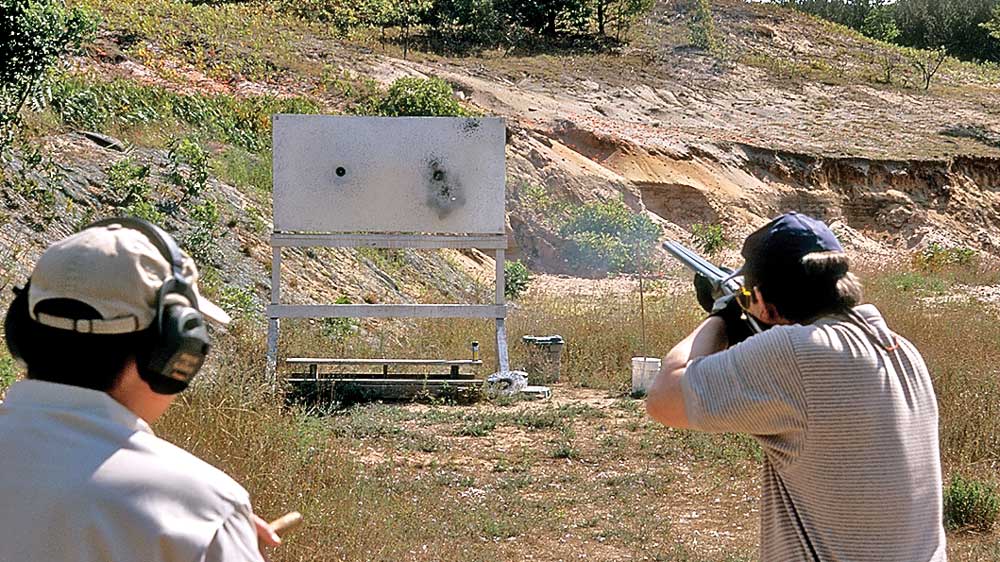
Once we have a safe background and we’ve carefully measured 40 yards or whatever distance we’ve chosen, we’re about ready to shoot ... but not quite. While our first use of patterning was to check gun fit, we’re now checking performance, and our shots must be accurately placed. Not that this is a competition, but we want to be sure that our patterns are well centered within our pattern sheet, so all shots should be fired from a solid rest, not offhand. If you have or can borrow a rifle pedestal and rear bag or a Caldwell Lead Sled, that’s the way to go. If not, a pile of sandbags, a milk crate or anything that allows you to fire a carefully aimed shot should be used. Because some of the loads pack brutal recoil, try to set up so your torso is erect, rather than hunched behind the gun. In addition, use a PAST Magnum pad, Browning Rectar pad or just an extra sandbag between you and the stock for protection. Obviously, if you’re shooting light target loads, recoil isn’t a big factor, but move up to one of the 2-oz. turkey whammers, and you’ll appreciate the additional recoil protection.
Gun fitting is an art. Good gun fitting requires firing live ammunition at a pattern plate. There are no alternatives or short cuts.
It probably goes without saying, but keep careful notes. HunterJohn targets provide an area for recording data, but I normally just jot it in the upper right-hand corner of whatever target I have. It should include: the load, shotgun make and model, gauge, shot size, weight of the shot charge and choke. If you’re shooting only one load with one shotgun and choke, this might be superfluous, but it only takes a moment, and then there’s no confusion. Rather than keep a pile of targets, keep a logbook at home, and record the data there once the targets are processed.
Once the shooting is finished, it’s time to evaluate the results. Because we’re testing how ammunition performs in a specific barrel, it does not matter that it strikes the target perfectly centered. Therefore, we inscribe our 30" circle so that it encompasses the maximum number of pellets. Very few patterns are ever dead center, so a movable means of drawing our circle is necessary. A 30"-diameter template cut from cardboard will do. I had a disk made of 3/8"-thick plexiglass. Its too heavy, and it would have been better made from 1/4" material. Pre-printed pattern targets have a series of 30" circles inscribed on them. In use, determine which circle encloses the most shot, and use it for counting.
Once we have established the 30" circle, it is a simple matter to count the pellets that fall within it. Count all the pellets, even those touching the line, then record your count. To determine the pattern’s percentage, divide the number of pellets you counted by the number of pellets contained in an unfired shell. Various tables are available that provide nominal pellet counts for various shot weights, and they are within a pellet or two of optimum. If you want to be sure, open three separate shells from the same box, count the pellets in each, then average the three.

The question that continually arises is how many patterns must be shot to establish valid data? That’s a good question. At one time, the ballisticians at Western-Winchester stated that 100 patterns would no more than demonstrate the tendencies of a given barrel/choke/load. I once did a story about different types of choke tubes. Beginning with the fixed choke, I then had Chuck Webb at Briley Manufacturing install increasingly longer screw-in choke tubes, shooting and evaluating patterns following each modification. I chose to shoot 50 patterns for each modification, and it became a test of endurance by the end of the research phase. In fact, shooting three patterns will give you an idea, and in general, five patterns are enough. If they vary greatly, then five to 10 more patterns ought to be shot and evaluated. If there continues to be a major discrepancy, then a choke or load change is definitely dictated, followed by additional patterns.
While using the total pellet count provides the percentage of shot striking the 30" circle, there is other information that can be derived. The most common secondary data is the evenness of the pattern. To derive this data, it is necessary that the 30"-diameter disk have a concentric inner area that measures 20" in diameter. The pellet strikes in both circles are counted and recorded separately. Each is then divided by the total number of pellets in the test shell, and their percentages noted.
Those patterns with very high 20" percentages and low 30" percentages demonstrate central thickening; good for a turkey load, but not so hot for quail. When we seek an even pattern we are looking for about 20- or 25-percent fewer pellets in the outer ring than in the inner ring.
Patterns can be further evaluated by bisecting the 30" circle into four or more fields and counting and figuring percentages with them. There is a German system that divides the 30" circle into 16 sections, and there is even a 100-section system. But for general purposes, the 20" and 30" concentric circles tell us everything we need to know. If you want to go a step further, take a common clay target and use it to mark any areas of the patterns that have no pellets. There will be some when large shot is used, and they diminish as the shot sizes become smaller. Skeet shot at 21 yards and trap targets shot at 40 yards should be devoid of holes, and if they are present, then your choice of loads and chokes should be closely investigated.
Modern ammunition with all of its refinements is as good as it has ever been. Consequently, pattern testing has often more to do with choke performance than ammunition. However, when dealing with handloads for clay targets, it is imperative to shoot patterns to see if the ammo matches the choke and barrel.
Also, sporting clays competitors will want to check their load/choke combinations at varying ranges to determine which are best for the diverse targets thrown in this challenging sport. A wide, thin pattern is little consolation when a tiny mini is thrown high overhead, and knowing how your shotgun performs can make the difference between a winner and a competitor.
Hunters will benefit from knowing that their turkey loads will really deliver that ultra-tight pattern to a gobbler’s head, or that their steel loads for waterfowl are not too tight for hunting ducks in flooded timber.
There is no hiding the fact that patterning a shotgun is time consuming. Shooting the patterns requires a lot of time at the range, and collecting and interpreting the data demands still more; but if you are really interested in obtaining top performance from your shotgun, it is time is well spent.
Nominal Pattern Percentages
If patterns are shot at 40 yards, then the below nominal 30"-pattern percentages can be applied to determine the amount of choke in a particular shotgun barrel/choke combination.
Standard pattern percentages at 40 yards:
Full choke ..... 60-70%
Modified choke ..... 55-60%
Improved cylinder ..... 45-55%
Skeet at 21 yards ..... 75-100%
Currently, there are choke tubes that fill in the gaps between full, modified and improved cylinder, and often these tubes provide better pattern performance for given applications. Improved-modified often delivers better patterns than full, and light-modified bridges the gap between improved cylinder and modified, providing slightly denser patterns than the latter and slightly less density than the former. These percentages are only guides, and often shooting patterns will reveal that the choke stamped on a choke tube or barrel is far from the results; even a better reason to pattern your shotgun.
Patterning References
Many shotgun-oriented books contain information on patterning. Perhaps the best is the out-of-print The Mysteries of Shotgun Patterns by George G. Oberfell and Charles E. Thompson. I found my copy on amazon.com, and if it’s not available new, a used-book search can probably locate a copy. This book doesn’t much help with patterning modern ammunition—it was written in 1957, before most of the high-performance refinements were made to shotshells—but it does provide an explanation of all the tools we use to evaluate patterns.
The late Bob Brister’s Shotgunning: The Art And The Science is a bit dated, but contains much of interest to shotgunners, including his pattern tests that show the effects of shot stringing. Brister’s book is easily found in bookstores and online. Scattered throughout my own book, The Shotgun Encyclopedia (Safari Press), are explanations of patterning, choke and other aspects of shotgunning.
—John M. Taylor
This feature article, “What You Need To Know About Shotgun Patterning" appeared originally in the September 2005 issue of American Rifleman. To subscribe to the magazine, visit the NRA membership page and select American Rifleman as your member magazine.
Most Popular