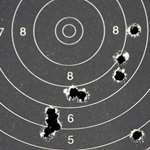
I can’t tell you how many times a fouled bore has proven to be the source of accuracy problems. I also can’t tell you how many times the gun owner has denied it. Almost without fail, they insist to the point of confrontation that they “already cleaned it and it still won’t shoot!”
The key here is to clean it correctly.
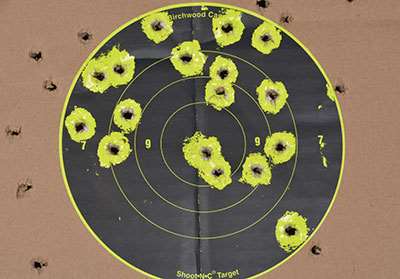
I had a precision rifle in the shop recently that had stopped shooting tiny groups. The guy was convinced it needed a new barrel. While the barrel was getting a little shot out, I managed to bring the gun around again, lending it at least another season of competition.
It had a few other problems, including some bedding issues introduced by the guy trying to make it shoot, but the root cause of the problem was fouling.
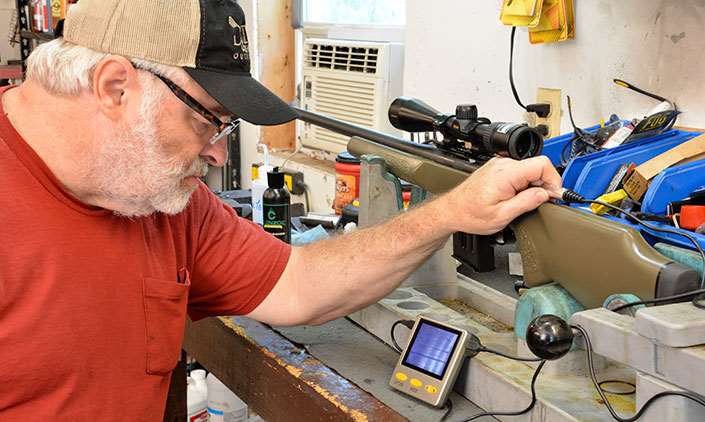
I ran a couple of wet patches through the barrel to get out the carbon fouling, and then used one of the new Lyman Borecam Digital Borescopes to look at the bore. The inside of the rifle bore looked like it was copper-plated—the entire thing was coated. Yet the guy insisted he had cleaned the rifle. I am certain that he had, but cleaning doesn’t mean it’s clean.
Lately I am seeing “experts” on the Internet claiming that a rifle bore must be fouled to shoot well. They claim that a clean rifle will not shoot accurately.
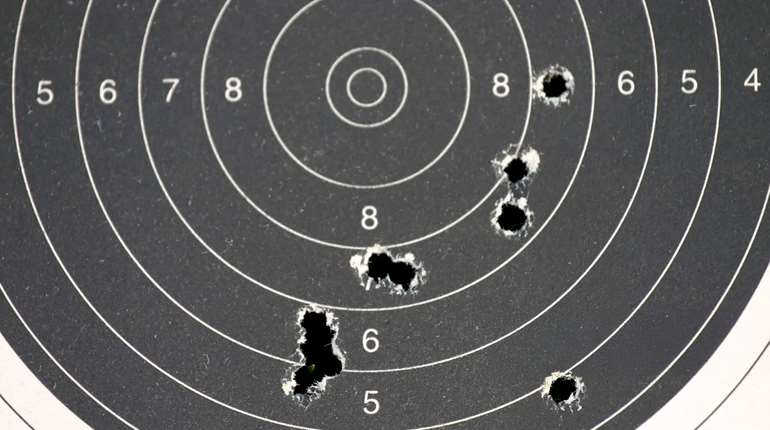
I have tested hundreds, perhaps thousands, of rifles over my career as a gun writer and have shot countless groups with those rifles. There is one simple truth I have learned: Clean barrels shoot better than fouled barrels.
Some of the Internet experts are bragging about shooting thousands of rounds without cleaning and then insisting that you must shoot dozens of rounds after cleaning before the gun shoots well again. This is total bunk. I have seen some guns that shoot well for a long time between cleanings. Usually, but not always, they are rifles with high-end, hand-lapped barrels that don’t foul badly anyway. But I have never seen a rifle where accuracy failed to deteriorate as copper fouling increased. A rough bore fouls faster than a polished and lapped bore, but they all foul sooner or later, and when they do, accuracy decays.
Let me say again, just to make sure the point is clear—when a good rifle suddenly goes bad, more often than not, bore fouling is the reason. It’s first on the checklist.
Many shooters run a few patches through the bore and maybe make a pass or two with a brush and assume that they have cleaned the rifle. That’s the equivalent of running your car through a puddle and claiming you washed it. Even if they have scrubbed for days, it doesn’t ensure the rifle is clean. Scrubbing with the wrong solvent accomplishes nothing, and, even with the correct solvent, sometimes guns are so badly fouled it takes a while to hit the bottom.
I once spent a week cleaning a badly fouled .17 Rem. rifle, and I was starting to think it was physically impossible for that much copper to be trapped in so small a bore. Another time, I had a .338 Win. Mag. that was fouled so much it looked like a smooth bore. It took days to get all the copper out of the rifle mentioned earlier that my long-range-competition-shooting friend brought to my shop. I am not saying I stood at the bench all that time, but I worked on those rifles a few times every day.
Running a few patches with some solvent through the barrel is not enough. The key is to clean the bore down to bare steel and remove all powder and jacket fouling. If you can accomplish that with a few patches, fine, but it doesn’t happen often. I have a few high-end barrels on custom rifles that foul so little they clean up with a few patches, but they are very rare critters in the shooting world, and most rifle barrels will require some effort to clean.
I can’t say how many patches or how many swipes of the brush will be required to clean any specific rifle—nobody can. If you read something or saw a video of a “system” where “X” amount of passes with a patch will clean your bore, you have witnessed the work of a charlatan or a fool. No two rifles are the same, there is no possible way to predict the number of patches needed to clean a fouled bore. It might be four or it might be 400.
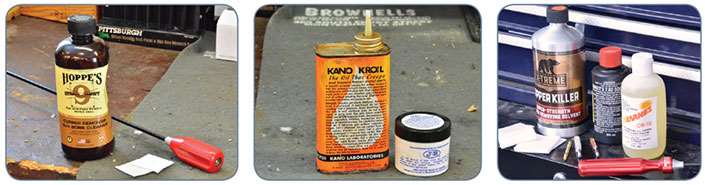
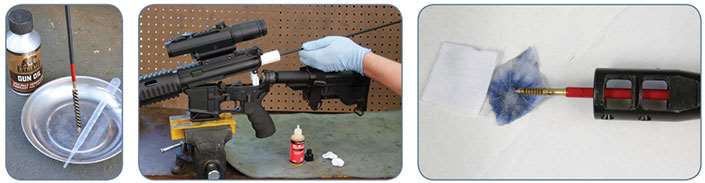
These are strong solvents, so glove up, use eye protection and have lots of ventilation. Start with a bore solvent that will remove both powder fouling and copper fouling such as Hoppe’s No. 9 Benchrest. Clean from the rear when possible, and always use a rod guide to keep the rod centered and to keep the crud out of the action.
Make several passes using a new wet patch each time. It’s best to use each patch for only one pass before replacing it with a new solvent-soaked patch, but I do sometimes use both sides of the patch at this stage of cleaning. One pass for each side. You may want to let the gun soak a few minutes between patches to allow the solvent to work.
Leaving the barrel wet with solvent, use a properly fitted bronze brush soaked with solvent to make several passes. Keep the brush wet with solvent, re-applying after every couple of passes. Don’t dip the brush in the solvent bottle, as this will contaminate the remaining solvent. Instead put some solvent in a small container and dip into that. I keep a supply of small Dixie Cups in my shop for this use. Or at least that was my approach for years until Jamey Majors gave me a box of pipettes. These are disposable tubes that will suck up the solvent, filling a bulb at the top and allow you to drip it back out a little at a time. They work well for wetting the brush, and actually use considerably less solvent than the Dixie Cup approach because there is no waste. Any leftover is still clean and can be returned to the bottle, whereas the leftover solvent in the Dixie Cup is contaminated and must be disposed of.
Never reverse the brush in the bore, instead push it all the way out of the muzzle then pull it back. After use, always clean the solvent from your brush with a spray of degreasing solvent, allowing it to run off the brush and flush away the gunk. This is to prevent abrasive debris from accumulating and to extend the life of the brush.
Let the gun sit for a few minutes to allow the solvent to work, and then follow with a couple more wet patches. Wait a few more minutes and run a dry patch through.
Now remove all traces of the first solvent using dry patches, followed with a few patches soaked with a degreaser such as acetone and a final dry patch, as some bore solvents do not mix well and we are about to get a lot more aggressive.
Switch to a copper-removing solvent like Sweet’s 7.62, Montana X-Treme Copper Killer or Barnes CR10. Run a couple of wet patches through the bore, and let it sit for a few minutes. Then follow with another wet patch, wait and repeat. Use snug-fitting patches so they will get down into the corners of the rifling, but not so tight that the solvent is squeezed out of them as they go down the bore. I often use the next smaller size jag and double-up on the patches so there is thicker cotton that will shape to the lands and grooves better.
The goal is to get to the point where you can let the solvent sit for at least five minutes and have no blue stains on the next patch through, indicating that there is no remaining metal fouling.
Remember, though, that a brass jag can leave a “false” stain on the patch, although it’s usually on the inside rather than the outside of the patch, so it’s easy to distinguish stains from bore fouling. When in doubt, use a plastic or stainless-steel jag.
If it’s just not happening fast enough, use a brush. Many sources recommend nylon brushes, but I don’t think they are aggressive enough. I use a bronze brush with the understanding that these strong solvents will eat the brush. Even with cleaning the brush with a degreasing spray immediately after use they are only good for a few cleaning sessions, so treat them as a consumable product just like the patches and solvents. Buy a few extra brushes to replace them as they are used up.
Remember that after scrubbing with a strong solvent and a bronze brush there will be a lot of blue gunk on the next patch through the bore. Some of that is from the dissolving brush, some of it is from the bore. It can be a lot, so don’t be shocked. Also, don’t think you have stumbled onto the secret to doing this fast. (If you actually do, please share.) All that blue gunk is a good thing to get out of the bore, but don’t think it means you are done.
For most aggressive copper solvents, it is recommended that they not be left in the bore for more than 15 minutes. That doesn’t mean you can stop cleaning after fifteen minutes, only that you need to keep removing the old solvent and replacing it with fresh. Keep working with wet patches and brushes to refresh the solvent often.
Even after the patches start coming out clean, it’s possible to have copper fouling trapped between layers of powder or carbon fouling. Just to be sure, clean all the solvent out of the gun and switch solvents with the idea that one might get the fouling that the other does not.
The best approach is to return to a general-use solvent such as Hoppe’s No. 9 Benchrest. Make sure to remove all traces of the first solvent before switching to another solvent.
If it’s really fouled, the old benchrest shooter’s trick of Kroil and J-B Bore Cleaning Compound can help to loosen things up. Kroil has excellent penetration qualities, so it will work in under the fouling. The J-B Bore Cleaning Compound is slightly abrasive, so it cleans the crud and copper out, but it’s not abrasive enough to damage the bore. In fact, with regular use it helps smooth the bore.
Wet a few patches and saturate the bore with Kroil, then let it soak for a while. Wet a tight-fitting patch with Kroil and then coat it with J-B compound. Run it through the bore a bunch of times, at least 20 passes, and twice that is better. Check the patch often and add more J-B and Kroil as needed. If the patch gets worn, replace it.
Switch to a clean patch wet with Kroil and clean all the goop out of the bore. Then use a few dry patches. Follow with a couple of wet patches using an aggressive copper solvent. Let it stand five minutes then run a clean patch. If it comes out with no blue stains, you are almost done. If there are blue stains indicating there is still copper fouling, keep repeating this process with both solvents and the J-B and Kroil in rotation until there is no sign of blue on any patches after letting the aggressive solvent work for five minutes.
Like I said, sometimes it’s a fast process and sometimes it seems like you will never get the darn thing clean. But until you can soak the bore with an aggressive copper-removing solvent, wait a timed five minutes and then run a clean patch through without blue staining, the gun is not clean.
Once it’s clean, you must remove all traces of any solvent or cleaning agents. Use patches soaked with acetone until the bore is clean, then follow with dry patches. Wet a few patches with a CLP-type solution such as Clenzoil and swab the bore. Then follow with a clean patch to wipe out the excess, but leaving a film.
Give the chamber the same treatment with a couple of swabs. One wet with oil, the other to dry. Clean up any solvent that has dripped into the action or other gun parts, and don’t forget to wipe off the muzzle. Then oil to prevent rust.
Very often this will correct the accuracy problems, but even if it doesn’t, cleaning at least eliminates one big issue off the checklist.
 Gunsmithing Modern Firearms
Subtitled “A Gun Guy’s Guide To Making Good Guns Even Better,” this latest book by longtime Rifleman contributor Bryce M. Towsley is of great interest to anyone who likes to tinker on his own guns, as well as those who want to dig deeper on how to care for them.
The accompanying article is excerpted from the book with permission, but it’s only one of 17 chapters Towsley penned. While some are based on projects, such as turning a Mosin-Nagant into a tactical rifle, he also covers quite a few projects the home “kitchen-table gunsmith” can tackle, including how to stipple a Glock or other polymer pistol frame. Need to install a new front sight or replace a Model 700 trigger? They are in there.
While he gets pretty deep on some fairly advanced principles for many—including a chapter entitled “Time for a Lathe?”—there are also quite a few things those with a little patience and the ability to read can accomplish themselves. Including in that latter category are building your own AR-15 or M1911 from parts.
The highly recommended 8 1/2"x11" book includes nearly 1,000 color photos and has 289 pages. If one project in the book isn’t for you, just turn to the next one. And, of course, there’s plenty of Towsley’s humor throughout. You can buy an autographed copy for $25 plus shipping from brycetowsley.com.
—Mark A. Keefe, IV, Editor In Chief