When it comes to bolt-action service rifles of World War I and World War II on the military surplus market, the models that typically come to mind first are rifles like the Mauser 98, Springfield M1903 and Mosin-Nagant. While these three examples have undoubtedly earned their reputations and fan bases, they often overshadow another workhorse of the era, the Lee-Enfield series.
The Lee-Enfield served as the standard issue rifle of Great Britain and the Commonwealth forces from the late 19th century through the first half of the 20th century. As the common rifle of the British Empire, the series was used across the globe in vastly different climates and conflicts. From the mud of the trenches on the Western Front, the arid sands of North Africa, and to the dense jungles of the South Pacific, the Lee-Enfield proved to be a reliable battle rifle. Although some early "Long Lees" and carbines had smaller magazine capacities, the Lee-Enfield's 10-round magazine, fed by stripper clips or "chargers," gave British soldiers a real advantage.
The use of a double stack 10-round magazine and cock-on close bolt-action meant that the Lee-Enfield was one of the fastest firing battle rifles of the era. In fact, when the Short, Magazine Lee-Enfield (or SMLE) Mk III was introduced in 1907, its magazine capacity was twice that of its contemporaries. The cock-on-close action allowed more rapid manipulation of the bolt than on other models, like the cock-on-open action of the Mauser 98. Trained soldiers drilled to accurately shoot 15 rounds per minute or more, greater than the potential output of opponents. For these reasons, the SMLE (which was renamed the No. 1 rifle in 1926) and the No. 4 adopted in 1939 were the equivalent of what the M1 Garand would become as a battle rifle—a “Commonwealth Garand.”
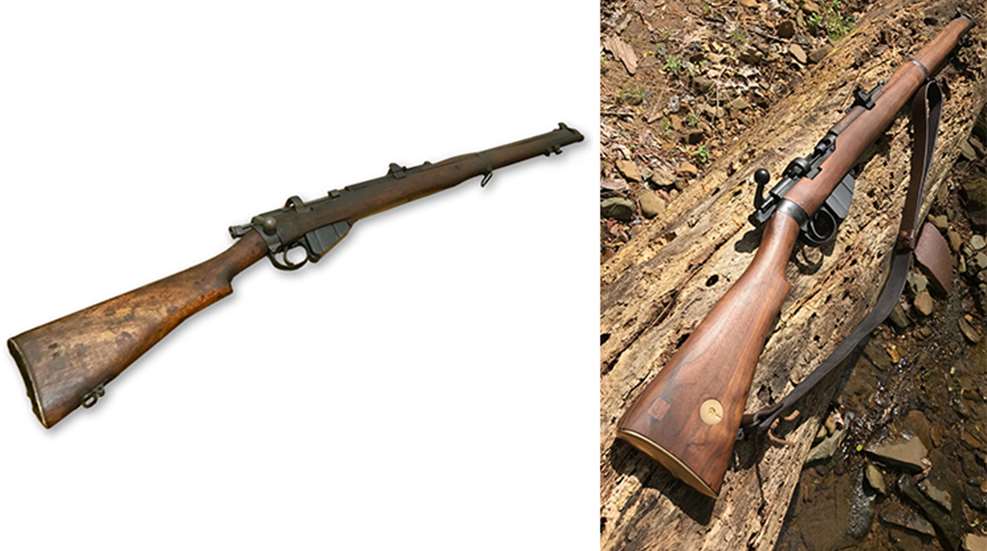
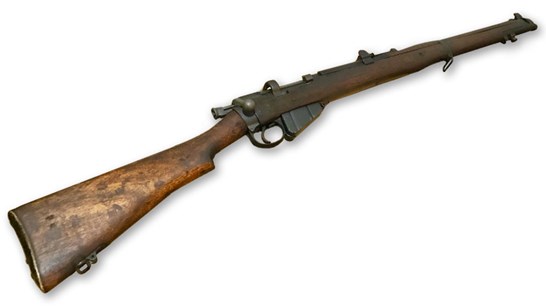
Lee Enfield No. 1 Mk III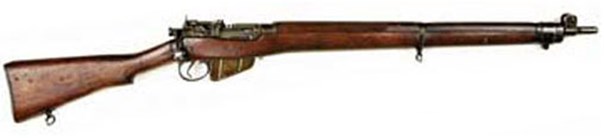
Lee Enfield No. 4
There are two models of Lee-Enfield most common on the surplus market today: the No. 1 Mk III* and the No 4. The No. 1 Mk III* and No 4 share design principles, but only a few small parts are fully interchangeable. Enthusiasts generally prefer the No. 4 due to more familiar peep sights, longer sight radius, and slightly improved accuracy. In addition, No. 4s can generally be found with less wear for a comparatively lower price than the Mk III*. Parts and furniture are also easier to find for the No 4.
On the other hand, No. 1 Mk III*s are desirable for their historic role in both world wars across multiple theatres. Depending on where and when they were made, Mk III*s are generally more intricate in their craftsmanship and build quality over the No. 4, which was simplified to ease production. While Mk III*s that are veterans of battle can be purchased, they generally look the part as well with wear, tear and taller price to match. Cheaper examples are on the market, but expect a rifle that has non-matching parts or has been “sporterized. “
With these factors in mind, I decided to drive to a local gunshop to look for a No 4. When I arrived, six Enfields were on the rack of which one was a No 4. This Canadian-made Long Branch 1943 No. 4 Mk 1 had typical wear on the metal and wood. It held my interest until I looked at the $1,000 price tag. It ended up back on the rack.
That left five rifless to consider. Two were Indian-made Ishapore 7.62x51 mm derivatives (model 2A1s) with noticeable wear, along with $600 price tags. The last three rifles were No. 1 Mk III*s, one manufactured by Royal Small Arms Factory Enfield (RSAF) in England, and two by Lithgow Small Arms Australia. The RSAF example, despite being a 1918 model with original unit marks in the wood, was $850 and showed its age. The first Lithgow was a 1942-marked gun in decent shape and with a $820 price tag. The second was dated 1920 with the metal parts visibly free of rust and in good shape, but with very worn wood and a cracked buttstock for $400. 
Taking a Gamble
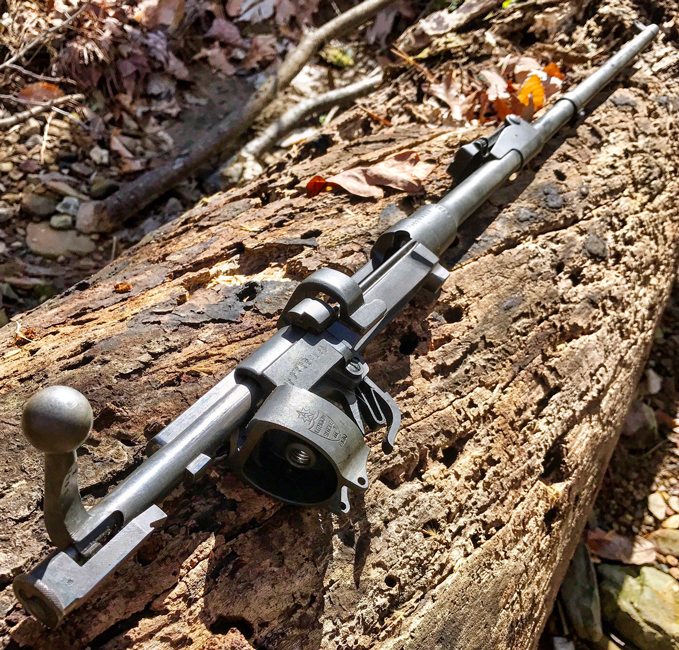
It was evident why the second Lithgow was the cheapest. My initial reaction was to put it back and leave empty handed. Yet, something caught my eye with this Lithgow Mk III*. The fore-end was made of walnut with the dial and cutouts for volley sights and a magazine cutoff, features that would not be present on a post-World War I SMLE. The serial numbers of the bolt handle and nose cap did not match, generally something that lowers the value. However, they were both from the same production sequence made by Lithgow. The bore showed strong rifling without any noticeable pitting, with the barrel’s serial number matching that of the receiver. The final oddity that deepened my interest was the lack of an importer’s mark or added serial number, which was present on every other SMLE on the rack. At this point, I decided to take a gamble with this rifle and my $400.
In order to understand the mixed batch of parts on my SMLE, it is necessary to explain changes in production of the Mk III during World War I that resulted in the Mk III*. Prior to the outbreak of war in 1914, the SMLE Mk III’s design incorporated finely machined parts and intricate features that made it a comparatively expensive service rifle for the time. By the end of 1915, the British realized that they would not be able to produce enough rifles to meet wartime needs. In order to increase production and lower the cost, the rifle was simplified. These changes included the deletion of the long-range volley sights, rear sight windage adjustment knob along with simplification of the cocking piece, rear sight protector, and sling swivel band. These rifles were designated SMLE Mk III*. The alterations for the Mk III*, while in full swing for British manufacturers, did not immediately begin for Commonwealth manufacturers like Australia’s Lithgow until later in the war. Existing Mk IIIs were modified later to Mk III* specifications, and some Mk III*s made during or shortly after the war were made with leftover Mk III parts in the mix.
Upon taking the rifle home and carefully disassembling it, I began to examine its features. It is important to note that when disassembling a Mk III and Mk III*, never attempt to unscrew the buttstock before carefully removing the fore-end. The Mk IIIs utilize a square shaped head on the stock bolt that fits into a specifically cut notch at the rear of the fore-end. Attempting to unscrew the stock bolt with the fore-end attached will cause damage and likely crack it.
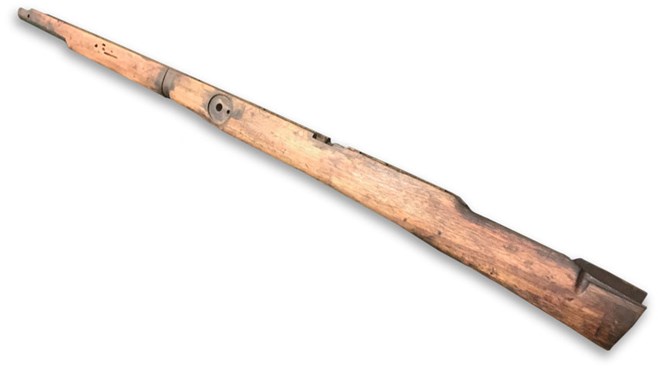
The damaged butt was made of coachwood and likely original given that it was the only piece of the wood furniture to have the seven pointed star with an “A” in the center, the period symbol for Lithgow SAF. As mentioned earlier, it was abundantly apparent that the fore-end was not original due to the volley sight, walnut composition, "EFD" stamps indicating manufacture by Enfield in Britain, and a different serial number without a sequencing letter. The only other part that did not have a Lithgow stamp was the rear sight guard also marked "EFD," but of the simplified Mk III* type.
Interestingly enough, despite the fact that the rifle was built as a Mk III*, it had some Mk III features that were marked with the Lithgow seven-point star. This included the cocking piece, sling swivel band, and even an adjustable windage gauge on the rear sight. 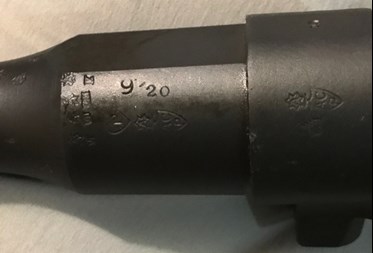
I found that the barrel was marked "9’20" indicating that it was accepted in September of 1920. This means that the barrel was original and that it was not re-barreled in “factory through repairs,” or "FTR," as is common with most pre-World War II SMLEs. The fact that the bore is in good condition given its age and the fact that it was likely shot with corrosive ammunition is quite remarkable. What is also remarkable is the lack of any importer marks, which indicates that the rifle likely did not find its way into the country as most did in the 1980s. It was also marked "H.V.," meaning that the rear sight base and barrel were for the faster spitzer bullet of the Mk VII ammunition adopted by Britain in 1911. Lithgow did not incorporate this change until the end of 1917, meaning that if the rifle was made before then and not modified to H.V., the barrel and rear sight base would not be compatible with most commonly found .303 ammunition today. 
Despite the fact that that serial numbers on the nose cap and bolt did not match, they were from the same production sequence “A” which ran from 1918 to the mid 1920s. There was a potential issue with headspace safety, since the bolt was of a non-matching serial number. To determine if the rifle would be safe to shoot with the existing bolt, I used a three-piece coin style SMLE headspace kit. This kit includes a go, no-go, and field gauge for determining if the rifle is within safe headspace. The bolt fully closed on the go, closed mostly with resistance on the no-go, and did not close on the field gauge. While it might sound alarming that the rifle mostly closed on the no-go gauge, as it turns out this is the typical headspace tolerance for post-World War I SMLEs, which were slightly on the loose side to account for inconsistent ammunition made at the time. As long as the bolt does not close on the field gauge, or .074 inches, the rifle is considered safe to shoot.
With the rifle disassembled, the next step was cleaning of all metal parts of cosmoline and other grit built up in covered areas. When I purchased the rifle, I initially thought the metal was Parkerized due to its dark gray appearance. However, on closer inspection I noticed that the metal finish was lighter in some areas than others with no evidence of scuffing. After researching the metal finishes used by Lithgow during the period the rifle was built, it became apparent that the metal was not parkerized, but oil blackened. The process of oil blackening involved heating the metal parts and then quenching them in oil to form a black gray coating that inhibits rust.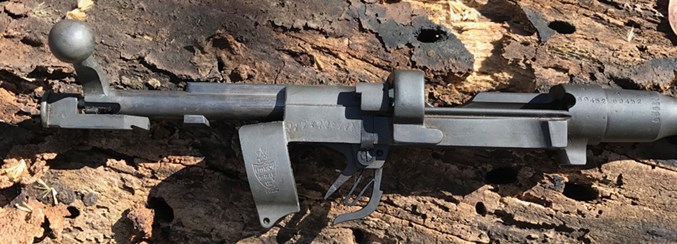
This oil blackened finish was visibly thin after nearly a century of handling. Despite my better judgment, I decided to strip and refinish the metal. This opened my options for cleaning the metal parts, in that I no longer needed to worry about damaging the finish with stronger cleaners. In order to clean off the caked on cosmoline, I submerged all metal parts in a covered tub of acetone and allowed it to sit for an hour. Using Nitrile gloves, a respirator, and safety glasses, I carefully scrubbed the metal until it was visibly free of cosmoline.
Next, I stripped the remaining oil blackened finish with Birchwood Casey’s blue and rust remover, leaving the metal in its bare state. I chose a cold blue solution called Kleen Bore black magic, which produces more of a black-gray finish instead of a black-blue finish that is expected with most other cold blues available. In most situations a complete re-bluing of a firearm with cold blue solution is considered to be a fool’s errand, but it was worthwhile for this project.
The trick to successful and consistent cold bluing is a detailed cleaning and degreasing of the metal surface to insure there are no contaminants that might interfere with the solution. Before bluing it is also important to tape over or block off any areas that you do not intend to coat, like the bore. Before application, is also beneficial to heat the area you are about to finish with a blow dryer to get it just warm enough to quickly dry the solution and prevent runs. After 30 seconds, the treated area must be rinsed in warm water to stop the chemical reaction of the bluing solution, or it can continue and spur the onset of rust. After rinsing, the steps of cleaning, warming, applying, and rinsing must be repeated for each coat.
Each metal part took the solution well, coming out a deep dark grey as desired after three applications. After all applications were done, the metal parts were covered thick in oil and left overnight in trash bags to completely stop the chemical reaction. Inspecting the parts the next day, the new finish had a similar black gray color as the oil blackened, although with more luster and darker.
Furniture
The next focus of the restoration was the most difficult and expensive: replacing and refurbishing the wood furniture. In order to return the rifle to like new condition, I opted to replace the fore-end and buttstock and refinish the existing topwood set. The buttstock was easily replaced with an unissued Enfield walnut version for $35 on eBay. The fore-end was far more difficult and expensive to replace, given that there is short supply of originals. After a month of looking, I finally won an "EFD" marked 1947 unissued fore-end for $200 on eBay.
Despite now sinking an extra $235 into my arguably overpriced project, I posted the fore-end that came with the rifle for sale. As it turns out, original volley sight fore-ends for SMLEs are “unobtanium.” With a massive bidding war occurring over it, and I easily made my money back for the replacement wood.
As I waited for the new wood to arrive, I began restoring the topwood set. This started with a six hour-long soak of the wood in acetone to strip out decades' worth of the dirt and linseed oil. After the soak, I let the wood dry on a shelf for a day to ensure that it did not warp and that the wood was completely dry before moving on. Next was the repair of two small cracks in the ears of the front topwood, which is typical damage to find for this part. Using carpenters glue and wood clamps, the cracks were filled and left to dry for another day.
When the new stock and fore-end arrived, they showed signs of raised grain and extra material, as they did when fresh made. This is completely normal for "new" old stock wood furniture, as they were not fine-tuned and fitted until paired to a rifle at the factory. On the SMLE, the fit of the fore-end to the barrel and receiver are crucial to the overall accuracy since it provides the primary bedding. If a fore-end is damaged, warped, or simply has uneven bedding, the result can be decreased accuracy of the rifle.
SMLE fore-ends were fitted specifically to each rifle at the factory, hence the presence of the serial number on the fore-end on all-matching rifles. A No. 1 Mk III* new from the factory would typically have an acceptable spread of two to four inches in diameter at 100 yards. While this spread is not as small as the potential of contemporaries like the Mauser or Springfield 1903, both derived from hunting rifles, the SMLE was purpose built as a battle rifle and deemed accurate enough for its intended role. In fact, two- to four-inch spread at 100 yards on the Mk III* is identical to the standard spread of the M1 Garand with ball ammunition.
Since my new fore-end was unfitted, it meant that the tasks of carefully fitting and removing material where needed now fell on my shoulders. These were slow and tedious tasks as I checked clearance, bedding, and chiseled the draws to fit snug with receiver socket. This particular fore-end also had excess wood on the left side that needed to be sanded down to be uniform with the topwood. Using 120 grit sand paper with light pressure along the length of the area, I reduced the excess until it was flush and consistent.
With the wood fitted and shaped, now came the final standing and smoothing of the worked on wood. Using a 220-grit flex pad, I gradually removed any remaining raised grains and 120-grit scaring to create a consistent smooth dull surface on all the wood. Despite the fact that all of the wood was EFD walnut, the older top wood was still noticeably darker than the rest. In order to more closely match the wood, I used small amounts of Minwax dark walnut stain in thin coats.
After letting the stain dry, the final step for the wood was the application of linseed oil, as was historically done. This process was the longest step, as it took an hour for the wood to soak up the linseed oil and days to dry. While waiting, I removed scratches and evened the surface of the brass butt plate with 300 grit sand paper and the light use of 00 steel wool to bring back its luster without polishing it. When the wood was finally dry it was time for final reassembly. 
Moment of Truth
This was the moment of truth, getting a first glimpse of my completed gamble. First the butt was fitted, ensuring there was a small gap between the wood and the receiver socket to prevent the stock from cracking from recoil impulse. I then carefully installed the fore-end and made final checks that the barrel and receiver were properly bedded and floated where needed. Next came the screws, springs, topwood, and the nose cap.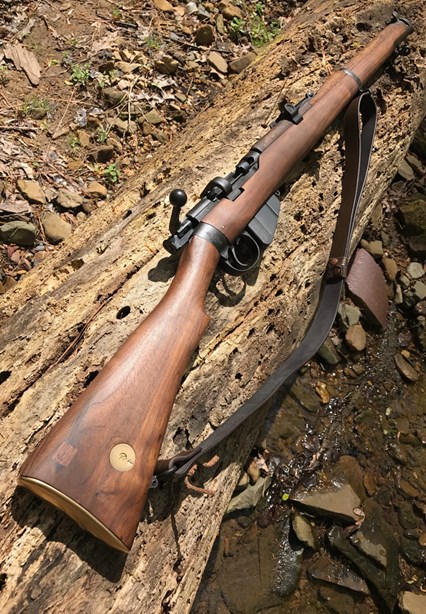
Refinished, the now eye catching rifle barely looked like the $400 project I began two months earlier. This goes to show that with a little knowledge, elbow grease, and patience, an old battle rifle can be a diamond in the rough. While I would not recommend restoring a complete SMLE with matching parts, since doing so may reduce its value, restoring one that is comprised of mixed parts or was “sporterized” is achievable. Despite the fact that .303 ammunition is not as easy to find in stores as it is online, the SMLE Mk III* is a smooth and fun rifle to shoot with a tame recoil impulse and fast bolt speed.