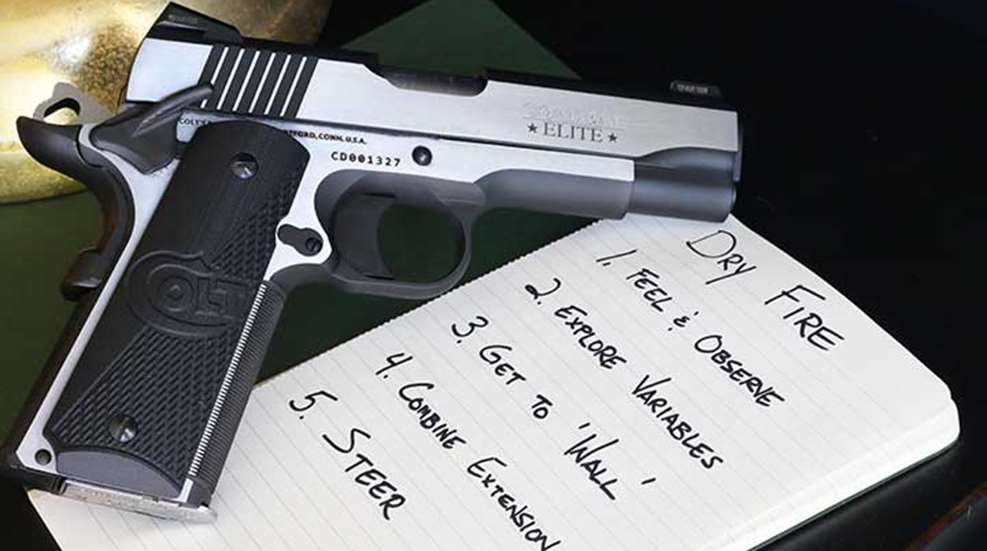
Most of us are spending a lot of time indoors that would otherwise be excellent shooting weather or are unable to get to the range. Editor-in-Chief Mark Keefe asked if I would share some thoughts on dry fire to perhaps help shooters get some repetitions in while stay-at-home orders are in effect. I am happy to do so with the understanding that there are many ways to organize dry fire, and this is but one, albeit one that I find very helpful.
I will focus on handguns here with some thoughts on rifles to follow perhaps in a later piece. I’ve been dry firing semi-religiously since my high school small-bore rifle team days back in the late 1980s to early 1990s. I’ve gone through very heavy dry-fire regimens during different workups and deployments and others focused as heavily when competing in different disciplines. Now I tend to dry fire almost daily for just a few minutes simply because I enjoy it.
I find it relaxing and for me, the familiarity of locking onto the front sight and purposefully working the trigger clears my mind and starts the day off "right." I often have a new-to-market pistol lying around for testing and have a need to learn a new-to-me trigger in order to get the best out of it for a thorough review. The following is the process that I use in dry fire, and I think it has application for shooters who do not yet have a firm and productive regimen of their own.
Safety first, however. Dry fire is inherently dangerous. I’ve seen mistakes leading to dry fire suddenly and unexpectedly becoming "live." The risk is always there, so a few reminders. No live ammo or loaded firearms in the dry-fire area. Violate this at your own risk and peril. Most of the bad stories I personally know of went astray here.
Be mindful of the direction of "fire" and what is beyond. Pick an aiming "azimuth" that would send a round through no rooms in your house which might be occupied and avoids your nearest neighbors. A friend had an incident where some lowlife drove by and shot into their house with a handgun.
This average variety 9 mm round sailed through a shrub, a porch rail, the exterior wall and through two rooms. You must have a safe direction of fire to forestall tragic mistakes. Now onto the good stuff. The process I use can be broken into five sequential steps to learn and then exercise shot delivery. I will address where some steps are more relevant to certain platforms as I go.
Step 1: Feel and Observe.
The objective here is, perhaps surprisingly, not to break perfect shots but to learn and understand exactly how the trigger feels along its movement and to observe the baseline movement of the front sight as the trigger is manipulated. As long as the front sight stays within the notch of the rear sight, life is good, and the shooter needn’t concern himself with judging the quality of the break. The entire point is to identify the ‘parts’ of the trigger movement and to be able to learn to recognize the feel of each.
For example, many pistol triggers have essentially two stages: a movement stage where the slack is removed and an engagement stage where the action parts are released to fire the shot. The first stage has many names such as pre-travel, weighted take-up, slack, etc and is there to varying degrees, even on single-action semi-automatics and revolvers.
There is considerable take-up in the single-action mode of most double- and single-action semi-automatics like the Beretta 92 series, and many striker-fired semi-automatics have a movement stage with more resistance. The goal at this point is to fully learn the feel of that movement stage. How far does it extend? Does it end predictably at a "wall" of resistance? Does the weight or feel of it change along its arc?
The next objective is to feel through the engagement stage. How much movement and travel can you feel as the shot is released? Are there any "humps" and bumps or is there a gradual "roll" leading to the shot? Is it consistent and, if not, is there a pattern to two different feels?
If you have a great 1911, this inquiry may be relatively brief, but even in many good 1911 triggers, I can interrogate a lot of feel in the break. It is to the shooters’ benefit to get ridiculously specific in this inquiry, especially in those striker-fired semi-automatics with a lot of travel and change throughout the release.
Throughout this first step, I am of course happy if the shots are breaking perfectly centered. Yet, I am not particularly concerned with the break, as long as the front sight is not diving out of the notch to one side or another. I am foremost trying to feel the parts of the trigger’s journey and map them in my mind.
My tempo is slow and deliberate, much more so than in live fire with "good" triggers at a 2- to 3-second press and more challenging ones in the 4- to 7-second time frame. With some striker-fired handguns, there is an inconsistency and a variety of feels throughout the arc, which may take a while to fully understand.
During this and the subsequent steps, I tend to aim at a wall corner, the vertical line in the background serving as a useful reference to gauge the movement in the front sight as I manipulate the trigger. I do not try to force the shot to release in any way, but I simply feel my way through and observe what happens in the reaction of the front sight with a detached level of judgment.
Step 2: Explore Inputs and Variables.
With the movement somewhat mapped in my mind, I now begin to see how I can keep the front sight more reliably centered through the break. I am still not "forcing" the shot with a "NOW!" approach but working through a checklist of inputs to explore the reaction in the sight alignment at the moment of release. At this point, I still largely defer judgment on the quality of my "shots" and am simply exploring and learning. I have three reliable "go-to" variables that I work through.
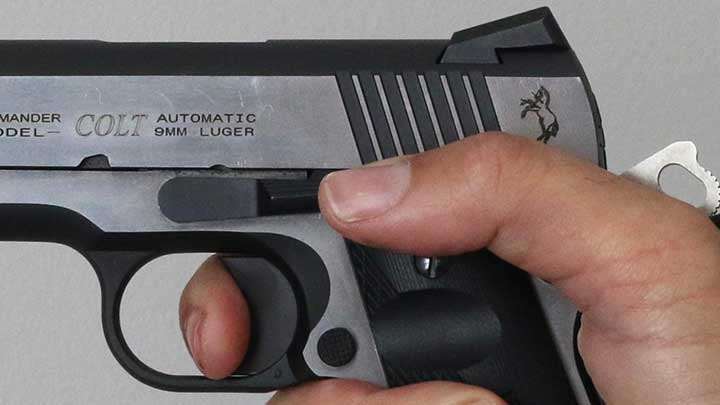
The first is more tension and pressure in the little finger of the firing hand. If the shots are breaking with a somewhat lazy movement of the front sight, adding a little more tension at the bottom of the firing grasp will have a visible result in the rigidity of the sight alignment at the moment of truth.
The second is varying finger placement on the trigger face. I like to explore the reaction in the break through placement up and down the trigger face. This allows me options later in live fire where, with some pistols, I know that, for most shots, the most comfortable/natural trigger finger placement is good enough but while dressing up a particularly difficult shot, I can shift to the sweet spot to ensure a clean break.
I do a similar exercise with horizontal placement. I try to really "feel" the face of the trigger and determine if I am engaging the flat face or the corner. I map the results of each in dry fire to see how much movement that drives in the front sight.
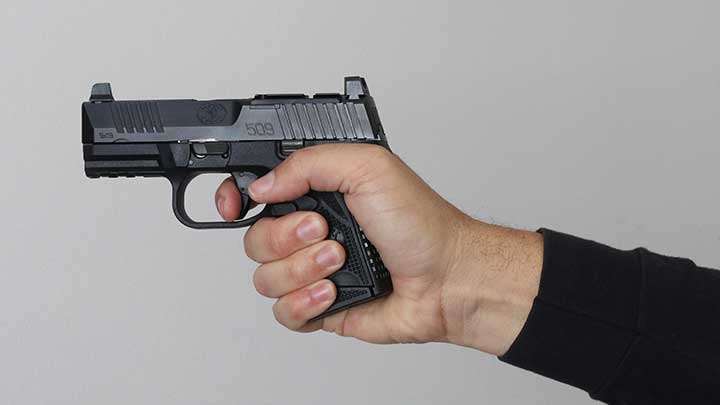
The third is altering tension in the support hand grasp. As I see predictable movement in the front sight with a repeatable, comfortable press of the trigger I can then determine whether targeting more tension in the support hand will counteract that. Many right-handed shooters will see the front sight dart to their left at the moment the dry fire shot breaks, particularly with some popular striker-fired handguns.
Whether that is a slight bobble or a distinct and frustrating hop depends on skill and perhaps the quality of the trigger. In either case, targeting some directional counterforce from the support hand will often reduce that movement significantly. This step is complete when the shooter is beginning to see repeatable, say 8- to 9-repetitions out of 10, "good" sight pictures as the shot releases.
Step 3: Get to the ‘Wall.'
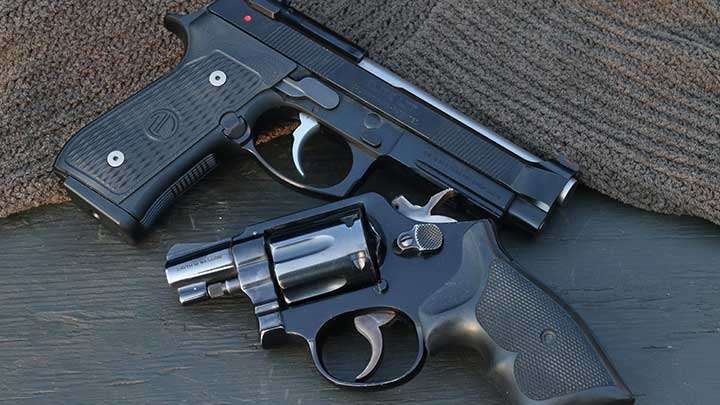
This step translates the data gained in step one into practical knowledge. The shooter seeks to press through the take-up to "hold" at the initial resistance of the engagement stage with the sights aligned. With a single-action semi-automatic, this is a slight, simple movement. With most double- and single-actions it’s a longish, simple movement.
With many striker-fired handguns, it may take some practice and finesse. The object here is to take a large percent of the movement and several pounds of the overall trigger weight off in one sweep to the engagement stage. The shooter then holds at that point for a beat or two, and on their decision, releases the striker or hammer in what should be an easier process.
The release here is actually less important than quickly getting to the "wall" where engagement begins. When I am working with a new pistol, I will spend some dedicated time being able to confidently sweep through the movement to get to the engagement. Once at the wall that mediocre 6-lbs. trigger is probably a quite manageable 3.5- to 4-lbs. press over significantly less travel.
With better triggers the weight and travel at the wall is an easy 2- to 3-lbs. over a crisp, short engagement. This approach works really well with most stock triggers in the carry and duty range but may not translate to all aftermarket or tuned triggers. In some cases, the overall feel of the trigger complicates a reliable ‘wall’ and it might lead to early shots to sweep boldly through. If that is the case, skip to step five.
Step 4: Combine Presentation with the Movement Stage.
When I have found the degree that I can sweep through the take-up, I then begin to dry fire, getting to that point as the pistol extends into final firing position from the holster or ready position. The goal is to be at the engagement stage of the trigger as the front sight settles fully into the notch on target. This assumes that the shooter has already made the firm decision to fire and is not presenting to assess a potential shot, in which case the finger would remain off of the trigger.
Step 5: ‘Steering’ the Trigger.
Steps three and four do not really apply to double-actions, whether revolvers or the first shot in double- and single-action handguns. This step applies as more to double-actions than it does to striker-fired pistols. Many shooters are somewhere on the spectrum between somewhat intimidated and downright afraid of the double-action trigger. This is a perfect time to address and overcome that.
The goal in this step is to roll all the way through the trigger arc, or track in a 1911, in a smooth, continuous sweep. Much like we did in step one, the object here is to feel and observe the movement as we roll through and see the movement in the front sight. The pro tip is to focus on a smooth, consistent sweep and not mentally chain yourself to the front sight being as still, as it would be in more deliberate fire.
For the 1911, we are crashing through the take-up and compressing the trigger in one swoop. With the striker-fired handguns we are "rolling over" the wall as a speed-bump while the trigger is compressed in one smooth motion. The amount of pressure may vary slightly as you "roll over" little hitches and bumps in the trigger arc as movement transitions to and through engagement. The idea is to steer the trigger through that sweep such that the front sight wobbles inside of the rear-sight notch without totally leaving it.
Think of it initially as the rear sight being goalposts and the front sight being the ball. You are steering the ball through the goal with that sweep of the trigger. As long as the front sight stays mostly within the notch, the shot impact will serve most practical demands out to 7 yds. Just as a ball that hits the edge of the goalposts will often bank in, the outboard edge of the front sight can leave tighter rear sight notches as long as most of the front sight is within the notch.
For many stock sights, the rule of thumb is that the front sight being all the way over touching the edge of the rear notch will push the impact roughly 1” for each 5 yds. of distance. That deflection is perfectly acceptable in many situations, and shooters needlessly try to hold the front sight motionless when a wobbly arc is okay.I promise you that over time and with familiarity, even a double-action can be confidently swept with the front sight nearly still. Accepting wobble within the notch is step one to getting there.
The second approach to steering the trigger is "landing" the front sight. As a shooter gains familiarity with the arc of movement and the little bumps or hitches within it they will eventually get to the point where they are able to put final "terminal guidance" to "land" the front sight close to the center of the notch just as the shot fires. This is similar, but not necessarily the same as stacking the trigger.
Landing accepts that there will be a degree of movement in the early portion of the stroke, but at some point, the shooter will have a "spot" where they have leverage or advantage and can steer the front sight back to center as the shot breaks. Progress begins once a shooter accepts that they are in charge and are actively steering the trigger. Early, even ugly, movement in the sight picture has no impact, as long as the shooter is able to land the front sight back at center as the handgun fires.
Following the five steps allows me to quickly adapt to a new pistol even with a less-than-ideal trigger and get the most out of it. Even if you already have a dry-fire regimen, chances are that some of these steps may fit in and help you gain more control of your trigger. Give it a try and share your thoughts.
Most Popular