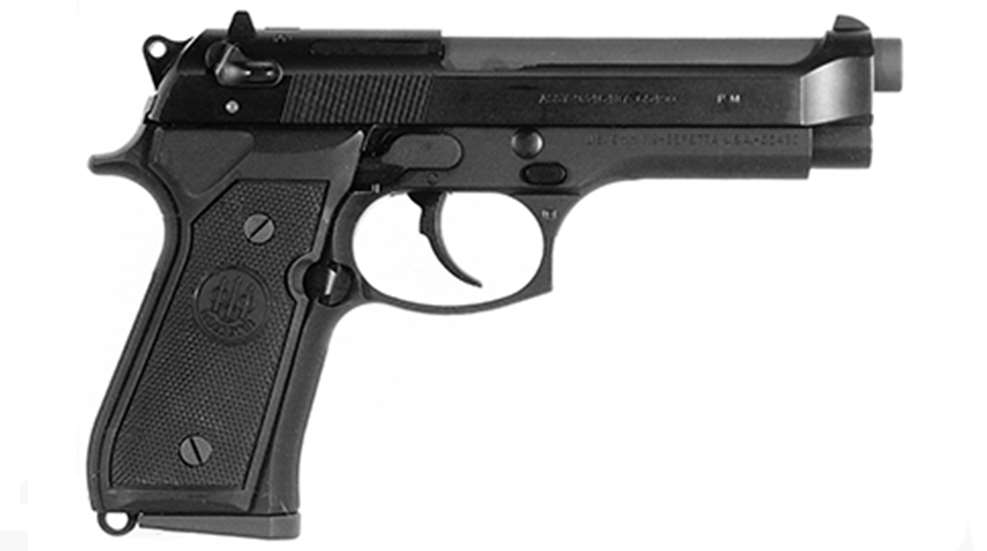
The handgun adopted as the “U.S. Pistol, M9” in 1985 has its roots in Italy’s Beretta Model 1951 or Brigadier. Beretta introduced a double-action 9x19 mm NATO pistol with a frame-mounted safety and a 15-round capacity-using a similar open-top slide and barrel arrangement-in 1976 under the Model 92 name. The safety was moved to the slide in 1979, and that pistol, the 92S1, with an ambidextrous safety/decocker and reversible magazine catch was tested by the U.S. Air Force in 1979. Several other small changes were made before the 92SB-F was formally adopted by the U.S. military as the M9. A slide capture device was added in 1989. The civilian equivalent of the M9 is the Model 92FS.
The 9x19 mm NATO M9’s adoption was part of the Dept. of Defense’s efforts to standardize handgun ammunition with our NATO allies and field one handgun for all U.S. armed services. Some of the U.S. contract guns were made in Gardone, Italy, but most have been made at Beretta USA’s Accokeek, Md., factory. The latest improvement to the M9 came with the M9A1, which the Marine Corps ordered in 2006, and a Picatinny rail was added to the dust cover.
The U.S. military reaffirmed its initial decision to go with the M9 in a January 2009  announcement of a contract for up to 450,000 Model 92FS pistols. It was the largest single military pistol contract awarded by the U.S. government since World War II.
All told, by December 2013, Beretta had produced around 4.2 million Model 92s and its variants since the double-action 9x19 mm NATO gun was introduced. The U.S. M9 has distinguished itself time and again at the proving grounds, in the field and in war, and it appears the M9 will remain the standard U.S. military sidearm for the foreseeable future.
Disassembly Instructions
Clear the pistol by removing the magazine, retracting the slide, and checking the chamber  and magazine well to make sure the chamber is empty and the gun unloaded.
With the slide forward and the hammer down, press the disassembly latch release button (27) (Fig. 1) and swing the disassembly latch (19) down and forward (Fig. 2). Allow the slide assembly to move forward off the frame (18).
With the slide assembly resting upside down on a firm surface, lift the recoil spring guide (17) from its step on the locking block (2) (Fig. 3) and, while restraining the guide, remove the spring (16) and guide to the rear. Push the plunger (3) at the rear of the barrel underlug (1) to detach the locking block from the slide lugs (Fig. 4). Move the barrel forward to clear the extractor (6) and remove it from the slide.
That completes basic field-stripping of the Beretta 92FS. Further disassembly is not recommended by Beretta unless performed by a competent gunsmith. Nevertheless, here is the full disassembly.
Remove the stocks (44), taking care not to lose the stock screw washers (62). Press the  back of the magazine release button (41) down and away for removal. Reinstalling the magazine release can be done with the button oriented to the left or right.
Depress the upper arm of the trigger bar spring (26) from its groove in the underside of the trigger bar (25) and slowly release the spring out and away to the right. Remove the trigger bar. Pull the slide catch (21) out to remove the catch and its spring (20). The trigger pin (23) can be drifted out to the left, freeing the trigger (22) and its spring (24).
Drift out the hammer spring cap spring pin (43) to free the cap (37) and slowly release tension on the hammer spring (36) to remove. Tapping out the hammer pin (34) will allow the removal of the hammer (33) and strut (35). Drift out the sear pin (40) to release the sear (38) and its spring (39) into the magazine well. Tap out the hammer release lever pin (31) and the ejector spring pin (32) to free the ejector (30) and the hammer release lever (29) for removal upward from the frame. Remove the firing pin block lever (59) by lifting up and out.
With the slide-mounted safety in “on-safe” position, drift out the two right safety lever  spring pins (58). Pull the right safety lever (57) to the right for removal. Tap out the firing pin retaining spring pin (54) to remove the firing pin block (53) and its spring (52). With a punch, dislodge the firing pin plunger (15), depress the rear face of the firing pin (12), and pull the left safety lever (14) up and to the left for removal, taking care not to lose the safety plunger (56) and its spring (55), the trigger bar release plunger (10) and its spring (11). Slowly release pressure on the firing pin to remove it and its spring (13). Drift out the extractor pin (7) and pry out the extractor (6) and extractor spring (8).
To disassemble the magazine, use a punch to depress the stud on the lock plate (50). Release the magazine base (51) by sliding it forward, taking care to restrain the magazine spring (49) and lock plate as tension is released.
Reassembly is in reverse order.
Parts Legend
1. Barrel
2. Locking block
3. Locking block plunger
4. Locking block plunger retaining pin
5. Slide
6. Extractor
7. Extractor pin
8. Extractor spring
9. Rear sight
10. Trigger bar release plunger
11. Trigger bar release plunger spring
12. Firing pin
13. Firing pin spring
14. Left safety lever
15. Firing pin plunger
16. Recoil spring
17. Recoil spring guide
18. Frame
19. Disassembly latch
20. Slide catch spring
21. Slide catch
22. Trigger
23. Trigger pin
24. Trigger spring
25. Trigger bar
26. Trigger bar spring
27. Disassembly latch release button
28. Disassembly latch release button spring
29. Hammer release lever
30. Ejector
31. Hammer release lever pin
32. Ejector spring pin
33. Hammer
34. Hammer pin
35. Hammer strut
36. Hammer spring
37. Hammer spring cap
38. Sear
39. Sear spring
40. Sear pin
41. Magazine release button
42. Magazine release button spring
43. Hammer spring cap spring pin
44. Stocks (left and right)
45. Stock screws (4)
46. Stock screw bushings (4)
47. Magazine tube
48. Magazine follower
49. Magazine spring
50. Magazine lock plate
51. Magazine base
52. Firing pin block spring
53. Firing pin block
54. Firing pin retaining spring pin
55. Safety plunger spring
56. Safety plunger
57. Right safety lever
58. Right safety lever spring pin (2)
59. Firing pin block lever
60. Magazine catch spring bush (short)
61. Magazine catch spring bush (long)
62. Stock screw washers (4)
Most Popular