The AR-15 style semi-automatic rifle has become one of the most popular guns in the United States. Experts cite a variety of reasons as to why this platform is such a crowd pleaser, including its accuracy, flexibility, and at the top of the list, its modularity.
Not only can the AR-15 can be configured for competition, hunting, plinking, and self defense, the modifications can be made with just a few tools in the comfort of your own home-based workshop. In fact, plenty of AR enthusiasts say it's easy to build a complete rifle from scratch. They usually point to one or more of the following three reasons for going the do-it-yourself rifle route:Building an AR-15 instead of buying one saves money; you can build a rifle with the features you want; working on ARs is an enjoyable hobby.
But how easy is it to assemble an AR-15 at home? When I started this project, I was in the same boat as most beginning AR builders. I had an understanding of how to operate and maintain an AR but I didn't know how to go about assembling one from a box of parts. Although it was tempting to knock on the doors of friends and associates who could walk me through the process step-by-step, I really wanted to know if it was possible to pull off a first-time build on my own. It would also be an opportunity to see how the three most common reasons for at-home assembly played out.
To level the playing field for a genuine first-time build experience, I followed these rules: The rifle would be built only from new parts, so no filching components off of other rifles. Besides a few ordinary household tools (needle-nose pliers, hammer, work light, etc.) a new tool set would be assembled to find out how much it would cost. I would acquire components for the AR from multiple providers. All of the components were identified and ordered online so as to avoid any persuasion on the part of helpful shop owners. Finally, there would be no hands-on assistance from anyone else. Books, videos, online-resources, and phone conversations with product providers were all fair game for information gathering, but no sneaking off to the gunsmith to have him do the work for me.
Here’s what I learned over the weeks of researching, ordering, assembling, and testing my first home-built AR-15:

Identifying the Rifle's Primary Purpose
Building an AR-15 rifle is a big investment of time and money, so it's important to know what you want before shopping for components. The best way to do this is to clearly define what the rifle is going to be used for most of the time. Close quarters, self-defense rifles tend to be compact, lightweight, and fitted with accessory rails for attaching lights and laser sights. Competition guns often have longer, heavier barrels and specialized trigger groups to improve their accuracy. ARs designed for hunting may be chambered for larger rifle calibers.
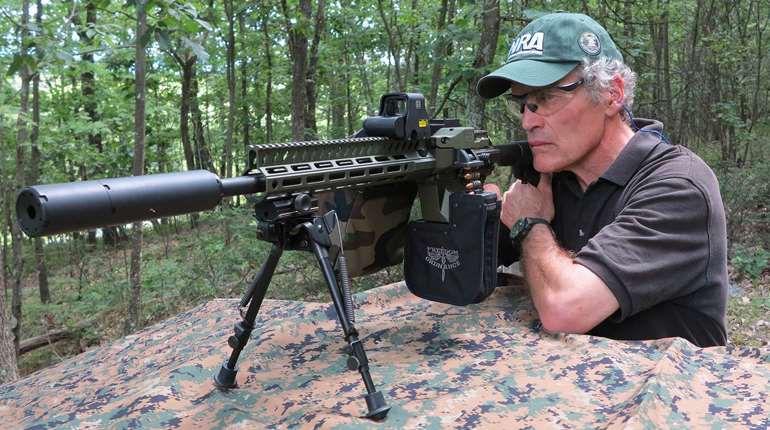
For this build, my plan was to go all-out in building a high-quality target rifle with parts selected for tight accuracy and a custom appearance. I hoped it would be possible to assemble it with the weight and barrel length needed for enjoyable benchrest target shooting while remaining handy enough for mobile shooting events like 3-gun competitions. Chambering it in .223 Rem./ 5.56 NATO and using a traditional direct impingement gas system (instead of a gas piston) opened it up to a wide variety of AR-15 component options.
Learning the Lingo
The AR-15 design is often praised for its versatility and flexibility, which is a complimentary way of describing its complexity. Depending on the model, an AR can contain somewhere in the neighborhood of 100 individual components. New builders will find themselves surrounded by unfamiliar terminology such as Forward Assist Pawl, Buffer Retainer and Bolt Carrier Assembly. Now throw in the names of tools that are made especially for ARs, such as the Pivot Pin Depressor, Ejector Removal Tool and Barrel Nut Alignment Gauge. Finally, there are assembly steps that employ unique terminology, such as Staking the Castle Nut.
Don't panic. We've all had to pick up a new lingo to go with unfamiliar parts and procedures at some point in our lives. This learning process is no different. If you can learn to prepare a meal or change the oil in your car, then building an AR is well within your grasp.
I spent a good deal of time wading through a variety of print and online resources looking for an efficient, affordable and easy to understand set of instructions to take the first time AR builder from Point A to Point Z with as little wasted time as possible. Save yourself time, money and confusion by taking advantage of the following resources currently available through the Brownells website:
Brownells How to Build An AR-15 Online Videos
Brownells Assembling An AR-15 Checklist (PDF)
The Competitive AR-15 Builder's Guide, by Glen D. Zediker
With these three resources at hand, I had everything I needed to know to successfully build an AR for the first time for less than $35, with the exception of a few instructions for specialized parts that were provided by the manufacturers.
The Brownells how-to videos are simply one of the best introductory AR building resources available. They provide a straight forward and easy-to-understand explanations of AR configuration options, must-have tools, and assembly steps required to complete a rifle. Printing and filling out the Brownells assembly checklist allows the builder to identify and track every single component and tool listed in the videos. Both of these tools are free on the website, or they can be purchased in DVD format. Brownells also proved to be an excellent starting point for researching and ordering parts and tools because they provide literally every single item needed to build a rifle.
Glen Zediker's Competitive AR-15 Builder's Guide provided a more detailed and advanced look at the build process. He gives a deeper level of detail, additional rifle configuration options, an expanded tool set and tips for trouble shooting and avoiding problems with the build.
Some Assembly Required
With the to-be-built AR-15’s purpose clearly defined and an understanding of the rifle’s components, tools, and assembly procedures firmly in hand, it’s time to look for components. Once the shopping starts, it becomes clear that there's an ocean of bits and pieces to navigate as well as a variety of parts kits and pre-assembled rifle sections intended to reduce the builder's time at the work bench. Remember that an AR-15 can be split in half with the push of a couple of pins into an Upper (upper receiver, bolt, barrel, sights) and a Lower (lower receiver, shoulder stock, trigger). Here is a high-level view of the various ways the parts of a rifle can come together:
")
1. Purchase a complete rifle, no assembly required.
2. Attach a pre-assembled Upper to a pre-assembled Lower.
3. Build the Lower, attach a pre-assembled Upper.
4. Build the Upper, attach a pre-assembled Lower.
5. Use a mix of pre-assembled sections, parts kits, and stand-alone components.
6. Use a mix of parts kits and stand-alone components.
7. Hunt down every single one of the 100 or so components individually for the fun of it.
Numbers 1 and number 7 are obviously the extremes, with number 7 being a bit of a joke since affordable parts kits eliminate the need to buy one component at a time except for rifle repairs. The use of parts kits and pre-assembled components is a great way to save time while hunting around for stand-alone parts that are on sale can help to reduce costs. For this particular build, the number 6 approach was used so as to maximize the customization of the rifle.
Selecting Parts
Don’t let yourself get too caught up in the "right parts" versus "wrong parts" debate. Gun geeks have strong opinions about everything while rarely agreeing on anything. The truth of the matter is that even most companies selling complete AR rifles don't actually make the whole gun themselves. Instead, it's less expensive for them to manufacture some of the parts and then rely on a handful of specialized manufacturers for other components, including forged receivers, springs and bolt carrier groups. In fact, some of the smaller rifle companies don't make any parts at all. Instead, they order logoed receivers and then buy the same parts an at-home builder can buy online. So instead of getting too caught up in all of the AR component rhetoric flowing through the online forums, focus on finding the parts that meet your needs at the price you can afford.
A feature of the AR parts market that goes a long way in simplifying selection for the at-home builder is the requirement for ‘mil-spec’ parts. In order to meet government contract requirements, and to compete with other companies, many AR components are built to meet the military's clearly defined specifications for component materials and dimensions. In other words, if the rifle you are building is mil-spec, then parts listed as mil-spec should be compatible in most cases.
However, as with any decades-old and heavily accessorized mechanical system, there are custom AR-15 part variations and non-mil-spec components that do not fit together. Be very careful to read and understand the dimensional fine print of the parts ordered to ensure they are compatible. As components and parts kits start to arrive, examine them closely to ensure they are the right size with all of the correct hardware. If it turns out that a part is the wrong size for a particular build, most companies will be happy to trade it if the part is still in as-new condition.
It should be noted here that all AR components can be ordered online and shipped to a person's home or business with the exception of the lower receiver. Whether it is bare (no other parts), partially assembled, or attached to a complete rifle, the U.S government considers the AR-15's lower receiver to legally be the gun. Therefore, a lower receiver is serialized, tracked and transported like any other firearm. This means that when a lower is ordered online, it will be shipped directly to the licensed dealer of your choice (FFL) and then transferred with the same fees and paperwork as any other rifle purchase. Some companies offer 80-percent-finished AR lower 'blanks' that can be sold over the counter, but the practicalities and legalities of using them is a topic for another day. For this project, the rifle was built using a fully finished and serial numbered lower.
")
Preparing the Work Space
Simply stated, the level of an at-home builder’s preparation will be the determining factor when it comes to how hard or easy a rifle build will be. Yes, the right tools are costly. However, they pay for themselves in the time they save and the unnecessary damage they prevent. Start by setting up a firm, stable, dirt-free work surface that can handle some hammering. A good vice is a requirement, as well as plenty of light. Grab some clean containers to keep smaller parts and tools organized.
For this first build, the tool set was organized according to the recommendations offered in the Brownells videos. First, a Wheeler Delta Series AR-15 Professional Armorer's Kit was ordered. It contains a rifle stand, an AR diagram work mat, several key tools, and important cleaning supplies for maintaining an AR once it’s in service. Next, the ordinary tools that were already on hand were gathered in. Finally, for those specialized tools not found in the Wheeler kit or around the house, Brownells proved to be a one-stop shopping solution. Last, but not least, a good pair of safety glasses were dusted off and donned throughout the build.
Getting It Together
After a few weeks of after-hours reading, research, and waiting for parts to arrive, it was finally time to put the rifle together. Most folks want to know how long it takes to build an AR. The time varies based on a builder's preparations, their skill level and the features of the rifle. A supplier I talked to on the phone, who builds ARs as a hobby, said he has it down to about a four-hour process. For my first time out, with everything already in place, it took about seven hours from start to finish. Since I didn’t exactly set a new record for speed, it was a good thing that a whole Saturday was set aside to get the job done.
Overall, the build went smoothly using a Present Arms Gunner’s Mount AR-15 work stand to support the rifle throughout the build. The stand’s pockets for small parts, modular support blocks, and sturdy construction were very convenient and useful. If you are planning to work with ARs on a regular basis, the Present Arms’ system is a worthwhile investment. If this professional-grade system is out of your price range, then the lower vice block provided by Brownells or the rifle stand in the Wheeler kit will do the trick.
When building an AR it’s important to follow the order of assembly steps religiously. Some components cannot be installed once other parts are in place. The build steps were simplified by choosing parts that were easier to work with. These included a drop-in trigger group, a no-castle-nut-required buffer tube, a free-float hand guard, and a receiver fitted with threaded retention pins instead of roll pins. But be prepared to run into problems along the way. Here are a few that cropped up with this build:
- A pair of anti-walk trigger and hammer pins were too big to fit the holes drilled in the receiver. They had to be replaced with a set of stock pins from a lower parts kit.
- The plan was to use Yankee Hill EZ Pull pivot and take down pins but the knob of the takedown pin interfered with the ambidextrous safety lever. They were replaced with EZ Push pins instead.
- The takedown pin detent and spring, located between the lower receiver and the shoulder stock, was tough to install (but that seems to be the case for most folks).
- Two detents had to be replaced using spare parts. One was launched across the room (never to be found again), while the other was damaged during installation (again, a common occurrence).
- The firing pin retention pin bent when reinserted into the bolt carrier group and would not seat properly. It was replaced with a pin from a spare parts kit.
Most of these problems involved the tiny little parts that an AR cannot do without. Save yourself from all kinds of frustration by having a small-part replacement kit on hand like the Windham Weaponry Most Wanted Parts Kit. It’s a $15 investment that will make all the difference in finishing the rifle with a smile on your face.
")
Once the rifle was fully assembled, it was put through a series of function checks at the bench, the headspace was checked, and it was cleaned and lubricated in preparation for the final function checks at the shooting range. When cleaning up the work space, don’t forget to carefully label and store all of the little bits and pieces that are left over for future use. Hold on to all of the instructions and information sheets as well because they will come in handy down the road.
The Payoff
After all of the planning and work, taking the new home-built AR-15 rifle to the range turned out to be a very positive experience. It passed each of the function checks with flying colors. To check for magazine compatibility, the rifle was fired with Brownells 30-round aluminum magazines, Tapco Intrafuse 30-round polymer magazines, and a Mako Group E-Lander 20-round steel magazine. All of them functioned reliably. Test ammunition included practice, hunting, target, and defense-grade .223 loads with bullets ranging from 55 grains to 77 grains in weight. There was only one failure to feed in the first 50 rounds. After that, there were zero malfunctions.
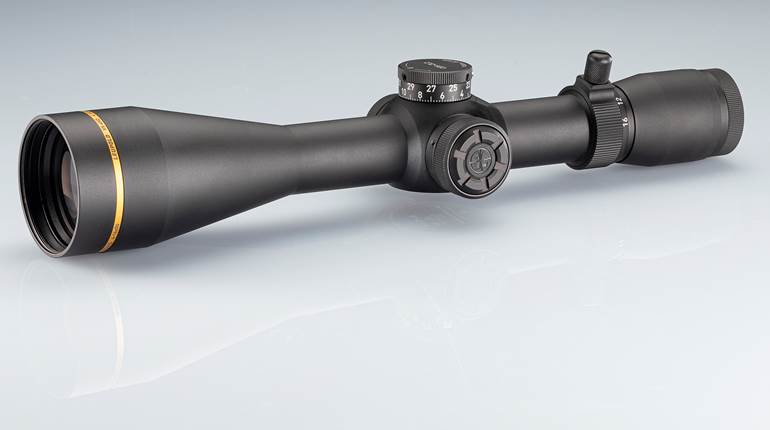
Weighing in at 8 lbs., 2 ozs. unloaded, with a crisp single-stage trigger pull of just 2 lbs., 14 oz, this one-of-a-kind rifle handled like, well, a dream come true. When shooting factory configured 16.5-inch barrel ARs at 100 yards using an optic, I tend to shoot groups in the 1.25 to 1.75-inch range. Topped with a Leupold VX-R Patrol Fire Dot 3-9 x40 mm scope, this 18-inch barrel rifle shaved a full half-inch off of my groups, bringing them down to around 0.75 to 1.25-inches. There's no doubt this rifle is out shooting the shooter, which demonstrates the quality and craftsmanship of the components more than the skills of the first-time builder who assembled them.
Was it Worth It? How worthwhile this endeavor was depends on the purpose for pursuing it. Let's go back to the three reasons folks usually site for building an AR-15 at home:
1. Building an AR instead of buying one saves money.
Yes, building a rifle at home can save you money on both basic and premium platforms but tool costs need to be taken into consideration. If you already have access to tools and a work space, then it's not too difficult to build a basic AR for under $600. This puts a few hundred bucks back in your pocket when compared to off-the-rack rifles that run between $800 to $1000. 
You can shop around for less expensive parts from different sources or work with companies like Palmetto State Armory and Ground Zero Precision which offer affordable rifle build kits starting in the neighborhood of $500. The kits usually contain everything needed except the lower receiver. Sturdy forged lowers can be found from several sources for between $55 to $89 (under normal gun market conditions). Add the sweat equity and you’ve got a solid basic rifle.
The components for my custom rifle build, which were comprised of handpicked top-shelf options, came out to about $2,200. This is certainly not the cheapest way to build a rifle but it does have its advantages. It was still cheaper than a target model in the $2500 to $3000 price range. I also avoided filling a box with the caste off factory parts that are left over when upgrades are installed on factory guns.
So, what about tool costs for new builders? There are those guys out there who say they can build an AR from scratch with a pair of pliers, a four-penny nail and a rock. I’m willing to believe they can pull it off, but that's just not my style. I wanted a complete professional kit on hand to make the job easier which added up to about $700 once the dust settled. I’ve been told that most AR builders find a happy medium between these two extremes.
Here's the good news about investing in tools: The purchase of a good tool set (great or small) may soak up the profit margin of a first time build but they will pay for themselves when it comes time to repair the rifle or build a second one.
2. You can build a rifle with the features you want.
This is one of the best reasons to assemble an AR yourself. An at-home builder can hand pick every single pin, spring and screw that goes into the rifle. It also allows for a fine level of budgetary control. Sink cash into the features that are the most important while using basic parts in other areas to save money. Home assembly also makes it easy to give the rifle a unique look and style all your own, if that’s something you want.
3. Working on ARs is an enjoyable hobby.
This has been one of the most informative and exciting shooting projects that I've ever worked on. To say that I'm pleased with the final results would be an understatement. It feels fantastic to step out onto the shooting range with a top-notch custom rifle that I know inside out. Although building a single rifle does not a gunsmith make, I now have the tools and know-how to modify the ARs I own or to build another one down the road. Like Humphrey Bogart said, "... I think this is the beginning of a beautiful friendship."