by
Support NRA American Rifleman
DONATE
** When you buy products through the links on our site, we may earn a commission that supports NRA's mission to protect, preserve and defend the Second Amendment. **
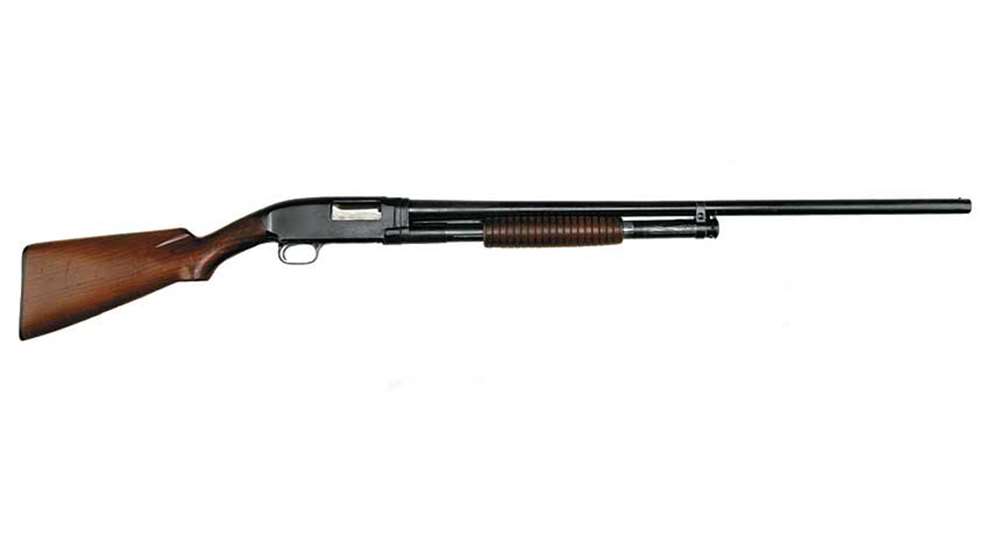
Winchester’s Model 12 slide-action shotgun has won the praise of hunters, competitors and soldiers alike during the 90 years and nearly 2 million pieces made since its 1912 introduction. Some of its fans have even gone so far as to agree with the company’s appellation of the gun as “the perfect repeater.”
The Model 12 was initially offered in 20 gauge only, which made it the first Winchester shotgun of that gauge and the first hammerless slide-action repeating shotgun to bear the Winchester logo. Two years after its introduction, it was available in both 12 gauge and 16 gauge.
The 12-ga. “trench” model with 20” cylinder-bore barrel, perforated cooling sleeve and detachable knife bayonet was introduced in 1917. Without bayonet lug and cooling sleeve, it was listed in the Winchester catalog as the Model 12 Guard and Riot gun. A 28-ga. sporting version came on the market in 1934.
In its various guises, the Model 12 would distinguish itself through countless victories in the game fields, trap and skeet ranges, and in both World Wars.
The gun’s basic mechanical layout—credited to design team chief Thomas Crossley Johnson in the company’s post-Browning partnership era—remained virtually unchanged throughout its life.
It is of the old school, wherein the bolt locks up to a forged, machined, blued-steel receiver, and walnut serves for the buttstock and slide handle. Numerous machine operations, some complex in nature, were required to produce the receiver, and Winchester boasted that only the best steel alloys then available were used in the gun’s manufacture.
That “quality at all costs” approach eventually proved the Model 12’s downfall, however, as it collided with the reality of modern-day labor costs and manufacturing methods. Finally, in the late 1960s, the Model 12 was deemed too costly to keep in production.
Attempts were later made to reduce its cost of manufacture, and limited sales of original-type guns were offered through the custom shop. By the early ’70s, though, the pump shotgun in general had lost much of its appeal, and the old warhorse was relegated to the heirloom and collectible sector of the market.
Nevertheless, the Model 12 remains beloved by tens of thousands of sportsmen who refuse to retire their “perfect repeaters” or think less of them.
Disassembly
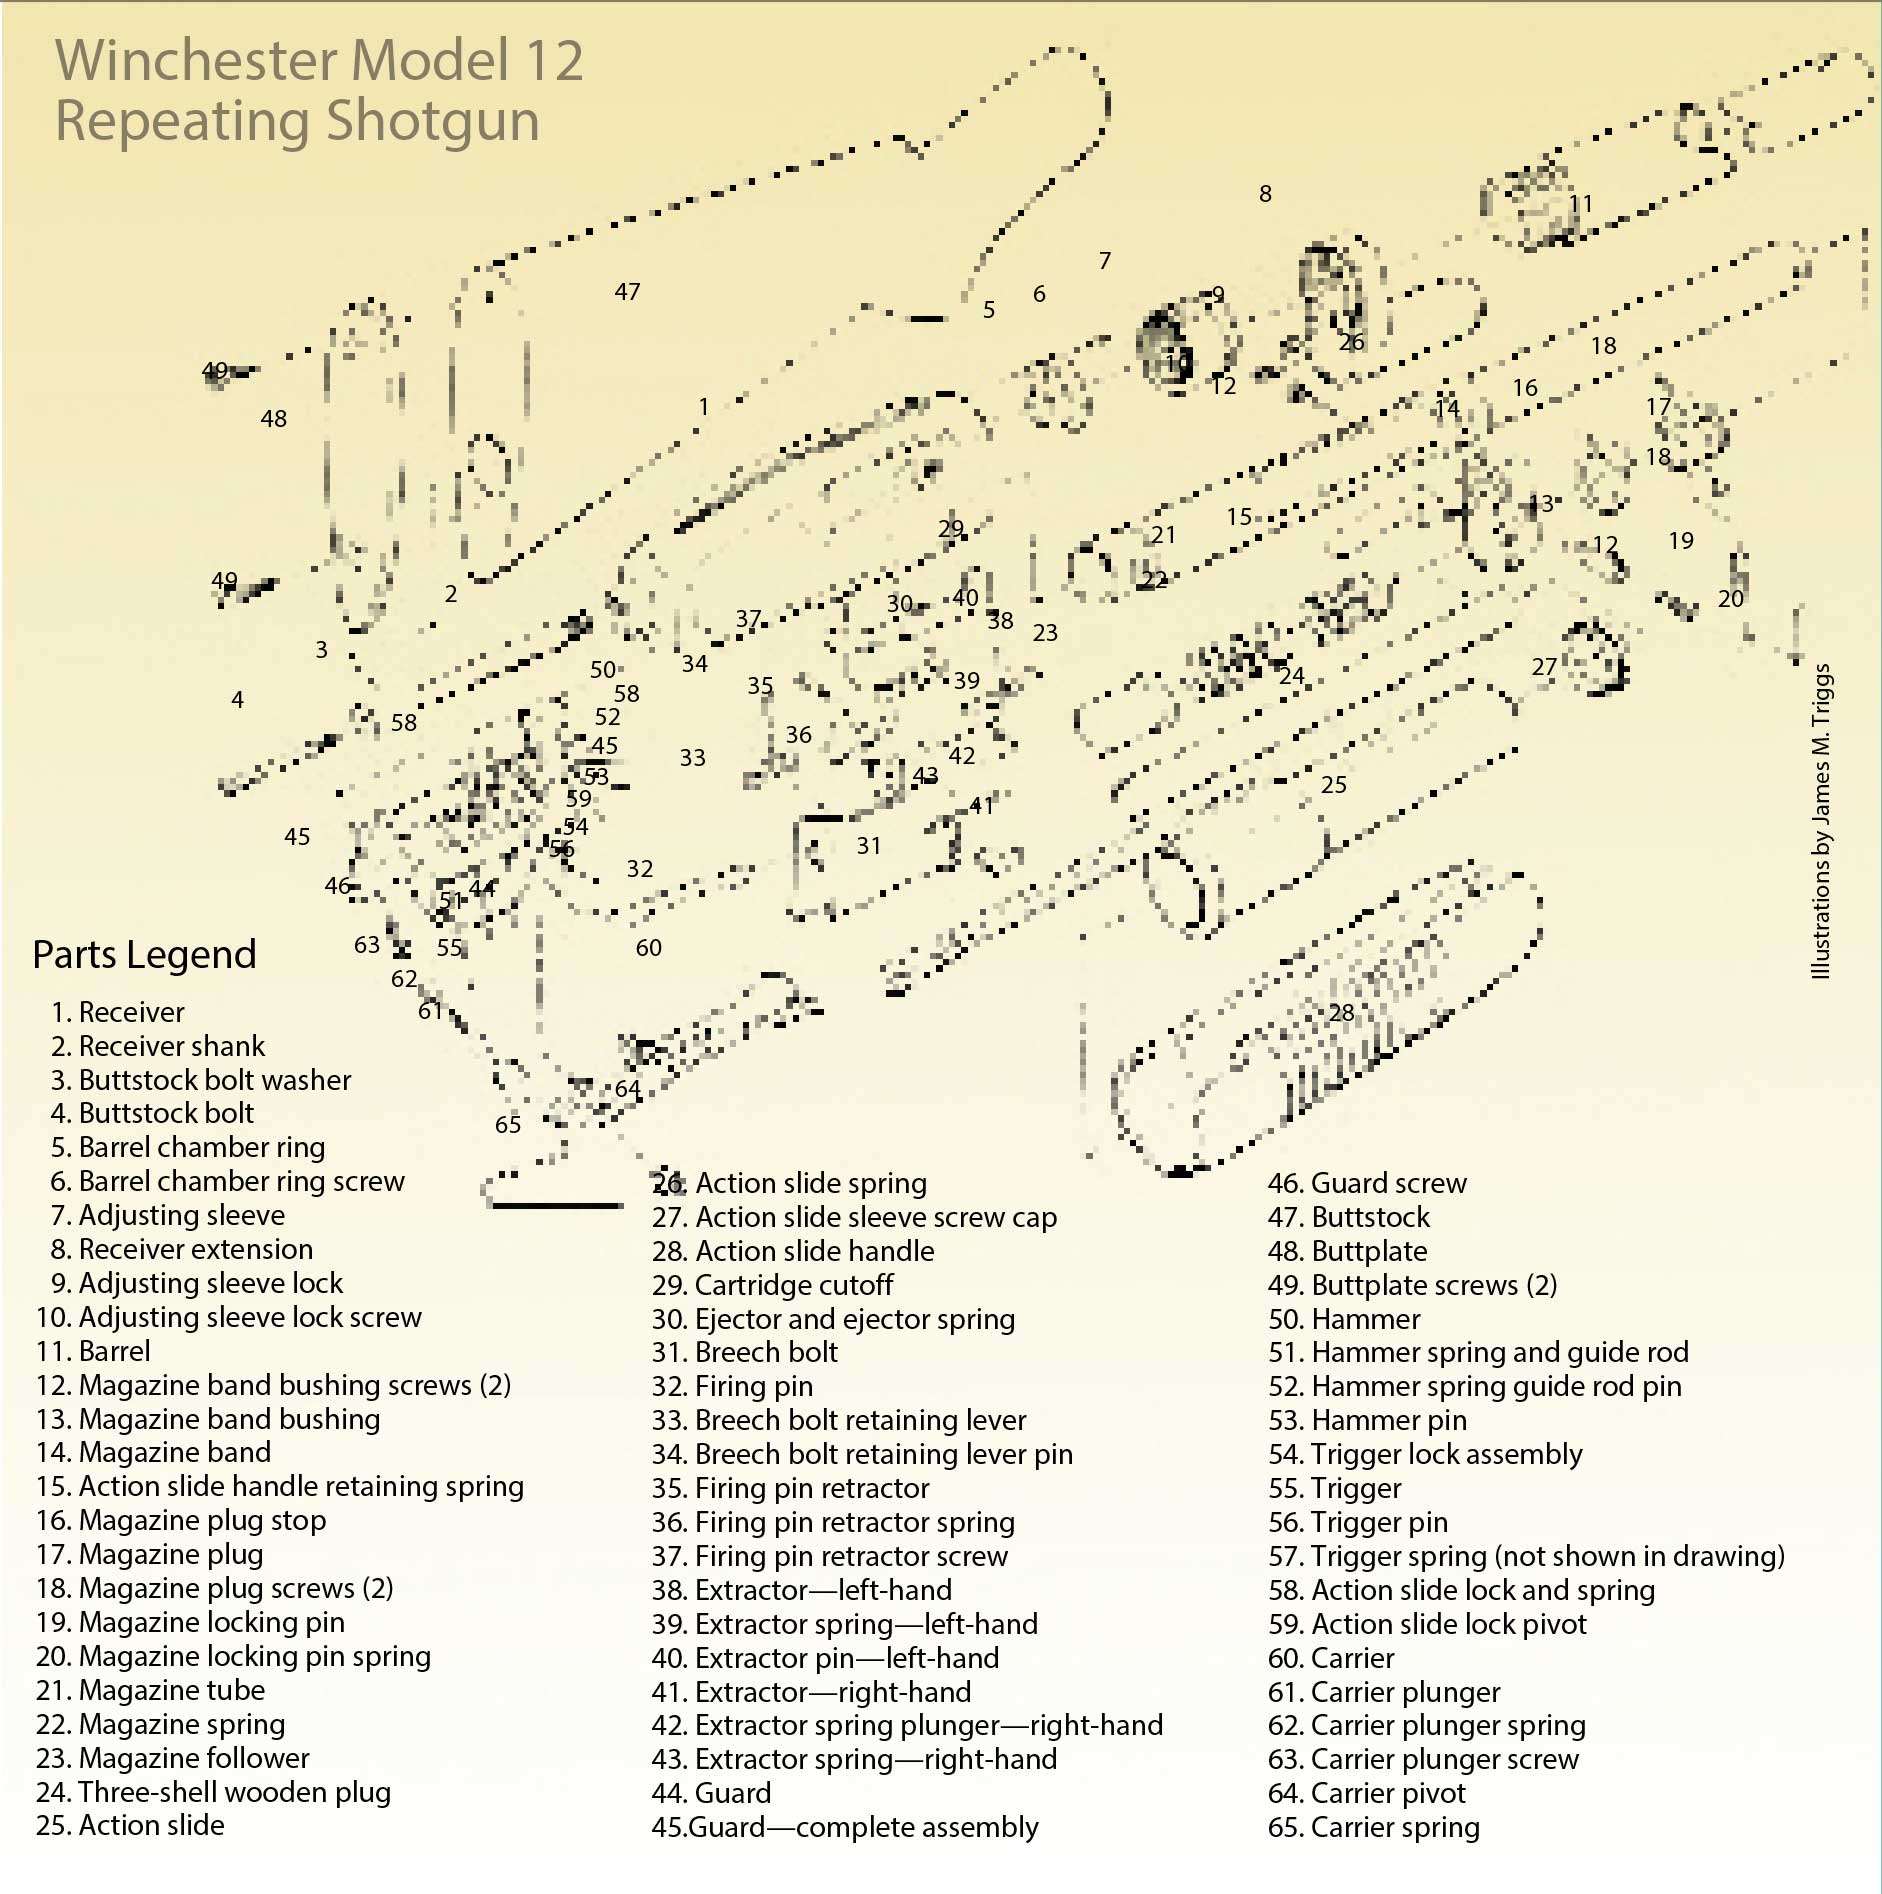
After first ensuring that the gun is unloaded and the chamber is empty, place the receiver in a properly padded vise with the trigger guard upward to facilitate disassembly. Remove the guard screw (46) and remove the complete guard assembly (45) from bottom of receiver (1). Note that the carrier assembly (60-65) may be removed from the guard by unscrewing the carrier pivot (64), which has a left-hand thread.
Further disassembly of parts contained within the guard assembly should not be attempted, and replacement of parts 50 through 59 should be made only by a qualified gunsmith. Pull the cartridge cutoff (29) out of receiver. The breech bolt (31) may then be removed as follows: with the breech bolt unit in the full forward position, gently pry the ejector stud (30) from its seat in the inside of the receiver wall and slide the ejector to the rear and out from under the breech bolt and, then, out of the receiver.
Before attempting to remove the breech bolt, be sure the action slide is disengaged. Depress the rearmost arms of the breech bolt retaining lever (33) and slide the breech bolt almost all the way to its rearmost position. Then, lifting the breech bolt by its back end first, guide the left- and right-hand extractors (38, 41) up through the vertical slots on the inside of the gun’s receiver walls.
Although not normally necessary, the buttstock (47) may be removed by unscrewing the buttplate screws (49) and removing the buttplate (48), after which the buttstock bolt (4) can be unscrewed with a long, heavy screwdriver and the buttstock pulled away from the receiver.
To disassemble the breech bolt, remove the firing pin retractor screw (37) and lift the firing pin retractor (35) out of its seat. Pull the firing pin retractor spring (36) out of its hole. The left-hand extractor and spring (39) and breech bolt retaining lever are removed by drifting out their respective retaining pins (40 and 34). Remove the right-hand extractor by slipping the blade of a small screwdriver between the plunger (42) and the extractor and easing the extractor up out of its hole inside the breech bolt. Remove the spring (43) and plunger (42) toward the front. Reassembly is accomplished in reverse order.
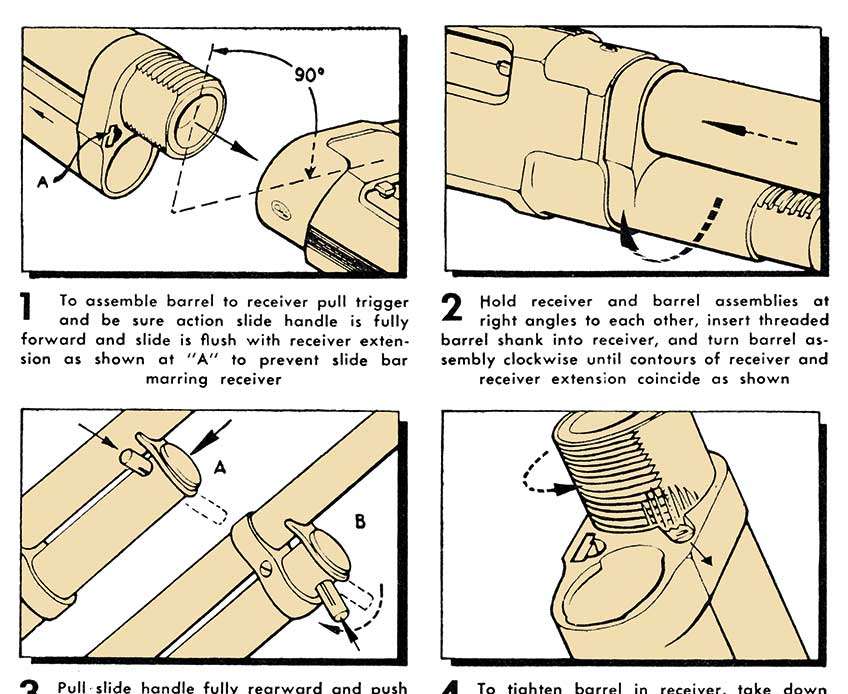
To assemble the barrel to the receiver, ensure that the gun is unloaded and the chamber is empty (Fig. 1). Pull the trigger and be sure the action slide handle is fully forward and the slide is flush with the receiver extension (A). Hold the receiver and barrel assemblies at right angles to each other, insert the threaded barrel shank into the receiver and turn the barrel assembly clockwise until the contours of the receiver and receiver extension coincide (Fig. 2).
Pull the slide handle fully rearward and push the magazine downward as far as it will go. Push out the magazine locking pin (A) (Fig. 3). Using the pin as a lever, turn the magazine one-quarter turn clockwise (B). The pin will not rotate unless the magazine is at full depth in the receiver. Push the magazine locking pin back into the magazine tube. The threaded end of the tube is now engaged with the receiver and locked.
Bring the action slide hand fully forward. Arrows stamped on the underside of the magazine tube and receiver extension should coincide. The gun is now ready to fire. Take down is in the reverse order. To tighten the barrel in the receiver, take down the barrel and receiver and remove the adjusting sleeve lock screw (Fig. 4).
Draw down the adjusting sleeve lock as shown, disengaging its notches from those on the adjusting sleeve. Turn the adjusting sleeve one notch counterclockwise to tighten. Turning the adjusting sleeve in a clockwise direction will loosen the joint between the barrel and receiver. Push the adjusting sleeve lock screw. If the barrel is still loose, repeat the procedure until the desired fit is achieved.
The Model 12 was initially offered in 20 gauge only, which made it the first Winchester shotgun of that gauge and the first hammerless slide-action repeating shotgun to bear the Winchester logo. Two years after its introduction, it was available in both 12 gauge and 16 gauge.
The 12-ga. “trench” model with 20” cylinder-bore barrel, perforated cooling sleeve and detachable knife bayonet was introduced in 1917. Without bayonet lug and cooling sleeve, it was listed in the Winchester catalog as the Model 12 Guard and Riot gun. A 28-ga. sporting version came on the market in 1934.
In its various guises, the Model 12 would distinguish itself through countless victories in the game fields, trap and skeet ranges, and in both World Wars.
The gun’s basic mechanical layout—credited to design team chief Thomas Crossley Johnson in the company’s post-Browning partnership era—remained virtually unchanged throughout its life.
It is of the old school, wherein the bolt locks up to a forged, machined, blued-steel receiver, and walnut serves for the buttstock and slide handle. Numerous machine operations, some complex in nature, were required to produce the receiver, and Winchester boasted that only the best steel alloys then available were used in the gun’s manufacture.
That “quality at all costs” approach eventually proved the Model 12’s downfall, however, as it collided with the reality of modern-day labor costs and manufacturing methods. Finally, in the late 1960s, the Model 12 was deemed too costly to keep in production.
Attempts were later made to reduce its cost of manufacture, and limited sales of original-type guns were offered through the custom shop. By the early ’70s, though, the pump shotgun in general had lost much of its appeal, and the old warhorse was relegated to the heirloom and collectible sector of the market.
Nevertheless, the Model 12 remains beloved by tens of thousands of sportsmen who refuse to retire their “perfect repeaters” or think less of them.
Disassembly
After first ensuring that the gun is unloaded and the chamber is empty, place the receiver in a properly padded vise with the trigger guard upward to facilitate disassembly. Remove the guard screw (46) and remove the complete guard assembly (45) from bottom of receiver (1). Note that the carrier assembly (60-65) may be removed from the guard by unscrewing the carrier pivot (64), which has a left-hand thread.
Further disassembly of parts contained within the guard assembly should not be attempted, and replacement of parts 50 through 59 should be made only by a qualified gunsmith. Pull the cartridge cutoff (29) out of receiver. The breech bolt (31) may then be removed as follows: with the breech bolt unit in the full forward position, gently pry the ejector stud (30) from its seat in the inside of the receiver wall and slide the ejector to the rear and out from under the breech bolt and, then, out of the receiver.
Before attempting to remove the breech bolt, be sure the action slide is disengaged. Depress the rearmost arms of the breech bolt retaining lever (33) and slide the breech bolt almost all the way to its rearmost position. Then, lifting the breech bolt by its back end first, guide the left- and right-hand extractors (38, 41) up through the vertical slots on the inside of the gun’s receiver walls.
Although not normally necessary, the buttstock (47) may be removed by unscrewing the buttplate screws (49) and removing the buttplate (48), after which the buttstock bolt (4) can be unscrewed with a long, heavy screwdriver and the buttstock pulled away from the receiver.
To disassemble the breech bolt, remove the firing pin retractor screw (37) and lift the firing pin retractor (35) out of its seat. Pull the firing pin retractor spring (36) out of its hole. The left-hand extractor and spring (39) and breech bolt retaining lever are removed by drifting out their respective retaining pins (40 and 34). Remove the right-hand extractor by slipping the blade of a small screwdriver between the plunger (42) and the extractor and easing the extractor up out of its hole inside the breech bolt. Remove the spring (43) and plunger (42) toward the front. Reassembly is accomplished in reverse order.
To assemble the barrel to the receiver, ensure that the gun is unloaded and the chamber is empty (Fig. 1). Pull the trigger and be sure the action slide handle is fully forward and the slide is flush with the receiver extension (A). Hold the receiver and barrel assemblies at right angles to each other, insert the threaded barrel shank into the receiver and turn the barrel assembly clockwise until the contours of the receiver and receiver extension coincide (Fig. 2).
Pull the slide handle fully rearward and push the magazine downward as far as it will go. Push out the magazine locking pin (A) (Fig. 3). Using the pin as a lever, turn the magazine one-quarter turn clockwise (B). The pin will not rotate unless the magazine is at full depth in the receiver. Push the magazine locking pin back into the magazine tube. The threaded end of the tube is now engaged with the receiver and locked.
Bring the action slide hand fully forward. Arrows stamped on the underside of the magazine tube and receiver extension should coincide. The gun is now ready to fire. Take down is in the reverse order. To tighten the barrel in the receiver, take down the barrel and receiver and remove the adjusting sleeve lock screw (Fig. 4).
Draw down the adjusting sleeve lock as shown, disengaging its notches from those on the adjusting sleeve. Turn the adjusting sleeve one notch counterclockwise to tighten. Turning the adjusting sleeve in a clockwise direction will loosen the joint between the barrel and receiver. Push the adjusting sleeve lock screw. If the barrel is still loose, repeat the procedure until the desired fit is achieved.
Most Popular