Shooters bring all sorts of preferences, prejudices and preconceived notions to our ideas about rifles and related equipment—and nowhere are they more apparent than in the realm of precision bolt-actions. Every nuance is overanalyzed, and discourses abound regarding the best action types, barrels and cartridges. Such firearms have long been the province of professional gunmakers whose methods for achieving the ultimate in accuracy are typically cloaked in mystery. And while many shooters still seek out their expertise and advice, more and more have decided to go it alone and build their own rifles.
That proposition has become increasingly attractive given the wide availability of components for such builds. Despite being from disparate companies, they are usually manufactured with computer-aided techniques to tolerances that result in near-perfect compatibility. Added to that are the Remington Model 700’s status as the de facto dimensional standard in actions along with an explosion of Precision Rifle Series and similar competitions. The result is a cottage industry awash in stocks, barrels and triggers that afford the home gunsmith a unique opportunity to assemble them on a legally transferred receiver into an accurate, powerful, long-range rifle. Perhaps the most remarkable aspect of the entire process is that it requires no machining or gunsmithing skills on the part of the builder.
For years, I had considered having a custom rifle built—going so far as to discuss it at length with more than one gunmaker—but I finally decided on the do-it-yourself (DIY) route because I was convinced it was the only way to end up with exactly the result I envisioned. And although the project covered here resulted in one specific build with unique specifications and capabilities, its larger purpose is to illustrate how simple it is for anyone with a modicum of mechanical ability to put together a precision rifle. After deciding on the role you want the rifle to fulfill, and establishing your budget, make a list of design considerations, select the parts, acquire a few tools, garner some advice and, finally, assemble and test the gun.
"Design" The Rifle
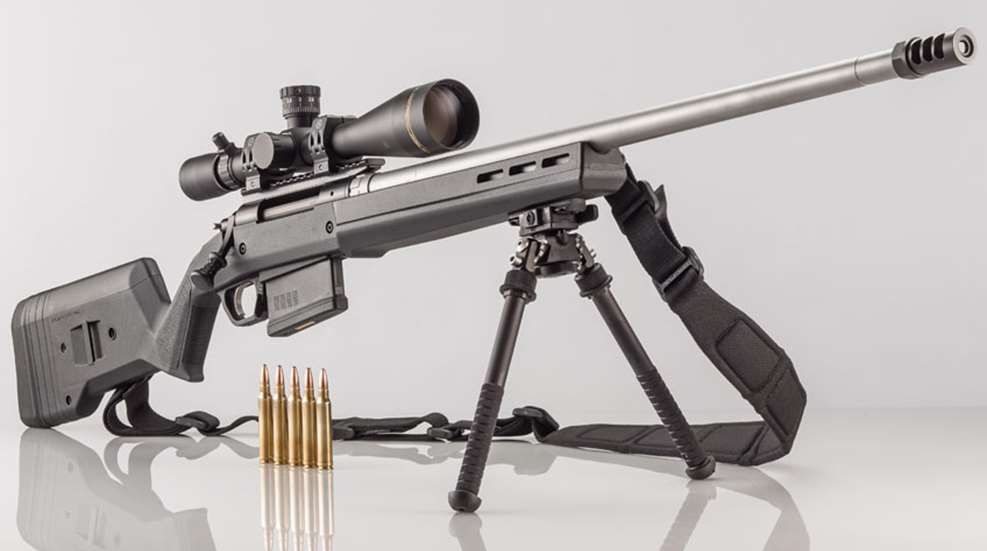
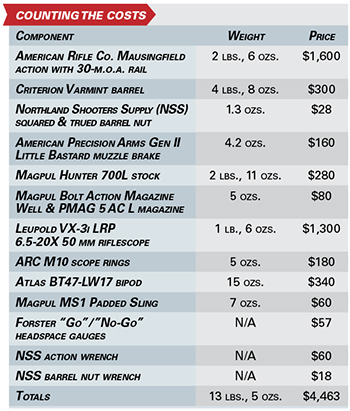
For this build, I envisioned a long-range precision rifle chambered for the .300 Winchester Magnum cartridge and capable of half-minute-of-angle accuracy for hunting or tactical applications. That first decision dictated a long action, and since I also preferred controlled-round feed, because of the positive manner in which it handles cartridges, the field of available candidates shrank quickly. I also wanted detachable-box-magazine capability to conveniently switch loads and to have as much on-board capacity as possible. An interchangeable bolt head and barrel would even allow other chamberings for different roles such as competition. After researching many of the actions and components available on the market and examining several finished rifles in person, I set goals of an overall weight in the neighborhood of 13 lbs. and a total build cost of $4,000. And though such numbers may shock users of typical hunting rifles, I believed they were justified considering that I wanted the rifle to be comfortable to shoot—not unlike the much lighter-caliber and heavier PRS-style guns—and I believed its switch-chambering/switch-barrel capability lent it a value comparable to multiple dedicated platforms.
The foundation of any rifle build is the receiver, which determines what the gun is capable of and how it functions. In the case of a DIY build, it also determines its compatibility with aftermarket components. The most obvious path in that respect, whether for short- or long-action cartridges, are actions matching the venerable Remington Model 700. Made in the millions, the Model 700’s simple cylindrical receiver format has spawned a wide aftermarket of components and accessories and, more recently, advanced clones that are dimensionally faithful to that popular model in key areas, including: outer diameter, overall length, action screw spacing and recoil lug location. Those similarities allow compatible builds to bed seemlessly into any Model 700-compatible stock—assuming it has a barrel channel that can accommodate the profile selected for the build. Yet another important feature is the Model 700’s simple two-pin method of attaching a trigger/safety assembly, which allows it to accept fire-control assemblies from a host of manufacturers. Best of all, whether such a receiver is threaded for factory Remington barrels (11⁄16x16 TPI) or small-shank Savage barrels (11⁄16x20 TPI), it can utilize the clever and proven locknut method of attachment and headspacing—in the former case, referred to as a “Remage.”
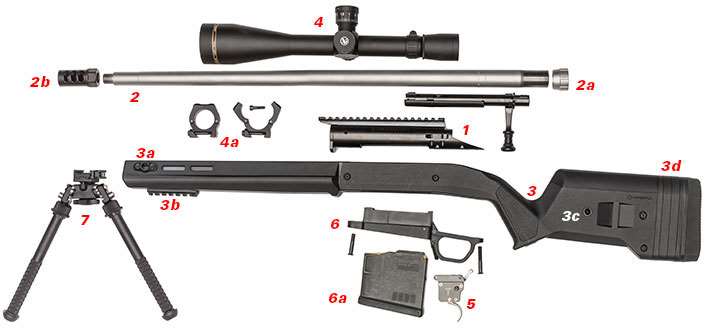
My choice of action (1) stemmed from a chance encounter at the SHOT Show a couple of years ago. As I passed by a small booth in the law enforcement section, a simple banner with the word “Mausingfield” caught my eye. When I stopped and began listening in on a conversation between the designer of the curiously named action, Ted Karagias, and a potential customer, it quickly became apparent that the hybrid of Mauser and Springfield features was deserving of further investigation. Karagias is a mechanical engineer and owner of American Rifle Co. (ARC) in Mukilteo, Wash. With a career that includes designing equipment for the production of commercial aircraft such as Boeing 787 airliners, his experience more than qualified him to develop a bolt-action rifle, whose engineering he deftly explained in a thorough yet understandable manner. As we discussed the merits of various designs, I realized we had a shared appreciation of several major points, including: the effectiveness and dependability of the Mauser’s claw extractor; the controllability and reliability of the Springfield’s fixed ejector; the commonality and versatility of Remington’s Model 700 format; and the cleverness and efficiency of Savage’s locknut-style of barrel attachment and headspace adjustment. And while it was clear that accuracy doesn’t take a back seat in the ARC philosophy, it was also apparent that Karagias thought of it as secondary to an even more important quality for a hard-use rifle destined for the field: dependability.
As we talked, I handled an in-the-white Mausingfield action that struck me as simultaneously beastly and beautiful. Its bolt glided into position and seemed to virtually close itself as my hand moved its uniquely shaped knob forward. The massive extractor, generous ejection port and rear-mounted, fixed-blade ejector all conveyed a sense of class and strength akin to the finest military and sporting bolt-actions. Explanations of its finer features, such as the easily interchangeable bolt heads—with toroidally cut lugs that do not require hand lapping to achieve even contact within the receiver—convinced me I had found the action on which I would build my dream rifle. By the time it arrived some months later, the entire receiver and bolt assembly benefitted from an attractive diamond-like carbon (DLC) surface treatment—the same wear-reducing finish used for tooling cutters, Formula One race cars and razor blades—while the steel optics rail, which is mechanically keyed to the receiver and fastened by way of five 8x36 TPI screws, was salt-bath-nitrided.
While the receiver is the foundation of any precision rifle, the barrel (2) is the heart of its accuracy. Upon Karagias’ recommendation for an off-the-shelf, pre-fit barrel, I decided to shop the Criterion barrels website. The company is well-regarded for its button-rifled OEM and aftermarket barrels and is a default source for many shooters seeking a quality barrel that won’t break the bank. Its prime distributor for Savage small-shank barrels is Northland Shooters Supply (NSS) in Bismarck, N.D. Owner James Kessler provided expert advice for this project, methodically guiding me through the various considerations for such a barrel, including: twist rate, length, profile, material, muzzle threading and, of course, chambering. Having already settled on .300 Win. Mag.—in my mind, an unassailable classic long-range hunting and tactical cartridge—I had only to specify the other particulars. Stainless steel was an easy choice because of its weather resistance and ease of maintenance. And I opted for a 1:10" twist rate in anticipation of shooting mostly 190-gr. bullets common in factory loads. As to length, I chose 26" as a compromise between maximizing the cartridge’s ballistic potential and minimizing the gun’s length. Perhaps most important was the barrel’s profile, which I knew, if heavy enough, would help ward off the ruinous effects of heat and harmonic disturbances on accuracy—particularly during long strings of fire. In the end, I chose what Criterion classifies as a Varmint contour, which lies between its Light Varmint and Bull profiles. It measures 1.040" at the breech and 0.812" at the muzzle. Because a muzzle brake or suppressor were likely accessories, I requested 5/8x24 TPI threads, a common specification for .30-cal. barrels. One additional consideration that occurred to me at the last minute was that I wanted to have a short section near the muzzle turned to a true cylindrical profile in order to fit a clamp-on front base for the use of iron sights. Kessler helpfully further suggested that I try Northland’s own trued barrel nut (2a), action wrench and barrel nut wrench along with Forster headspace gauges and one of his most popular accessories: the highly effective and easily installed American Precision Arms Little Bastard muzzle brake (2b).
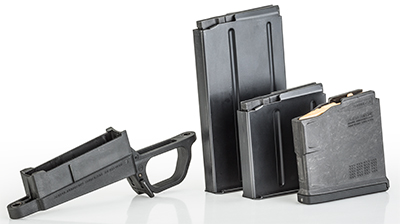
There are several well-regarded makers of fiberglass or carbon-fiber rifle stocks for precision-rifle builds, but such units can be quite expensive compared to injection-molded or laminate types. The Hunter 700 Long Action stock (3)(magpul.com) makes use of molded-polymer exterior components and an internal, cast-aluminum chassis to effect an ergonomically sound and comfortable interface with the shooter, and a mechanically solid base for the action, respectively. The chassis’ hard points form pillars for the action screws and a recess for the recoil lug. In this case, the contours of the exposed portion of the stock’s internal aluminum chassis mated perfectly with those of the Mausingfield, and its ejection port and bolt handle recesses also matched up nicely. The buttstock can be adjusted by way of interchangeable cheekpieces of various heights and length-of-pull spacers to accommodate different optics and shooter builds, respectively. It bucks the trend of vertical pistol grips found on many precision-rifle stocks with a grip angle that is more relaxed, allowing for a comfortable hand position and an excellent approach to the trigger. Of course, it also accepts the company’s numerous accessory components, and, in this case, I added: an M-LOK QD Sling Mount (3a), a six-slot aluminum M-LOK rail section at 6 o’clock on the fore-end for attachment of the bipod (3b), a QD Sling Mount Kit (3c) for the buttstock and a Zero-Rise Hunter-SGA Cheek Riser (3d), which, because I tend to affect a high cheekweld, affords proper alignment with the scope while allowing removal of the bolt from the receiver.
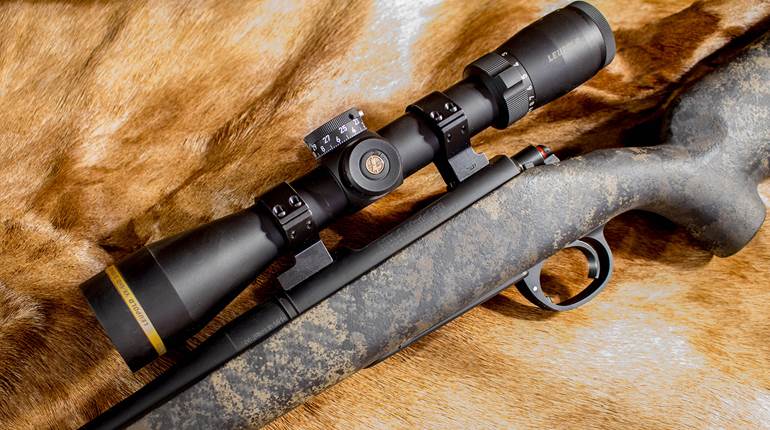
Riflescopes, too, have seen development spurred by the popularity of precision rifle shooting, and world-class optics are in greater abundance and at a higher state of development than ever before, so picking from among the many excellent brands is not an easy task. As I began to shop, I attempted to resist the attraction of specific labels, leaning instead toward proven features and value informed by past experiences. I did, however, have a sense as to the appropriate magnification range given the cartridge and the rifle’s intended use: somewhere from 4X to 6X at the low end and 15X to 25X at the high end. Further, I had already decided on a model with first-focal-plane optics, adjustment values in mils and a compatible mil-dot-type reticle—to estimate range at any magnification by observing objects of known size—along with easily adjustable turrets with zero stops. In the end, I ordered a Leupold VX-3i LRP 6.5-20X 50 mm (4). Its weight, price and reputation for optical and mechanical quality all seemed compatible with the project’s goals. Using ARC’s M10 scope rings (4a)—which combine the properties of both vertically and horizontally split designs—the scope mounted up nicely on the Mausingfield’s rail, which I had requested to include 30 minutes of angle to allow for plenty of elevation adjustment when shooting at long range.
Among the many high-quality trigger assemblies for Model 700 clones, the TriggerTech Special and Primary* (5) stood out for their unique mechanical design, which positions a roller between the trigger and sear engagement surfaces. Along with an intermediate “ticker” lever, it provides a frictionless release that does not rely solely on polished or treated engagement surfaces to yield a consistently clean and smooth break. Because the Mausingfield features a bolt release at its left rear, I ordered the Primary model without a release, but with an integrated two-position, right-hand safety. (*$145; 2 oz.; inadvertently omitted from cost itemization below).
Other bits and pieces, while less costly, were still carefully considered, and, it could be argued, make a significant difference in how well the outfit functions as a whole. For instance, the Atlas BT47-LW17 bipod (7) attaches easily to the Picatinny rail on the stock’s underside. And the Magpul MS1 Padded Sling allows for a variety of carry and shooting positions.
Assemble The Whole
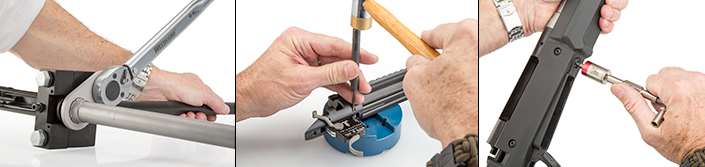
I took on this project because I became fascinated with the idea that a true precision rifle could be assembled in a process that involved no machining or specialized skills. Even more surprising, though, was that when it came time to put the rifle together, far less effort was required than I could ever have foreseen. Actual assembly took only a matter of minutes and required just a few tools. The main steps were: attaching the barrel to the receiver; attaching the trigger to the receiver; securing the barreled action into the stock; and mounting the scope. The first involved securing the receiver in the action vise (the jaws of which I padded beforehand so as not to mar the finish) before running the barrel nut fully onto the barrel’s threads. At that point, I coated the barrel’s threads with an anti-seize compound and then simply screwed the barrel into the receiver. The critical point here is to have the proper “Go” and “No-Go” gauges standing by to place onto the face of the bolt. When the bolt will fully close with the Go gauge chambered in place of a cartridge, but will not close with the No-Go gauge attached in the same manner, proper headspace has been established—and it must be maintained as the barrel nut is tightened. That will require a suitable wrench, which, for Savage-style nuts, typically consists of a short, stamped-steel plate with teeth that match the nut’s splines. The wrench’s other end will have a square 1/2" hole designed to engage a torque wrench. There’s no universally agreed upon torque value, but something in the order of from 45 to 100 foot-pounds (ft.-lbs.) is cited, depending on the source. Again, unlike most gun fastener values, which are in inch pounds (in.-lbs.), the barrel is secured with quite a bit more force.
 With the barrel firmly in place, I double-checked the headspace and then moved to the next step. Placing the receiver on a bench block, I used a light hammer and pin punch to tap pins that had been included by ARC with the Mausingfield through the trigger housing, securing the trigger assembly in place. Then it was time to set the entire action into the stock. Holding the bottom assembly in place, I torqued the two action screws to 65 in.-lbs. It was the first time I had held the nearly complete rifle in my hands, and the gun’s muzzle-forward balance and overall weight came as a surprise. As was often the case during the course of this build, I began to question my decisions. Had I gone for too heavy a barrel? Would it be possible to tote such a behemoth up a steep mountain on an elk hunt? As is often the case, though, such second-guessing receded as I went back through the mental checklist of why I had chosen each component in the first place. I realized I simply needed to become familiar with the new rifle’s characteristics and proficient in its use—in short, I would have to become one with the gun.
Confirm The Results
My first shots through the gun on the NRA Test Range went without a hitch. About a dozen or so rounds, with fastidious cleaning of the bore between each of the first few, confirmed that the rifle was functioning as it should. One three-shot cluster, measuring right at a half-minute of angle, hinted at the rifle’s accuracy potential. A few weeks later, on a cold February day at 340 Defense range in Summit Point, W.Va., I confirmed my zero on a (6") steel plate at the 300-yd. line, then switched to paper targets at the same range to print a few groups. Sub-minute accuracy for five shots proved elusive as I familiarized myself with the rifle’s various idiosyncrasies using a limited variety of factory ammunition. Even so, three shots typically measured slightly less than one-half minute of angle, or 1.5" at 300 yds. I was quite pleased that the rifle was showing such promise and relieved that the project I had turned over and over in my mind for so many months had successfully reached the end of its first phase. As the second phase, working with various loads, progresses, expect to see a report posted at americanrifleman.org/precisionriflebuild.
Bear in mind that this is not the kind of project to be undertaken on a whim. Even if you elect to build a lightweight short-action rifle using a much less expensive receiver, the build is still likely to cost more than many highly accurate, off-the-shelf rifles and will still take its toll on your wallet and your time. But, in the end, few such projects will result in as much personal satisfaction as being able to hit a distant target with a precision rifle conceived in your own mind and assembled and wielded by your own two hands.

 Feed the beast
Magpul’s bottom “metal” unit, the Bolt Action Magazine Well (6), is made mostly of polymer, but, of course, fits seamlessly into its Hunter 700L stock. A metal, paddle-style release between the trigger guard and magazine opening and metal inserts for the action screws ensure that the unit can withstand the application of proper action screw torque and the constant insertion and removal of both polymer and steel magazines. And while the included polymer, single-feed PMAG 5 AC L magazine (6a) fits and functions well, I wanted to try the steel single-feed units from Accuracy Int’l. The two five-rounders provided by the company and two 10-rounders provided by Mile High Shooting Accessories, all functioned flawlessly, although the AI magazines’ follower prevented the bolt from going forward on an empty magazine—just like a military Mauser.
Sights
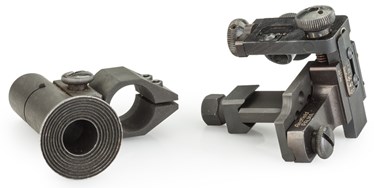
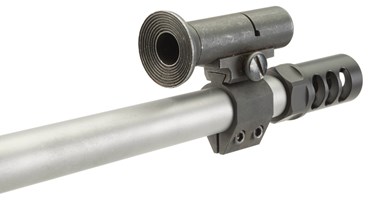
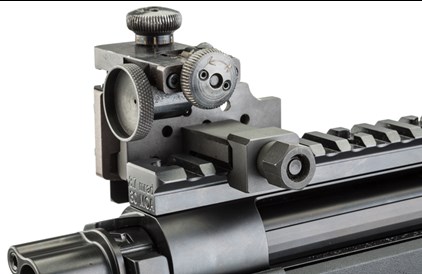
While not many of today’s rifle shooters, outside of certain competitive disciplines such as Palma, concern themselves with iron sights, I was determined to facilitate their mounting on this rifle. Given that it would be a switch-barrel gun, the solution came in the form of clamp-on front and rear sight bases. Both units were produced by Alan Lipski, but such parts are used by relatively few shooters and so are made in limited quantities and are often in low supply. I managed to source the rear unit from Creedmoor Sports while the front came from OK Webber. The rear simply clamps to the Picatinny rail, presenting a multi-position mounting plate for (in this case) a Redfield-style micrometer sight. The front is a split band-style unit with two pinch bolts and an integral dovetail for the mounting of a Redfield style globe front sight. Once the barrel is installed, timing the sight to top dead center simply requires turning the gun upside down on a flat surface to rest it on its Picatinny rail. I then slip the front sight on with its dovetail resting on the same surface and tighten its bolts, all of which precludes any drilling or tapping. The sights themselves—a Redfield Palma rear with ¼-m.o.a. adjustments and a Redfield Olympic front with interchangeable inserts, came from separate Ebay vendors at a combined cost of $200. And while the setup draws mostly puzzled glances, I’m satisfied that, in the unlikely event of an optics failure, I can still send shots fairly far down range with reasonable precision.